FEATHER-M0-Bootloader-UF2
UF2 Bootloader Details
|
|
En cours de traduction/élaboration. |
| Ceci est une page d'information pour les utilisateurs avancés qui sont curieux d'apprendre comment Adafruit transfert du code depuis votre ordinateur vers la carte Express! |
Les cartes Adafruit Express et Gemma/Trinket M0 embarque un bootloader amélioré qui facilité (plus que jamais) le flashage de différents code sur le microcontrôleur. Ce bootloader facilite la transition entre Microsoft MakeCode, CircuitPython et Arduino.
A la place d'avoir besoin d'un pilote ou d'un programme séparé pour flasher la carte (disons, bossac, jlink ou avrdude), il est simplement possible de glisser des fichiers sur un lecteur amovible.
Le format du fichier est un peu spécial. A cause des 'incompatibilités des systèmes d'exploitation', il n'est pas possible de transférer un fichier binaire ou hex (selon les tests d'Adafruit, ce n'est pas cross-platform compatible). A la place, le format de fichier contient des informations complémentaires pour aider le bootloader à savoir où les données doivent être placées. Ce format est appelé UF2 (USB Flashing Format, format de flashage usb). Microsoft MakeCode génère de l'UF2 pour le flashage et les releases de CircuitPython sont également disponible en UF2. Vous pouvez même créer votre propre UF2 depuis un fichier binaire en utilisant uf2tool, disponible ici.
Le bootloader est également compatible BOSSA, il peut donc être utilisé avec Arduino IDE qui attend un bootloader BOSSA sur les carte à base d'ATSAMD.
Pour plus d'information sur UF2, vous pouvez lire de nombreuses informations sur le blog MakeCode, puis lire les spécifications du format UF2. Voyez également le fork Adafruit de l'UF2 de Microsoft pour samd (dépôt GitHub) pour le code source et les releases des bootloaders pre-compilés.
| Le bootloader n'est pas nécessaire pour modifier votre code CircuitPython. Il est uniquement nécessaire pour faire une mise-à-jour du noyau CircuitPython, Arduino et Microsoft MakeCode. |
Activer le mode Booloader
Déclencher le bootloader est la première étape pour charger un nouveau code sur la carte. Le bootloader est activé en double cliquant le bouton Reset. Une fois le bootloader activé, vous verrez la petite LED pulser en rouge et un nouveau lecteur apparaître sur votre ordinateur (lecteur finissant par BOOT). Par exemple, un feather propose un lecteur FEATHERBOOT, tandis qu'un circuit CircuitPlayground proposera un lecteur CPLAYBOOT, Trinket M0 présentera un lecteur TRINKETBOOT et Gemma M0 se présentera quand à lui comme GEMMABOOT
Par la suite, quand le bootloader est actif, il changerea la couleur d'un ou plusieurs NeoPixel (présent sur la carte) pour indiquer le statut de la connexion:
- Rouge pour déconnecté
- Vert pour connecté.
Si la carte est connectée mais montre un statut déconnecté alors essayez un autre câble USB. Certains câbles ne fournissent que des fils d'alimentations sans fils de données.
Par exemple, voici un Feather M0 Express avec un programme utilisateur faisant tournoyer les couleurs de la LED Neopixel. Lorsque le bouton reset est double-cliqué (avec un interval d'une demi-seconde entre chaque clique) la LED NeoPixel sera deviendra verte pour pour indiquer que le bootloader est actif. Lorsque le bouton reset est cliqué une seule fois alors le programme utilisateur redémarre (et fait tournoyer la LED NeoPixel).
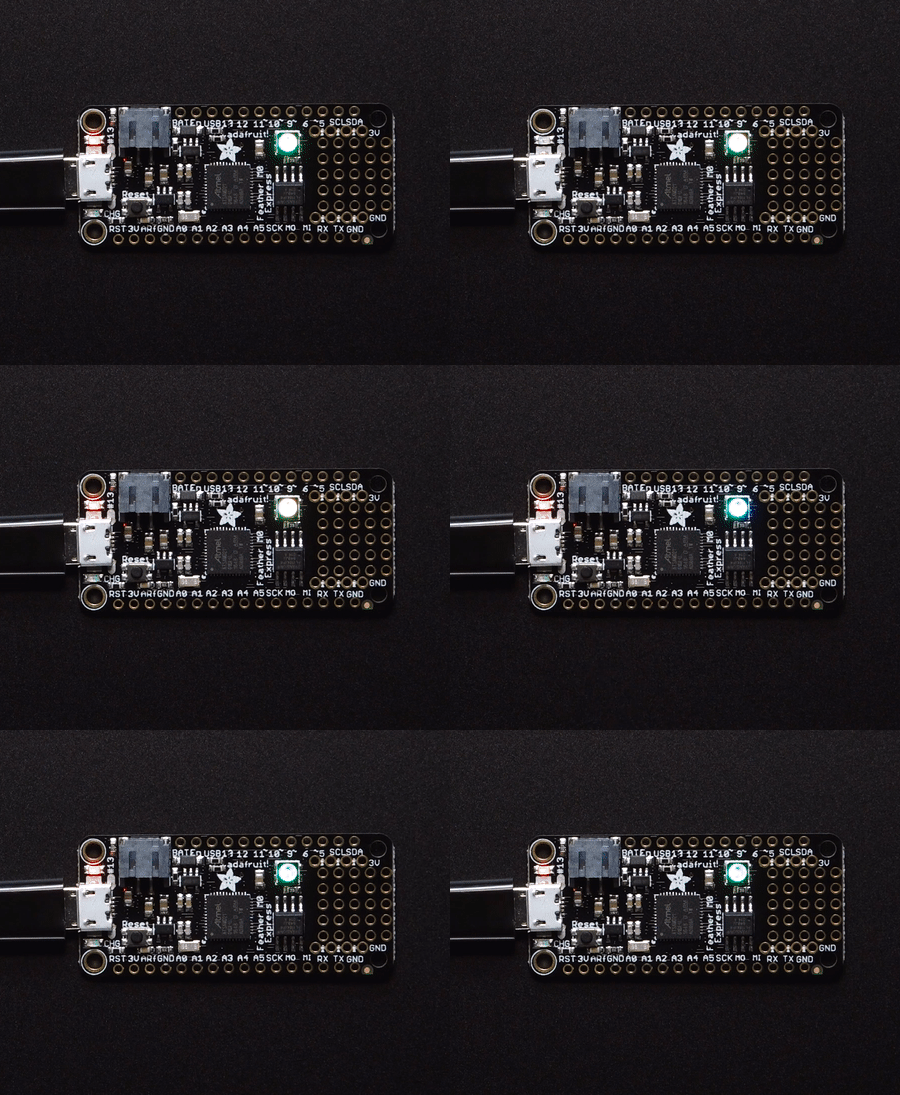
Crédit: AdaFruit Industries www.adafruit.com
Si le bootloader ne peut pas démarrer, la LED NeoPixel devient rouge.
Cela pourrait signifier que le câble USB n'est pas bon, pas connecté sur un ordinateur, ou que le pilote ne peut pas énumérer la carte. Essayez d'abord un nouveau câble USB. Essayez ensuite un autre port USB sur votre ordinateur!
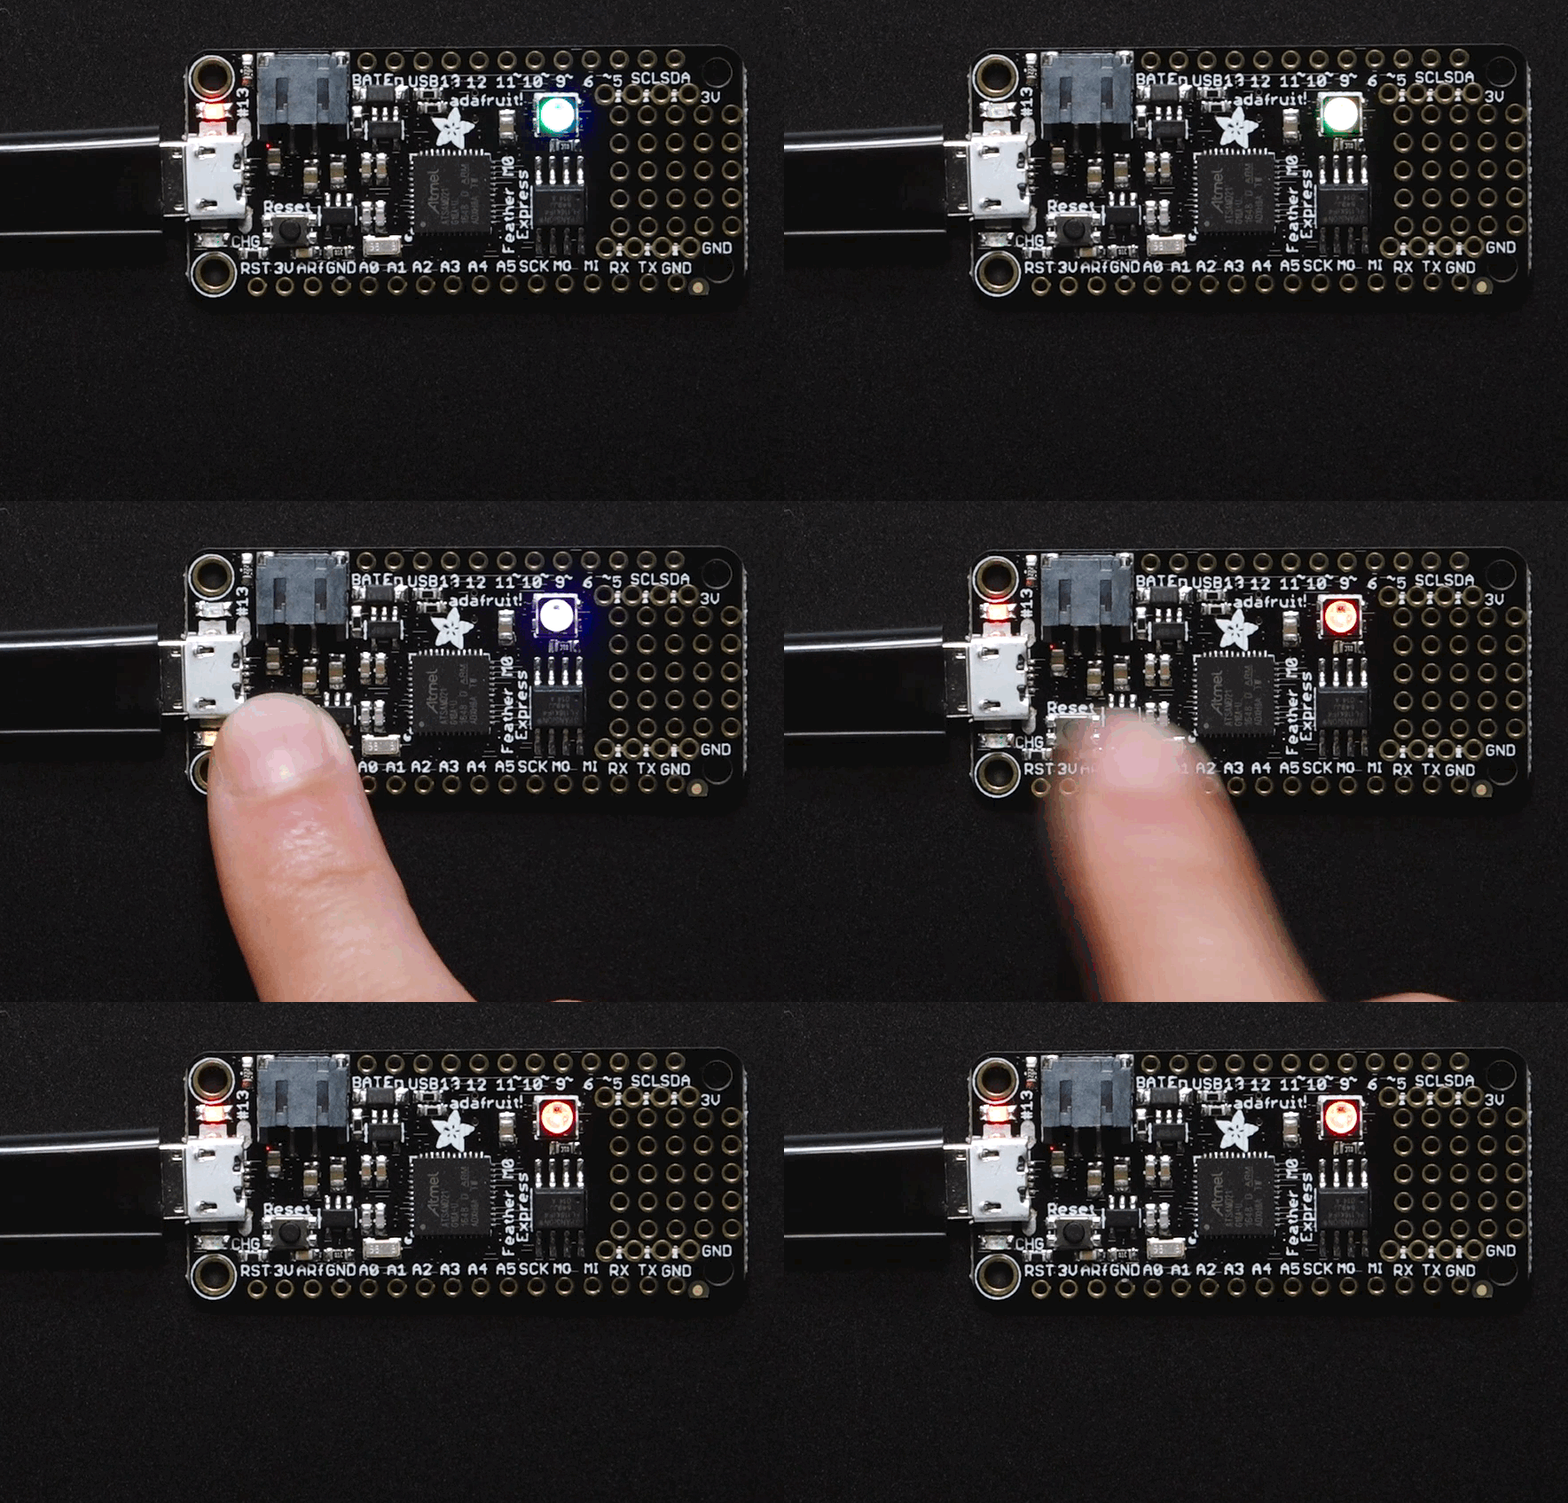
Crédit: AdaFruit Industries www.adafruit.com
Une fois le bootloader en cours de fonctionnement, vous pouvez vérifier votre ordinateur. Vous devriez vois un nouveau lecteur USB...
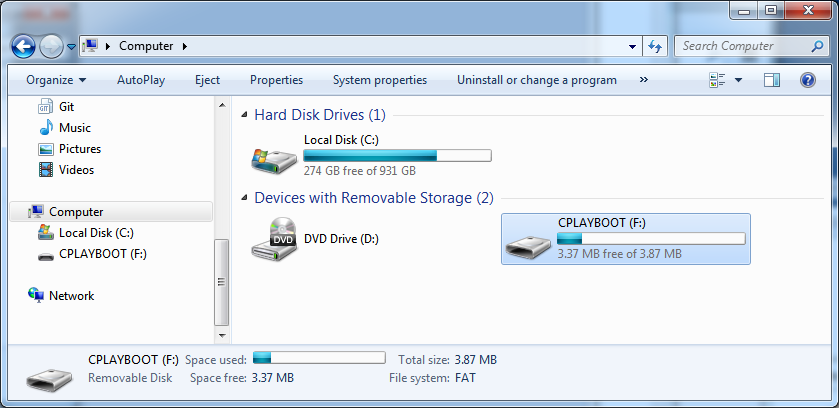
Crédit: AdaFruit Industries www.adafruit.com
Une fois le bootloader connecté avec succès, vous pouvez ouvrir le lecteur et naviguer dans le système de fichier virtuel. Il ne s'agit pas du même système de fichier que vous utilisez avec CircuitPython ou Arduino. Il devrait y avoir 3 fichiers:
- CURRENT.UF2 - Le contenu actuel de la mémoire Flash du MicroContrôleur.
- INDEX.HTM - Lien vers Microsoft MakeCode.
- INFO_UF2.TXT - Inclus l'info de version du bootloader. A inclure des les bugs reports.
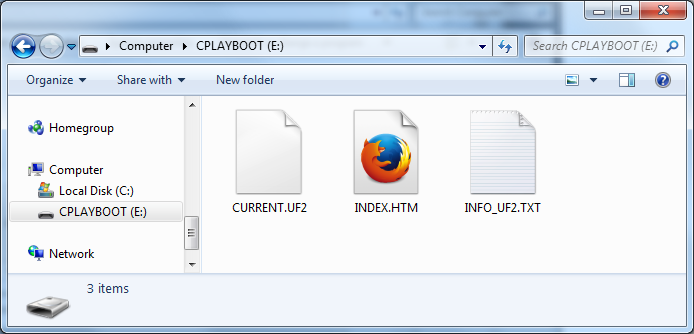
Crédit: AdaFruit Industries www.adafruit.com
Utiliser le Bootloader Mass Storage
Pour flasher quelque-chose de nouveau, il suffit simplement de glisser/déposer des fichier UF2 sur le lecteur. Après la copie du fichier, le bootloader démarrera automatiquement la carte. Cela provoque généralement un message d'alerte informant l'utilisateur d'une "éjection non sécurisée du lecteur". Cela n'est pas un problème car le bootloader sait que toutes les données ont étés correctement coppiées dans la mémoire Flash.
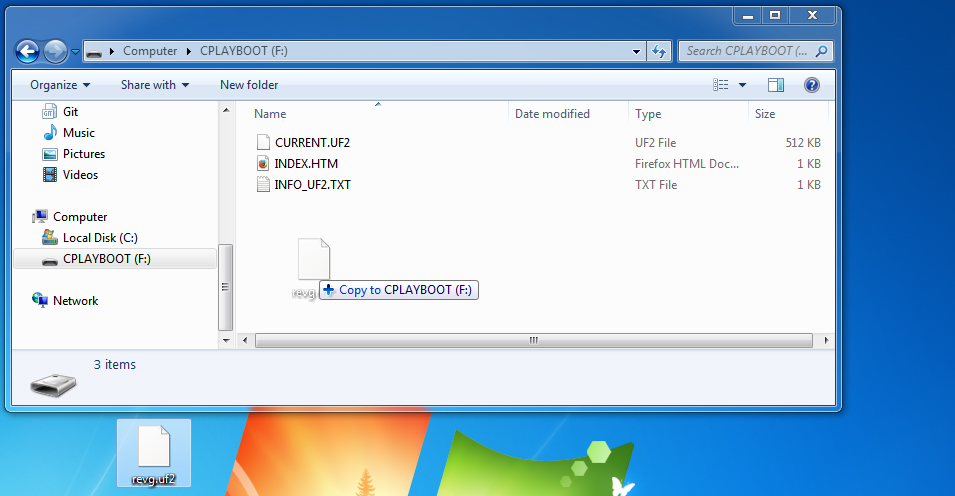
Crédit: AdaFruit Industries www.adafruit.com
Vous pourriez avoir une alerte mentionnant que le fichier n'a pas été copié avec toutes ses propriétés. Cliquez simplement sur "Oui" (Yes).
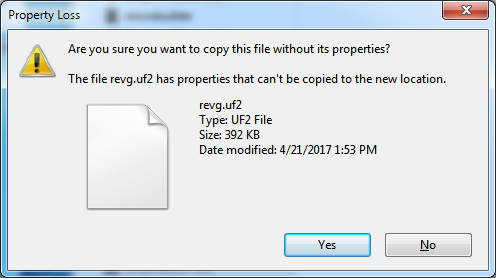
Crédit: AdaFruit Industries www.adafruit.com
Le système pour également se plaindre que le lecteur à été éjecté sans précaution. Ne vous inquiété pas de cela. Le lecteur est seulement éjecté par le bootloader une fois qu'il a vérifié et complété le processus d'écriture du nouveau code.
Utiliser le Bootloader BOSSA
|
|
En cours de traduction/élaboration. |
As mentioned before, the bootloader is also compatible with BOSSA, which is the standard method of updating boards when in the Arduino IDE. It is a command-line tool that can be used in any operating system. We won't cover the full use of the bossac tool, suffice to say it can do quite a bit! More information is available at ShumaTech.
Pilotes pour Windows 7
If you are running Windows 7 (or, goodness, something earlier?) You will need a Serial Port driver file. Windows 10 users do not need this so skip this step.
You can download our full driver package here:
Download and run the installer. We recommend just selecting all the serial port drivers available (no harm to do so) and installing them.
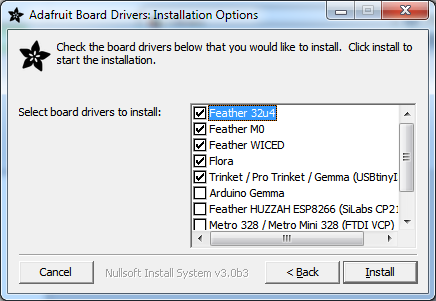
Crédit: AdaFruit Industries www.adafruit.com
Verifying Serial Port in Device Manager
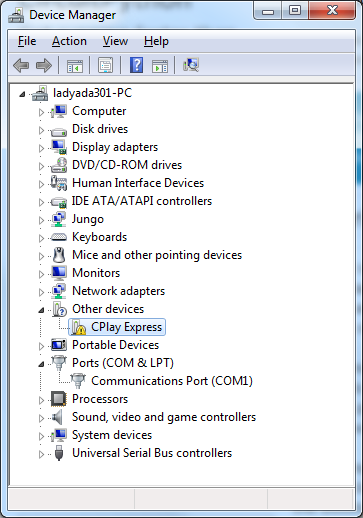
If you're running Windows, its a good idea to verify the device showed up. Open your Device Manager from the control panel and look under Ports (COM & LPT) for a device called Feather M0 or Circuit Playground or whatever!
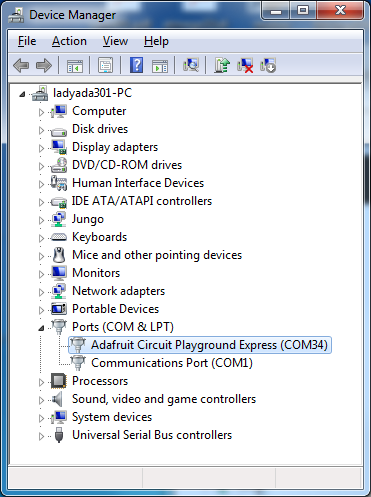
Crédit: AdaFruit Industries www.adafruit.com
If you see something like this, it means you did not install the drivers. Go back and try again, then remove and re-plug the USB cable for your board
Crédit: AdaFruit Industries www.adafruit.com
Running bossac on the command line
If you are using the Arduino IDE, this step is not required. But sometimes you want to read/write custom binary files, say for loading CircuitPython or your own code. We recommend using bossac v 1.7.0 (or greater), which has been tested. The Arduino branch is most recommended.
You can download the latest builds here. The mingw32 version is for Windows, apple-darwin for Mac OSX and various linux options for Linux. Once downloaded, extract the files from the zip and open the command line to the directory with bossac
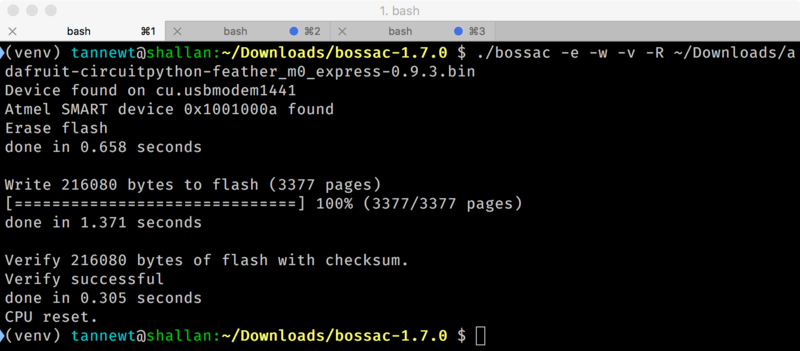
For example here's the command line you probably want to run:
bossac -e -w -v -R ~/Downloads/adafruit-circuitpython-feather_m0_express-0.9.3.bin
This will -erase the chip, -write the given file, -verify the write and -Reset the board. After reset, CircuitPython should be running. Express boards may cause a warning of an early eject of a USB drive but just ignore it. Nothing important was being written to the drive. A hard power-reset is also recommended after bossac, just in case.
Crédit: AdaFruit Industries www.adafruit.com
Faire une mise-à-jour du bootloader
The UF2 bootloader is a new bootloader, and while we've done a ton of testing, it may contain bugs. Usually these bugs effect reliability rather than fully preventing the bootloader from working. If the bootloader is flaky then you can try updating the bootloader itself to potentially improve reliability.
Updating the bootloader is as easy as flashing CircuitPython, Arduino or MakeCode. Simply enter the bootloader as above and then drag the update bootloader uf2 file below. This uf2 contains a program which will unlock the bootloader section, update the bootloader, and re-lock it. It will overwrite your existing code such as CircuitPython or Arduino so make sure everything is backed up!
After the file is copied over, the bootloader will be updated and appear again. The INFO_UF2.TXT file should show the newer version number inside.
For example:
UF2 Bootloader v1.20.0 SFHR
Model: Adafruit Feather M0
Board-ID: SAMD21G18A-Feather-v0
Lastly, reload your code from Arduino or MakeCode or flash the latest CircuitPython core.
The latest updaters for various boards:
Eliminer les popups Windows
If you do a lot of development on Windows with the UF2 bootloader, you may get annoyed by the constant "Hey you inserted a drive what do you want to do" pop-ups.
Toutes les images ci-dessous sont créditées à Adafruit Industries - All images here under are credited to Adafruit Industries
|
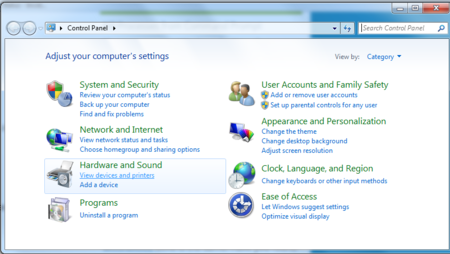
Go to the Control Panel. Click on the Hardware and Sound header |
|
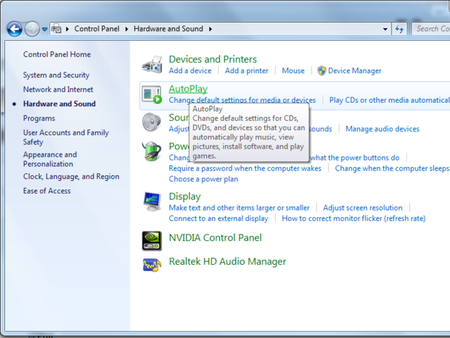
Click on the Autoplay header |
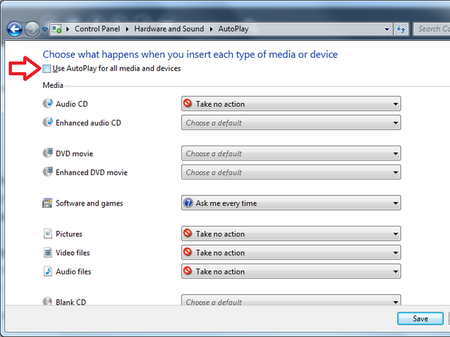
|
Uncheck the box at the top, labeled Use Autoplay for all devices |
Faire votre propre UF2
Making your own UF2 is easy! All you need is a .bin file of a program you wish to flash and the Python conversion script. Make sure that your program was compiled to start at 0x2000 (8k) because the bootloader takes the first 8k. CircuitPython's linker script is an example on how to do that.
Once you have a .bin file, you simply need to run the Python conversion script over it. Here is an example from the directory with uf2conv.py:
uf2conv.py -c -o build-circuitplayground_express/revg.uf2 build-circuitplayground_express/revg.bin
This will produce a revg.uf2 file in the same directory as the source revg.bin. The uf2 can then be flashed in the same way as above.
Source: Adafruit Feather M0 Express - Designed for CircuitPython créé par LadyAda, Tony DiCola, Scorr Shawcroft, Dan Halbert pour AdaFruit Industries. Crédit AdaFruit Industries
Traduit par Meurisse D. pour MCHobby.be
Traduit avec l'autorisation d'AdaFruit Industries - Translated with the permission from Adafruit Industries - www.adafruit.com
Toute référence, mention ou extrait de cette traduction doit être explicitement accompagné du texte suivant : « Traduction par MCHobby (www.MCHobby.be) - Vente de kit et composants » avec un lien vers la source (donc cette page) et ce quelque soit le média utilisé.
L'utilisation commercial de la traduction (texte) et/ou réalisation, même partielle, pourrait être soumis à redevance. Dans tous les cas de figures, vous devez également obtenir l'accord du(des) détenteur initial des droits. Celui de MC Hobby s'arrêtant au travail de traduction proprement dit.