Différences entre versions de « FEATHER-M0-MicroPython-Blinky »
| Ligne 7 : | Ligne 7 : | ||
== code.py == | == code.py == | ||
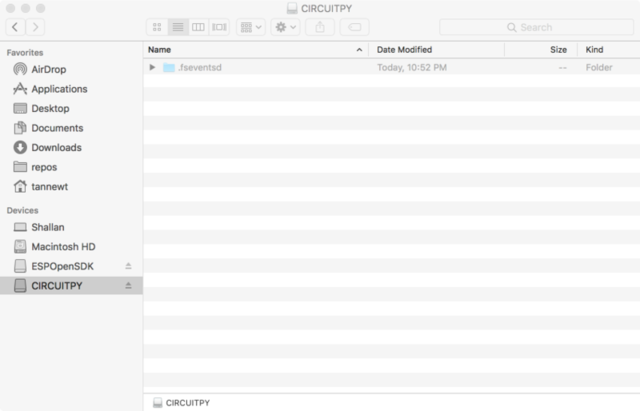
| − | + | Après avoir banché votre carte circuit python sur votre ordinateu, un lecteur CIRCUITPY devrait apparaître. Au début, le lecteur devrait vide mais vous pouvez créer et éditer un fichier comme vous le feriez avec n'importe quel lecteur USB. Dans ce test, savez un fichier '''code.py''' ('''code.txt''' et '''main.py''' devrait également fonctionner) à exécuter à chaque fois que la carte est redémarrée. C'est le pendant CircuitPython des croquis Arduino. However, all of the compiling is done on the board itself. ''All you need to do is edit the file.'' | |
{{ADFImage|FEATHER-M0-MicroPython-Blinky-01.png|640px}} | {{ADFImage|FEATHER-M0-MicroPython-Blinky-01.png|640px}} | ||
Version du 6 décembre 2017 à 19:30
Blink en Circuit Python
C'est le moment de réaliser notre premier projet "blink" (faire clignoter la LED) avec CircuitPython.
Cela permet de découvrir la façon d'écrire du code et nous permet de confirmer que tout se passe correctement avec notre carte.
code.py
Après avoir banché votre carte circuit python sur votre ordinateu, un lecteur CIRCUITPY devrait apparaître. Au début, le lecteur devrait vide mais vous pouvez créer et éditer un fichier comme vous le feriez avec n'importe quel lecteur USB. Dans ce test, savez un fichier code.py (code.txt et main.py devrait également fonctionner) à exécuter à chaque fois que la carte est redémarrée. C'est le pendant CircuitPython des croquis Arduino. However, all of the compiling is done on the board itself. All you need to do is edit the file.

Crédit: AdaFruit Industries www.adafruit.com
So, fire up your favorite text editor, such as Notepad on Windows, TextEdit on Mac or <a href="https://atom.io/">download Atom</a> (my favorite), and create a new file. In the file copy this:
<code class="prettyprint">import digitalio
import board
import time

led = digitalio.DigitalInOut(board.D13)
led.direction = digitalio.Direction.OUTPUT
while True:
    led.value = not led.value
    time.sleep(0.5)
</code>
Now, save the file to the drive as code.py (main.py or code.txt also works). After a brief time, the board's red LED should begin to flash every second.
|
|
En cours de traduction/élaboration. |
No class registered in CONVERSION_CLASS for section build-alert alert-danger
<div class="alert">
<i class='fa fa-exclamation-circle'></i>
Do not click the RESET button after saving your code file! It could cause the computer to not-finish writing your code to disk. Just wait a few seconds and it should automatically restart the python code for you!
Status LED (Gemma/Trinket/Metro/Feather)
If you have a Gemma, Trinket, Metro or Feather running CircuitPython, there's a single RGB LED on the board to help you know what's up. While code.py is running the status neopixel will be solid green. After it is finished, the neopixel will fade green on success or flash an error code on failure. Red flashes happen when data is written to the drive.
| Circuit Playground Express does not have this status LED |
Debugging
Did the status LED flash a bunch of colors at you? You may have an error in your code. Don't worry it happens to everyone. Python code is checked when you run it rather than before like Arduino does when it compiles. To see the CircuitPython error you'll need to connect to the serial output (like Arduino's serial monitor).
See <a href="https://learn.adafruit.com/micropython-basics-how-to-load-micropython-on-a-board/serial-terminal">this guide</a> for detailed instructions.
If you are new to Python try googling the error first, if that doesn't find an answer feel free to drop by the <a href="https://forums.adafruit.com/viewforum.php?f=60">support forum</a>.
Libraries
Using libraries with CircuitPython is also super easy. Simply drag and drop libraries onto the CIRCUITPY drive or into a lib folder on the drive to keep it tidy.
Find CircuitPython libraries on GitHub using the <a href="https://github.com/search?q=topic%3Acircuitpython">topic</a> and through our <a href="https://learn.adafruit.com/category/circuitpython">tutorials</a>.
Make sure the libraries are for CircuitPython and not MicroPython. There are some differences that may cause it to not work as expected.
More info
- <a href="https://learn.adafruit.com/category/micropython">Guides and Tutorials</a>
- <a href="https://circuitpython.readthedocs.io/en/latest/">API Reference</a>
- <a href="https://forums.adafruit.com/viewforum.php?f=60">Adafruit forum</a>
- <a href="https://github.com/search?q=topic%3Acircuitpython">Libraries</a>
Source: Adafruit Feather M0 Express - Designed for CircuitPython créé par LadyAda, Tony DiCola, Scorr Shawcroft, Dan Halbert pour AdaFruit Industries. Crédit AdaFruit Industries
Traduit par Meurisse D. pour MCHobby.be
Traduit avec l'autorisation d'AdaFruit Industries - Translated with the permission from Adafruit Industries - www.adafruit.com
Toute référence, mention ou extrait de cette traduction doit être explicitement accompagné du texte suivant : « Traduction par MCHobby (www.MCHobby.be) - Vente de kit et composants » avec un lien vers la source (donc cette page) et ce quelque soit le média utilisé.
L'utilisation commercial de la traduction (texte) et/ou réalisation, même partielle, pourrait être soumis à redevance. Dans tous les cas de figures, vous devez également obtenir l'accord du(des) détenteur initial des droits. Celui de MC Hobby s'arrêtant au travail de traduction proprement dit.