RASP-FT232H-Serial-Uart
|
|
En cours de traduction/élaboration. |
Port série/UART
Tel qu'il est livré, le FT232H agit comme un convertisseur FTDI (USB vers Série) dans sa configuration par défaut. C'est une fonctionnalité très intéressante pour dialoguer, depuis votre ordinateur, avec des périphériques séries tel qu'un Arduino. Il peut être utilisé en toute sécurité avec des signaux 3.3 volts et 5 volts. Cela signifie que le breakout FT232H peut être utilisé pour dialoguer, en toute sécurité, avec le port-série 5 Volts d'un Arduino ou le port série 3.3V d'une Raspberry Pi ou BeagleBone Black!
Lorsqu'il est utilisé en UART série, le broches du breakout FT232H ont les fonctions suivantes:
- D0 - TX ou broche de transmission. Cette broche est la sortie de donnée du composant FT232H et devrait être connecté sur la broche RX (broche de réception) d'un périphérique série.
- D1 - RX ou broche de réception. Cette broche est l'entrée de donnée du composant FT232H et devrait être connecté sur la broche TX (broche de transmission) d'un périphérique série.
- D2 - RTS ou broche "ready to send" (prêt à l'envoi). C'est une broche optionnelle utilisée pour le contrôle de flux d'une connexion série.
- D3 - CTS ou broche "clear to send" (prêt pour l'envoi de donnée). Comme RTS, c'est une broche optionnelle pour le contrôle de flux.
- D4 - DTR ou broche "data terminal ready". Autre broche optionnelle pour le contrôle de flux sur une connexion série RS-232.
- D5 - DSR ou broche "data set ready". Comme pour DTR, cette autre broche optionnelle est utilisé pour le contrôle de flux sur une connexion série RS-232.
- D6 - DCD ou broche "data carrier detect". Broche optionnelle qui est parfois utilisé pour la communication série en RS-232 (par exemple, avec un modem).
Les broches les plus importantes - et les plus souvent utilisées - sont D0 et D1 pour les broches TX et RX . Les autres broches sont seulement nécessaires si vous utiliser un périphérique avec contrôle de flux ou un périphérique avec des besoins RS-232 spécifiques.
Pilotes USB Série
|
|
En cours de traduction/élaboration. |
Before you can use the FT232H as a serial UART you need to make sure the proper serial port drivers are installed. Luckily most operating systems include FTDI's serial UART driver so there typically isn't any installation necessary.
Specifically Mac OSX Mavericks or greater have the FTDI serial driver included automatically. Linux kernel versions since ~2.6 also have the FTDI serial driver included, so modern Linux distributions like Ubuntu 12.04 or 14.04 should work without any driver installation. Windows can usually search online to find the driver automatically, however if that fails see below for manual driver installation instructions.
If for some reason your operating system doesn't have FTDI serial drivers installed, you can download and install official drivers from FTDI's site. There are drivers available for Windows 7 & 8, Mac OSX, and Linux.
Installation du pilote série Windows
Below I'll briefly walk through installation of the FTDI serial driver for Windows since it is a common platform to install the driver.
First start with your Windows 7, 8, or 8.1 machine booted and the FT232H board disconnected from the PC.
Download the FTDI serial driver (sometimes called VCP or virtual COM port) here, make sure to pick the Windows setup executable version of the driver.
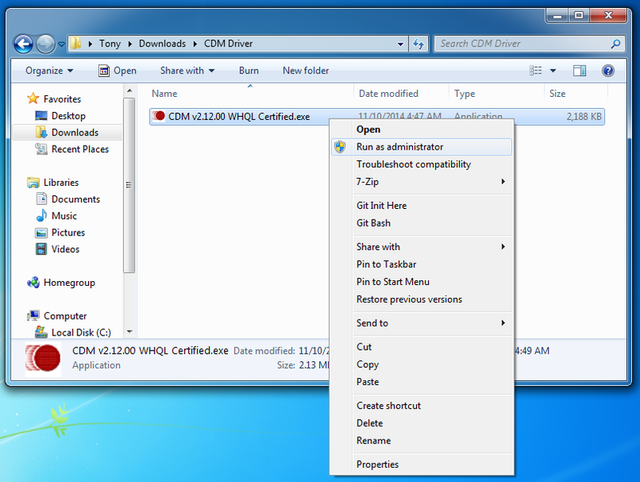
Next open explorer and navigate to the folder where the driver executable was downloaded. Right click on the file and select Run as administrator as shown below to start the installation. It's important to run as administartor or else the driver installation will fail to copy files to Window's system directories.
Now click through the setup pages, read and accept the license agreement, etc. to install the driver. The aren't any configuration or setup options you need to change or worry about in the installation.
Once the installation is done you might need to reboot your machine if the installation program tells you to do so.
After rebooting, plug in the FT232H breakot to your PC using a USB micro cable. You should see a message pop up that the device is recognized and a driver is being installed.
To check that the serial port installed successfully and find the COM port assigned to it, open device manager by clicking the start menu and searching for Device Manager.
Inside device manager look under the Ports (COM & LPT) node and you should see a USB Serial Port (COMx) device, where x is a number like 5. This COMx is the COM port assigned to the FT232H serial UART, and what you should use when connecting to the serial port in the Arduino IDE or with a serial terminal program.
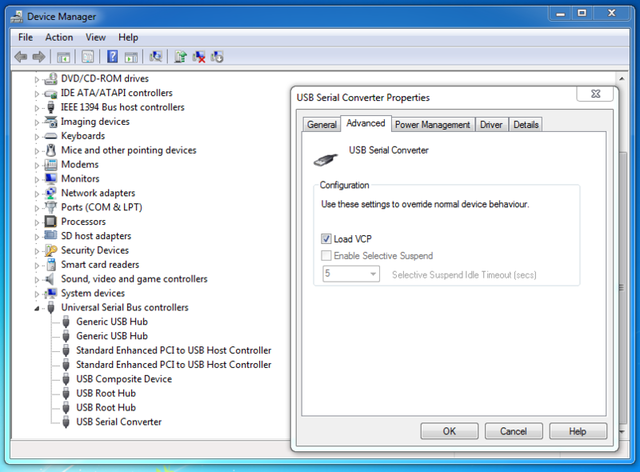
However if for some reason you don't see the USB Serial Port (COMx) device or Ports (COM & LPT) node, you might need to enable the VCP mode for the FTDI device. To do this open the Universal Serial Bus controllers node at the bottom of Device Manager and you should see a USB Serial Converter node. Right click this node and click the Properties menu, then click the Advanced tab at the top. Make sure the Load VCP checkbox is checked and then click OK. See the picture below for the configuration page and device manager view you should see.
Now unplug and plug in again the FT232H board and check device manager again to find the USB Serial Port (COMx) node in the Ports (COM & LPT) node. That's it, you're all set to access the device as a serial COM port in Windows!
Utiliser le port série
Once any necessary serial port drivers are installed, you're ready to use the FT232H as a USB to serial UART. Let's perform a simple loopback test to confirm you can read and write data with the UART. This test will connect the TX pin to the RX pin so any data sent to serial UART will be immediately received and echoed back to you.
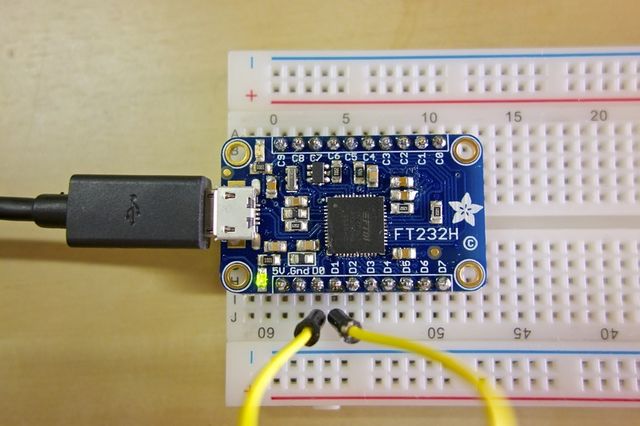
Using a jumper wire, connect pin D0 (TX)' to D1 (RX) on the FT232H breakout as shown below.
Now open a serial console for the FT232H board and check that anything you type is echoed back to you.
Windows
On Windows you can use PuTTY as a serial console. Download and run PuTTY, then configure it for a Connection type of Serial as shown below on the right. The Serial line should be set to the COM port you found for the USB serial converter in device manager (shown on the left), in this case COM5. Speed should be set to 9600 baud.
RASP-FT232H-Serial-Uart-30.png|640px
Click open and you should see an empty terminal screen appear. Try typing a message and you should see what you type echoed back to you, like below:
RASP-FT232H-Serial-Uart-31.png|640px
If you don't see anything, make sure you've connected the D0 pin to the D1 pin on the FT232H board.
Also make sure you're using the right COM port for the FT232H device. Try unplugging any other USB to serial converter (including development boards like Arduinos!) and only connecting the FT232H board to make sure you can find its COM port in device manager.
Mac OSX
On a Mac you can use a few included terminal commands to list serial ports and connect to a serial port to test the loopback connection.
First start with the FT232H board disconnected and open a terminal to run the following command to list all serial ports.
ls /dev/tty.*
Source: Adafruit FT232H Breakout Add a serial protocol 'swiss army knife' to your computer and talk directly to devices with SPI, I2C, serial UART, GPIO's, and more!
Créé par Toni DiCola pour AdaFruit Industries.
Traduction réalisée par Meurisse D pour MCHobby.be.
Toute référence, mention ou extrait de cette traduction doit être explicitement accompagné du texte suivant : « Traduction par MCHobby (www.MCHobby.be) - Vente de kit et composants » avec un lien vers la source (donc cette page) et ce quelque soit le média utilisé.
L'utilisation commercial de la traduction (texte) et/ou réalisation, même partielle, pourrait être soumis à redevance. Dans tous les cas de figures, vous devez également obtenir l'accord du(des) détenteur initial des droits. Celui de MC Hobby s'arrêtant au travail de traduction proprement dit.
Traduit avec l'autorisation d'AdaFruit Industries - Translated with the permission from Adafruit Industries - www.adafruit.com


