Différences entre versions de « RASP-PCF8523-I2C-Test »
| Ligne 6 : | Ligne 6 : | ||
You'll also need to set up i2c on your Pi, to do so, run sudo '''raspi-config''' and under '''Advanced''' select I2C and turn it on. | You'll also need to set up i2c on your Pi, to do so, run sudo '''raspi-config''' and under '''Advanced''' select I2C and turn it on. | ||
| + | Reboot once you've done that with {{fname|sudo reboot}} | ||
| + | |||
| + | == Vérifier le câblage == | ||
| + | Verify your wiring by running | ||
| + | |||
| + | sudo apt-get install python-smbus i2c-tools | ||
| + | |||
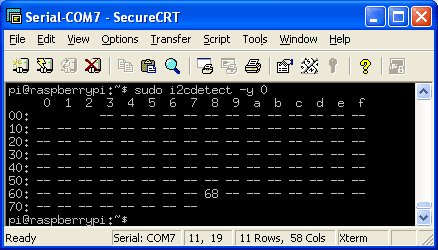
| + | to install the helper software and then {{fname|sudo i2cdetect -y 1}} at the command line, you should see ID #68 show up - that's the address of the DS1307, PCF8523 or DS3231! | ||
| + | |||
| + | If you have a much older Pi 1, you will have to run {{fname|sudo i2cdetect -y 0}} as the I2C bus address changed from 0 to 1 | ||
| + | |||
| + | {{ADFImage|RASP-PCF8523-I2C-Test.gif}} | ||
| + | |||
| + | {{ambox|text= Once you have the Kernel driver running, i2cdetect will skip over 0x68 and display UU instead, this means its working!}} | ||
{{RASP-PCF8523-TRAILER}} | {{RASP-PCF8523-TRAILER}} | ||
Version du 21 août 2017 à 16:45
|
|
En cours de traduction/élaboration. |
Configurer I2C sur votre Pi
You'll also need to set up i2c on your Pi, to do so, run sudo raspi-config and under Advanced select I2C and turn it on.
Reboot once you've done that with sudo reboot
Vérifier le câblage
Verify your wiring by running
sudo apt-get install python-smbus i2c-tools
to install the helper software and then sudo i2cdetect -y 1 at the command line, you should see ID #68 show up - that's the address of the DS1307, PCF8523 or DS3231!
If you have a much older Pi 1, you will have to run sudo i2cdetect -y 0 as the I2C bus address changed from 0 to 1

Crédit: AdaFruit Industries www.adafruit.com
| Once you have the Kernel driver running, i2cdetect will skip over 0x68 and display UU instead, this means its working! |
Source: Adding real time clock to Rasberry-Pi
Tutoriel créé par Ada pour AdaFruit Industries. Tutorial created by Lady Ada for AdaFruit Industries
Traduit avec l'autorisation d'AdaFruit Industries - Translated with the permission from Adafruit Industries - www.adafruit.com
Toute référence, mention ou extrait de cette traduction doit être explicitement accompagné du texte suivant : « Traduction par MCHobby (www.MCHobby.be) - Vente de kit et composants » avec un lien vers la source (donc cette page) et ce quelque soit le média utilisé.
L'utilisation commercial de la traduction (texte) et/ou réalisation, même partielle, pourrait être soumis à redevance. Dans tous les cas de figures, vous devez également obtenir l'accord du(des) détenteur initial des droits. Celui de MC Hobby s'arrêtant au travail de traduction proprement dit.