Différences entre versions de « RASP-PYGAME-GUI-Analogique »
| Ligne 16 : | Ligne 16 : | ||
</syntaxhighlight> | </syntaxhighlight> | ||
| − | If you need to enable i2c follow this guide: Configuring I2C | + | If you need to enable i2c follow this guide: [[Rasp-Hack-GPIO_Configurer_I2C|Configuring I2C]] |
{{ADFImage|RASP-PYGAME-GUI-Analogique-01.jpg}} | {{ADFImage|RASP-PYGAME-GUI-Analogique-01.jpg}} | ||
Version du 11 juillet 2016 à 10:30
|
|
En cours de traduction/élaboration. |
Entrée Analogique

Crédit: AdaFruit Industries www.adafruit.com
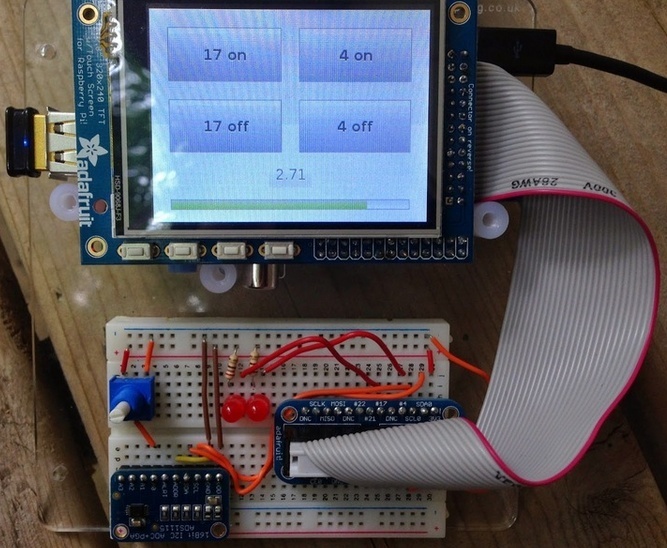
This example uses a 10K potentiometer to provide a varying voltage. For analog to digital I normally use an MCP3008 over SPI. That's not possible here though because the PiTFT uses both SPI channels on the Pi. So I've switched to an I2C ADC: ADS1115 16-Bit ADC - 4 Channel with Programmable Gain Amplifier.
Get the Adafruit Python library:
cd /home/pi
git clone https://github.com/adafruit/Adafruit-Raspberry-Pi-Python-Code.git
If you need to enable i2c follow this guide: Configuring I2C

Crédit: AdaFruit Industries www.adafruit.com
Démarrage
At the top of this script now we have some more imports for the threading and ADC.
The gain and sample rate are configured and the ADC initialized.
import sys
sys.path.append('/home/pi/Adafruit-Raspberry-Pi-Python-Code/Adafruit_ADS1x15')

import pygame
import os
import pygameui as ui
import logging
import RPi.GPIO as GPIO
import signal
from Adafruit_ADS1x15 import ADS1x15
import threading
import time

ADS1015 = 0x00  # 12-bit ADC
ADS1115 = 0x01  # 16-bit ADC

# Select the gain
# gain = 6144  # +/- 6.144V
gain = 4096  # +/- 4.096V
# gain = 2048  # +/- 2.048V
# gain = 1024  # +/- 1.024V
# gain = 512   # +/- 0.512V
# gain = 256   # +/- 0.256V

# Select the sample rate
sps = 8    # 8 samples per second
# sps = 16   # 16 samples per second
# sps = 32   # 32 samples per second
# sps = 64   # 64 samples per second
# sps = 128  # 128 samples per second
# sps = 250  # 250 samples per second
# sps = 475  # 475 samples per second
# sps = 860  # 860 samples per second

# Initialise the ADC using the default mode (use default I2C address)
# Set this to ADS1015 or ADS1115 depending on the ADC you are using!
adc = ADS1x15(ic=ADS1115)

#Setup the GPIOs as outputs - only 4 and 17 are available
GPIO.setmode(GPIO.BCM)
GPIO.setup(4, GPIO.OUT)
GPIO.setup(17, GPIO.OUT)

log_format = '%(asctime)-6s: %(name)s - %(levelname)s - %(message)s'
console_handler = logging.StreamHandler()
console_handler.setFormatter(logging.Formatter(log_format))
logger = logging.getLogger()
logger.setLevel(logging.DEBUG)
logger.addHandler(console_handler)

os.putenv('SDL_FBDEV', '/dev/fb1')
os.putenv('SDL_MOUSEDRV', 'TSLIB')
os.putenv('SDL_MOUSEDEV', '/dev/input/touchscreen')

MARGIN = 20
Le thread du potentiomètre
xxx
Source: Raspberry Pi Pygame UI basics créé par by Jeremy Blythe pour www.adafruit.com
Traduit par Meurisse D. pour MCHobby SPRL Toute référence, mention ou extrait de cette traduction doit être explicitement accompagné du texte suivant : « Traduction par MCHobby (www.MCHobby.be) - Vente de kit et composants » avec un lien vers la source (donc cette page) et ce quelque soit le média utilisé.
L'utilisation commercial de la traduction (texte) et/ou réalisation, même partielle, pourrait être soumis à redevance. Dans tous les cas de figures, vous devez également obtenir l'accord du(des) détenteur initial des droits. Celui de MC Hobby s'arrêtant au travail de traduction proprement dit.
Traduit avec l'autorisation d'AdaFruit Industries - Translated with the permission from Adafruit Industries - www.adafruit.com