RASP-PiTFT-Extra
Contrôler le rétro-éclairage
There's a 4-LED backlight on the TFT and it draws ~75mA at all times. There might be times you'd like to save some power and turn off the backlight. The screen and touchplate will still work, you just can't see anything. We designed the board with the STMPE610 touchscreen controller which has 2 extra GPIO and tied one of them to the transistor that controls the backlight. You can use the command line to control the backlight.
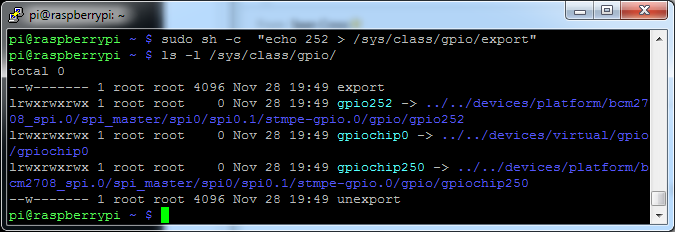
Start by getting access to the GPIO by making a device link
sudo sh -c "echo 252 > /sys/class/gpio/export"
ls -l /sys/class/gpio

Crédit: AdaFruit Industries www.adafruit.com
Once you verify that you see GPIO #252, then you can set it to an output, this will turn off the display since it will output 0 by default
sudo sh -c "echo 'out' > /sys/class/gpio/gpio252/direction"
Then turn the display back on with
sudo sh -c "echo '1' > /sys/class/gpio/gpio252/value"
or back off
sudo sh -c "echo '0' > /sys/class/gpio/gpio252/value"

Crédit: AdaFruit Industries www.adafruit.com
Bouton tactile comme bouton d'alimentation
Its a good idea to safely turn off your Pi with a good sudo shutdown -h now but that often means pulling out a keyboard or connecting to the console. With our kernel we added a cool module that will let you turn any GPIO into a power button. Since there's a couple of tactile switches right there on the front, lets turn one into a power button. Press once to properly turn off the pi, press again to start it up. Isn't that nice?
We'll be using GPIO #23, the left-most button. You can use any of them or other GPIO but #23's our favorite number anyways.
You will have to grab ****** a pack of slim tactile switches ***** or otherwise solder in a button
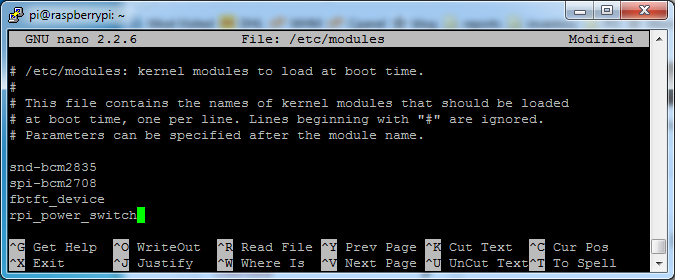
Add rpi_power_switch to /etc/modules and save

Crédit: AdaFruit Industries www.adafruit.com
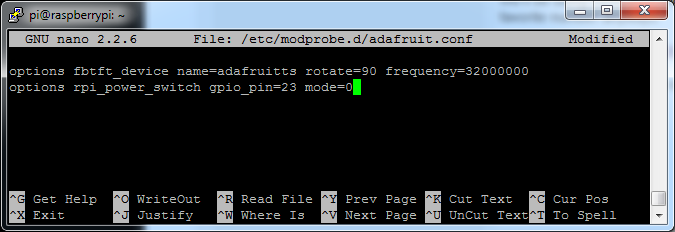
Now create a new conf file or edit our existing one with
sudo nano /etc/modprobe.d/adafruit.conf
and enter in the line
options rpi_power_switch gpio_pin=23 mode=0
Of course, change the gpio_pin setting to some other # if you wish. mode=0 means its a pushbutton not a switch. If you happen to install an on/off switch, use mode=1.

Crédit: AdaFruit Industries www.adafruit.com
To make it active immediately run sudo modprobe rpi_power_switch

Crédit: AdaFruit Industries www.adafruit.com
Source: Adafruit PiTFT - 2.8" Touchscreen Display for Raspberry Pi
Créé par LadyAda pour AdaFruit Industries.
Augmenté par Meurisse D. pour MCHobby
Traduction réalisée par Meurisse D pour MCHobby.be.
Toute référence, mention ou extrait de cette traduction doit être explicitement accompagné du texte suivant : « Traduction par MCHobby (www.MCHobby.be) - Vente de kit et composants » avec un lien vers la source (donc cette page) et ce quelque soit le média utilisé.
L'utilisation commercial de la traduction (texte) et/ou réalisation, même partielle, pourrait être soumis à redevance. Dans tous les cas de figures, vous devez également obtenir l'accord du(des) détenteur initial des droits. Celui de MC Hobby s'arrêtant au travail de traduction proprement dit.
Traduit avec l'autorisation d'AdaFruit Industries - Translated with the permission from Adafruit Industries - www.adafruit.com