Rasp-Hack-MCP230XX-Librairie
Point de départ
Never one to leave you with just a breakout board or an IC and a goodbye, Adafruit provides a library for the MCP23008 and MCP23017 in our dépôt GitHub d'AdaFruit pour Python. The easiest way to use it is with our convenient WebIDE, which will automatically point to the Adafruit github repository.
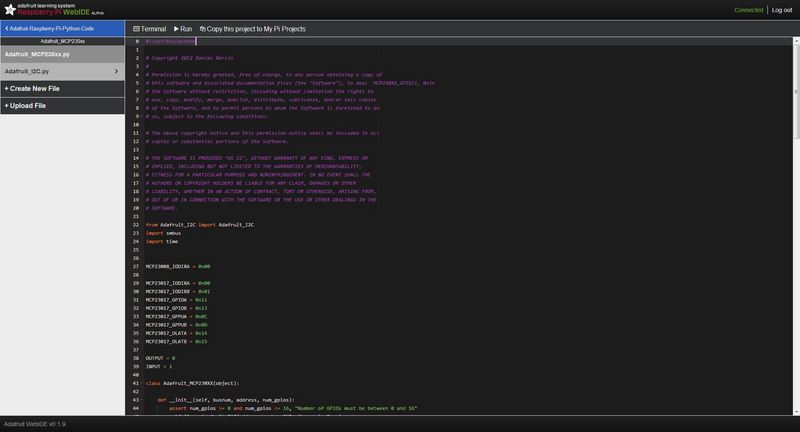
Once you've opened up the WebIDE in the browser, you simply need to click in the left-hand navigation on the following folders and filenames:
- Adafruit-Raspberry-Pi-Python-Code
- Adafruit_MCP230xx
- Adafruit_MCP230xx.py
This should give you something similar to the following:
This should give you something similar to the following:

Crédit: AdaFruit Industries www.adafruit.com
# Use busnum = 0 for older Raspberry Pi's (256MB)
mcp = Adafruit_MCP230XX(busnum = 0, address = 0x20, num_gpios = 16)
# Use busnum = 1 for new Raspberry Pi's (512MB with mounting holes)
# mcp = Adafruit_MCP230XX(busnum = 1, address = 0x20, num_gpios = 16)

# Set pins 0, 1 and 2 to output (you can set pins 0..15 this way)
mcp.config(0, OUTPUT)
mcp.config(1, OUTPUT)
mcp.config(2, OUTPUT)

# Set pin 3 to input with the pullup resistor enabled
mcp.pullup(3, 1)
# Read pin 3 and display the results
print "%d: %x" % (3, mcp.input(3) >> 3)

# Python speed test on output 0 toggling at max speed
while (True):
  mcp.output(0, 1)  # Pin 0 High
  mcp.output(0, 0)  # Pin 1 Low
This file contains both the base MCP230xx class that makes it easy to use the chip, along with a very simple demo that will toggle a single pin as fast as possible. The example code shows how you can set pins to both input and output:
Instantiating an instance of Adafruit_MCP230xx
To instantiate an instance of the wrapper class that allows you to access the MCP230xx, you need to uncomment one of the two lines at the top of the above code. There are two options because earlier versions of the Pi Model B (pre 512MB SDRAM) used I2C0, whereas the latest Model B devices (with 512MB SDRAM) use I2C1.
The address assumes you are using an MCP23017 with all three address pins set to GND. If you are using a different address pin configuration, you can open up the datasheet to see how the address scheme works (fiche technique du MCP23017 ou la fiche technique du MCP23008.)
# Use busnum = 0 for older Raspberry Pi's (pre 512MB)
mcp = Adafruit_MCP230XX(busnum = 0, address = 0x20, num_gpios = 16)

# Use busnum = 1 for new Raspberry Pi's (512MB)
# mcp = Adafruit_MCP230XX(busnum = 1, address = 0x20, num_gpios = 16)
Numéro des broches
The MCP23008 has 8 pins - A0 thru A7. A0 is called 0 in the library, and A7 is called 7 (the rest follow the same pattern)
The MCP23017 has 16 pins - A0 thru A7 + B0 thru B7. A0 is called 0 in the library, and A7 is called 7, then B0 continues from there as is called 8 and finally B7 is pin 15
Activer une broche en entrée
You can enable or disable the internal pullup resistor and set the pins as input with the following lines of code:
# Set pin 3 to input with the pullup resistor enabled
mcp.pullup(3, 1)

# Read pin 3 and display the results
print "%d: %x" % (3, mcp.input(3) >> 3)
The second line reads pin 3, and shifts the value left 3 bits so that it will equal 0 or 1 depending on whether the pin is high or low when it is sampled. This will results in output similar to the following: "3: 0" or "3: 1" (depending on the pin state).
Activer une broche comme sortie
To set a pin as output, you also need two lines of code:
# Set pin 0 to output (you can set pins 0..15 this way)
mcp.config(0, OUTPUT)

# Set pin 0 High
mcp.output(0, 1)

# Set pin 0 Low
mcp.output(0, 0)
That's all there is to it! The default sample code will toggle the GPIO pin as fast as possible, and if you hooked it up to an oscilloscope you'd end up with something similar to the following:
{{#Widget:Iframe |url=http://www.youtube.com/embed/zBuMJ-R40N0 |width=420 |height=315 |border=0 }} Source: AdaFruit Industries, liens direct: sur YouTube
Interruption et Callback
As it currently stands, the library does not support any sort of interrupt or call back functionality (there is a hardware interrupt pin on the MCP but we don't use it in this code). Only polling is currently supported!
Source: MCP230xx GPIO Expander on the Raspberry Pi créé par Kevin Townsend pour www.adafruit.com
Traduit , corrigé et augmenté par Meurisse D. pour MCHobby.be Toute référence, mention ou extrait de cette traduction doit être explicitement accompagné du texte suivant : « Traduction par MCHobby (www.MCHobby.be) - Vente de kit et composants » avec un lien vers la source (donc cette page) et ce quelque soit le média utilisé.
L'utilisation commercial de la traduction (texte) et/ou réalisation, même partielle, pourrait être soumis à redevance. Dans tous les cas de figures, vous devez également obtenir l'accord du(des) détenteur initial des droits. Celui de MC Hobby s'arrêtant au travail de traduction proprement dit.
Traduit avec l'autorisation d'AdaFruit Industries - Translated with the permission from Adafruit Industries - www.adafruit.com