Différences entre versions de « Rasp-PiGRRL-2 »
(Page créée avec « {{Rasp-PiGRRL-2-NAV}} {{traduction}} {{Rasp-PiGRRL-2-TRAILER}} ») |
|||
| Ligne 1 : | Ligne 1 : | ||
{{Rasp-PiGRRL-2-NAV}} | {{Rasp-PiGRRL-2-NAV}} | ||
| + | |||
{{traduction}} | {{traduction}} | ||
| + | No class registered in CONVERSION_CLASS for section build-embed | ||
| + | <nowiki> | ||
| + | <div class='build-video'><iframe width="480" height="270" src="https://www.youtube.com/embed/xzfvlyLVFtw?feature=oembed" frameborder="0" allow="autoplay; encrypted-media" allowfullscreen></iframe> | ||
| + | </nowiki> | ||
| + | |||
| + | {{ADFImage|Rasp-PiGRRL-2-01.jpg|640px}} | ||
| + | |||
| + | <h2> | ||
| + | <a href="#raspberry-pi-retro-game-console" class="anchor-link"><span class="fa fa-link"></span></a><span id="raspberry-pi-retro-game-console" class="anchor-link-target"></span>Raspberry Pi Retro Game Console</h2> | ||
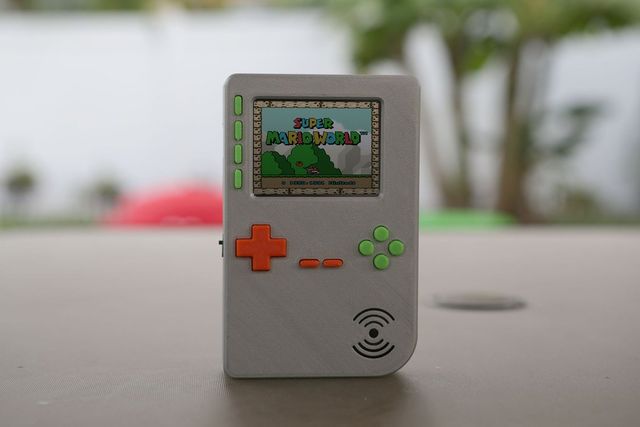
| + | This project takes the original concept of the <a href="../../../../pigrrl-raspberry-pi-gameboy">PiGRRL</a> and makes it more powerful, using a Raspberry Pi 2. It's about the same size but features more buttons (D-Pad, A,B,X,Y, L, R, pause and start.) and four extra buttons on the PiTFT. It's sporting a small audio amplifier and speaker, so you can enjoy the crispy sounds of 8-bit goodness. | ||
| + | |||
| + | <h2> | ||
| + | <a href="#easier-to-build" class="anchor-link"><span class="fa fa-link"></span></a><span id="easier-to-build" class="anchor-link-target"></span>Easier to build!</h2> | ||
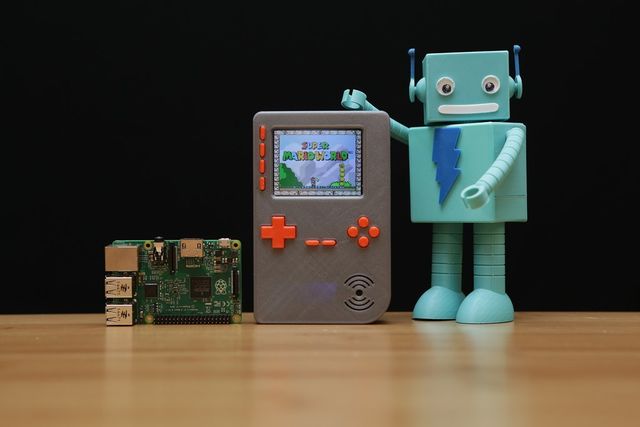
| + | With this update, we really wanted to make it easier to build. We've dramatically cut the build time in half by making a custom gamepad PCB. Just solder in the buttons and an IDC box header to the gamepad PCB - No more tedious button wiring! | ||
| + | |||
| + | {{ADFImage|Rasp-PiGRRL-2-02.jpg|640px}} | ||
| + | |||
| + | <h2> | ||
| + | <a href="#project-expectations" class="anchor-link"><span class="fa fa-link"></span></a><span id="project-expectations" class="anchor-link-target"></span>Project Expectations</h2> | ||
| + | This project is geared towards beginners, but is still a big project to take on. This guide will walk you through all the necessary steps to wire, assemble and build your very first Raspberry Pi game console. It does require a good amount of soldering, wire tinning and good ol' elbow grease, but don't be discouraged! If your dedicated to take on this project, it'll only take a weekend to make. | ||
| + | |||
| + | {{ADFImage|Rasp-PiGRRL-2-03.jpg|640px}} | ||
| + | |||
| + | <h2> | ||
| + | <a href="#adafruit-parts" class="anchor-link"><span class="fa fa-link"></span></a><span id="adafruit-parts" class="anchor-link-target"></span>Adafruit Parts</h2> | ||
| + | |||
| + | * <a href="https://www.adafruit.com/products/2358">Raspberry Pi 2 </a>or <a href="https://www.adafruit.com/products/3055">Raspbery PI 3</a> | ||
| + | |||
| + | * <a href="https://www.adafruit.com/products/2298">2.8" PiTFT Plus</a> | ||
| + | * <a href="https://www.adafruit.com/products/3015">PiGRRL Gamepad PCB</a> | ||
| + | * <a href="https://www.adafruit.com/products/2465">PowerBoost 1000c</a> | ||
| + | * <a href="https://www.adafruit.com/products/328">2500mAh battery</a> | ||
| + | * <a href="https://www.adafruit.com/products/2130">PAM8302 2.5W Audio Amp</a> | ||
| + | * <a href="https://www.adafruit.com/products/1890">Mini Metal Speaker</a> | ||
| + | * <a href="https://www.adafruit.com/products/1988">40pin GPIO ribbon cable</a> | ||
| + | * <a href="https://www.adafruit.com/products/805">Slide Switch</a> | ||
| + | * 10x <a href="https://www.adafruit.com/products/367">6mm</a> + 2x <a href="https://www.adafruit.com/products/1119">12mm tactile buttons</a> | ||
| + | |||
| + | * 1x <a href="https://www.adafruit.com/products/1993">2by20 pin IDC box header</a> | ||
| + | |||
| + | |||
| + | <h2> | ||
| + | <a href="#tools-and-supplies" class="anchor-link"><span class="fa fa-link"></span></a><span id="tools-and-supplies" class="anchor-link-target"></span>Tools and Supplies</h2> | ||
| + | |||
| + | * <a href="https://www.adafruit.com/category/128">3D Printer</a> + <a href="https://www.adafruit.com/products/2080">Filament</a> | ||
| + | |||
| + | * <a href="https://www.adafruit.com/categories/84">Soldering Iron</a> + <a href="https://www.adafruit.com/categories/84">Solder</a> | ||
| + | |||
| + | * <a href="https://www.adafruit.com/products/2051">30AWG</a> + <a href="https://www.adafruit.com/products/1970">26AWG</a> Wire | ||
| + | * <a href="https://www.adafruit.com/products/291">Helping Third Hands</a> / <a href="https://www.adafruit.com/products/151">Panavise</a> | ||
| + | |||
| + | * <a href="https://www.adafruit.com/products/1649">Heat Shrink</a> | ||
| + | * Glue / Mounting Tack | ||
| + | * <a href="https://www.adafruit.com/products/527">Wire Stripper</a> / <a href="https://www.adafruit.com/products/152">Cutters</a> | ||
| + | |||
| + | * Filing Tool / Hobby Knife | ||
| + | * 14x #4-40 3/16 machine screws | ||
| + | * 6x #2-56 3/8 machine screws | ||
| + | * <a href="https://www.amazon.com/Vermont-American-20058-Carbon-Machine/dp/B00062BKNS/">#4-40 Screw Tap</a> | ||
| + | |||
{{Rasp-PiGRRL-2-TRAILER}} | {{Rasp-PiGRRL-2-TRAILER}} | ||
Version du 5 février 2018 à 21:06
|
|
En cours de traduction/élaboration. |
No class registered in CONVERSION_CLASS for section build-embed
<div class='build-video'><iframe width="480" height="270" src="https://www.youtube.com/embed/xzfvlyLVFtw?feature=oembed" frameborder="0" allow="autoplay; encrypted-media" allowfullscreen></iframe>

Crédit: AdaFruit Industries www.adafruit.com
<a href="#raspberry-pi-retro-game-console" class="anchor-link"></a>Raspberry Pi Retro Game Console
This project takes the original concept of the <a href="../../../../pigrrl-raspberry-pi-gameboy">PiGRRL</a> and makes it more powerful, using a Raspberry Pi 2. It's about the same size but features more buttons (D-Pad, A,B,X,Y, L, R, pause and start.) and four extra buttons on the PiTFT. It's sporting a small audio amplifier and speaker, so you can enjoy the crispy sounds of 8-bit goodness.
<a href="#easier-to-build" class="anchor-link"></a>Easier to build!
With this update, we really wanted to make it easier to build. We've dramatically cut the build time in half by making a custom gamepad PCB. Just solder in the buttons and an IDC box header to the gamepad PCB - No more tedious button wiring!

Crédit: AdaFruit Industries www.adafruit.com
<a href="#project-expectations" class="anchor-link"></a>Project Expectations
This project is geared towards beginners, but is still a big project to take on. This guide will walk you through all the necessary steps to wire, assemble and build your very first Raspberry Pi game console. It does require a good amount of soldering, wire tinning and good ol' elbow grease, but don't be discouraged! If your dedicated to take on this project, it'll only take a weekend to make.

Crédit: AdaFruit Industries www.adafruit.com
<a href="#adafruit-parts" class="anchor-link"></a>Adafruit Parts
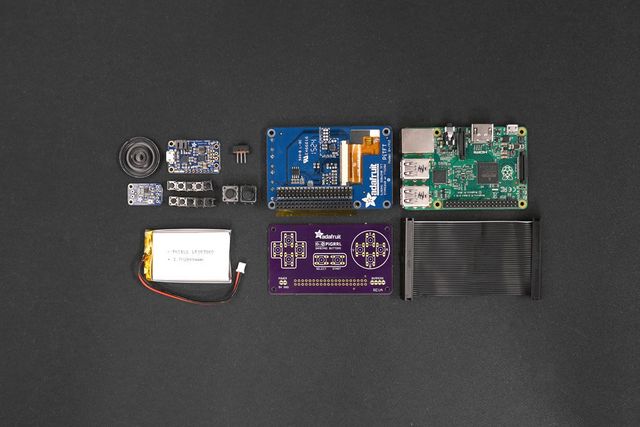
- <a href="https://www.adafruit.com/products/2358">Raspberry Pi 2 </a>or <a href="https://www.adafruit.com/products/3055">Raspbery PI 3</a>
- <a href="https://www.adafruit.com/products/2298">2.8" PiTFT Plus</a>
- <a href="https://www.adafruit.com/products/3015">PiGRRL Gamepad PCB</a>
- <a href="https://www.adafruit.com/products/2465">PowerBoost 1000c</a>
- <a href="https://www.adafruit.com/products/328">2500mAh battery</a>
- <a href="https://www.adafruit.com/products/2130">PAM8302 2.5W Audio Amp</a>
- <a href="https://www.adafruit.com/products/1890">Mini Metal Speaker</a>
- <a href="https://www.adafruit.com/products/1988">40pin GPIO ribbon cable</a>
- <a href="https://www.adafruit.com/products/805">Slide Switch</a>
- 10x <a href="https://www.adafruit.com/products/367">6mm</a> + 2x <a href="https://www.adafruit.com/products/1119">12mm tactile buttons</a>
- 1x <a href="https://www.adafruit.com/products/1993">2by20 pin IDC box header</a>
<a href="#tools-and-supplies" class="anchor-link"></a>Tools and Supplies
- <a href="https://www.adafruit.com/category/128">3D Printer</a> + <a href="https://www.adafruit.com/products/2080">Filament</a>
- <a href="https://www.adafruit.com/categories/84">Soldering Iron</a> + <a href="https://www.adafruit.com/categories/84">Solder</a>
- <a href="https://www.adafruit.com/products/2051">30AWG</a> + <a href="https://www.adafruit.com/products/1970">26AWG</a> Wire
- <a href="https://www.adafruit.com/products/291">Helping Third Hands</a> / <a href="https://www.adafruit.com/products/151">Panavise</a>
- <a href="https://www.adafruit.com/products/1649">Heat Shrink</a>
- Glue / Mounting Tack
- <a href="https://www.adafruit.com/products/527">Wire Stripper</a> / <a href="https://www.adafruit.com/products/152">Cutters</a>
- Filing Tool / Hobby Knife
- 14x #4-40 3/16 machine screws
- 6x #2-56 3/8 machine screws
- <a href="https://www.amazon.com/Vermont-American-20058-Carbon-Machine/dp/B00062BKNS/">#4-40 Screw Tap</a>
Source: PiGRRL 2 - Make a portable Raspberry Pi 2 game console
Créé par les frères Ruiz pour AdaFruit Industries.
Traduction réalisée par Wrotny A pour MCHobby.be.
Toute référence, mention ou extrait de cette traduction doit être explicitement accompagné du texte suivant : « Traduction par MCHobby (www.MCHobby.be) - Vente de kit et composants » avec un lien vers la source (donc cette page) et ce quelque soit le média utilisé.
L'utilisation commercial de la traduction (texte) et/ou réalisation, même partielle, pourrait être soumis à redevance. Dans tous les cas de figures, vous devez également obtenir l'accord du(des) détenteur initial des droits. Celui de MC Hobby s'arrêtant au travail de traduction proprement dit.
Traduit avec l'autorisation d'AdaFruit Industries - Translated with the permission from Adafruit Industries - www.adafruit.com