ADF-RTC-DS1307-UTILISER
Librairie Arduino
N'importe quel micro-controleur 5V supportant I2C peut facilement utiliser le DS1307. Cette page montrera comment l'utiliser avec un Arduino puisqu'il s'agit d'un micro-controleur vraiment très populaire.
Pour la librairie RTC, AdaFruit à utilisé un dérivé (fork) de l'excellente librairie RTC produit par JeeLab - téléchargement de RTClib ici.
RTCLib est une librairie permettant de lire l'heure du DS1307 mais aussi de la modifier :-) . Cette librairie initialement écrite par JeeLab à été modifiée par AdaFruit pour répondre à ses besoin... il est donc préférable d'utiliser la librairie proposée ci-dessus pour assurer une totale compatibilité.
Télécharger l'archive Zip en cliquant sur le lient Download Source (en haut à droite) et renommer le répertoire décompressé "RTClib" pour ensuite [[l'installer dans le répertoire des librairie Arduino (dans un répertoire nommé RTCLib).
Branchement
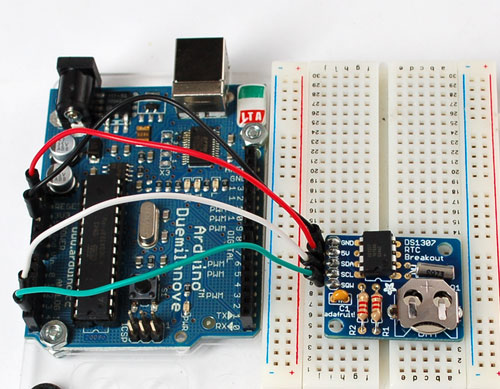
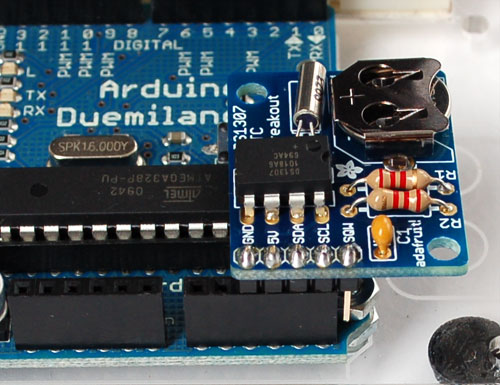
Il y a seulement 5 broches/pins à raccorder: 5V GND SCL SDA SQW.
- 5V est utilisé pour alimenter le circuit intégré du RTC quand vous avez besoin de dialoguer avec lui (par exemple: pour demander l'heure). S'il n'y a pas d'alimentation 5V alors le C.I. passe en mode veille et utilise la pile bouton comme alimentation de secour.
- GND est la masse commune et son raccordement est obligatoire
- SCL est le signal d'horloge (clock) du bus I2C - il est nécessaire pour dialoguer avec le RTC.
- SDA est le signal de donnée (data) du bis I2C - il est également nécessaire pour dialoguer avec le RTC
- SQW est une broche optionnel. Sortie d'une onde carrée (square-wave output) que vous pouvez obtenir du module RTC si vous l'avez configuré pour qu'il le produise. La plupart des utilisateur n'ont pas besoin de cette broche et ne l'utilise pas.
Truc et astuce: Avec le branchement ci-dessous, il est possible d'alimenter le module RTC directement depuis les broches analogiques en utilisant la configuration suivante:
- Placer la broche analogique 3 (digitale 17) sur OUTPUT et au niveau logique HIGH (haut)
- Placer la broche analogique 2 (digitale 16) sur OUTPUT et niveau logique LOW (bas)
Premier test RTC
La première chose que nous allons réaliser avec ce sketch de démonstration, c'est de lire l'heure depuis le module RTC une fois toutes les secondes.
Nous allons aussi voir ce qu'il arrive lorsque nous retirons et remplaçons la pile... cette opération interrompant le fonctionnement du RTC.
Donc, pour commencer, retirez la pile du son emplacement pendant qu'Arduino n'est pas alimenté (ou raccordé via USB). Attendez 3 secondes et ensuite, replacez la pile. Cela fait une remise-à-zéro (reset) du circuit RTC.
Maintenant ouvrez le sketch suivant sur votre Arduino (il est disponible dans Examples->RTClib->ds1307) et téléchargez le sur votre Arduino avec breakout DS1307 branché OU votre shield Datalogger raccordé.
// fonctions Date et heure en utilisant
// le RTC DS1307 RTC via bus I2C et librairie Wire

#include <Wire.h>
#include "RTClib.h"

RTC_DS1307 RTC;

void setup () {
    Serial.begin(57600);
    Wire.begin();
    RTC.begin();

  if (! RTC.isrunning()) {
    Serial.println("RTC n est pas en cours de fonctionnement!");
    // La ligne suivante fixe la date et l'heure du RTC avec les date et heur de compilation du sketch
    //RTC.adjust(DateTime(__DATE__, __TIME__));
  }

}

void loop () {
    DateTime now = RTC.now();

    Serial.print(now.year(), DEC);
    Serial.print('/');
    Serial.print(now.month(), DEC);
    Serial.print('/');
    Serial.print(now.day(), DEC);
    Serial.print(' ');
    Serial.print(now.hour(), DEC);
    Serial.print(':');
    Serial.print(now.minute(), DEC);
    Serial.print(':');
    Serial.print(now.second(), DEC);
    Serial.println();

    Serial.print(" since 1970 = ");
    Serial.print(now.unixtime());
    Serial.print("s = ");
    Serial.print(now.unixtime() / 86400L);
    Serial.println("d");

    // Calcule une date dans le future, date ayant
    // 7 jours et 30 secondes de plus
    DateTime future (now.get() + 7 * 86400L + 30);

    Serial.print(" maintenant + 7d + 30s: ");
    Serial.print(future.year(), DEC);
    Serial.print('/');
    Serial.print(future.month(), DEC);
    Serial.print('/');
    Serial.print(future.day(), DEC);
    Serial.print(' ');
    Serial.print(future.hour(), DEC);
    Serial.print(':');
    Serial.print(future.minute(), DEC);
    Serial.print(':');
    Serial.print(future.second(), DEC);
    Serial.println();

    Serial.println();
    delay(3000);
}
Démarrer le moniteur série et assurez vous qu'il soit bien configuré sur un débit de 57600 bauds.
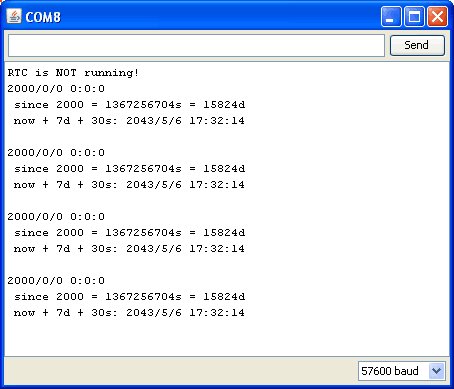
Vous devriez voir les messages suivants:
A chaque fois que le composant RTC perd toutes ses sources d'alimentation (incluant donc la pile de secours) l'heure retournée it will report the time as 0:0:0 and it won't count seconds (its stopped). Whenever you set the time, this will kickstart the clock ticking. So basically the upshot here is that you should never ever remove the battery once you've set the time. You shouldn't have to and the battery holder is very snug so unless the board is crushed, the battery wont 'fall out'
Fixer l'heure
With the same sketch loaded, uncomment the line that starts with RTC.adjust like so:
// following line sets the RTC to the date & time this sketch was compiled
RTC.adjust(DateTime(__DATE__, __TIME__));
This line is very cute, what it does is take the Date and Time according the computer you're using (right when you compile the code) and uses that to program the RTC. If your computer time is not set right you should fix that first. Then you must press the Upload button to compile and then immediately upload. If you compile and then upload later, the clock will be off by that amount of time.
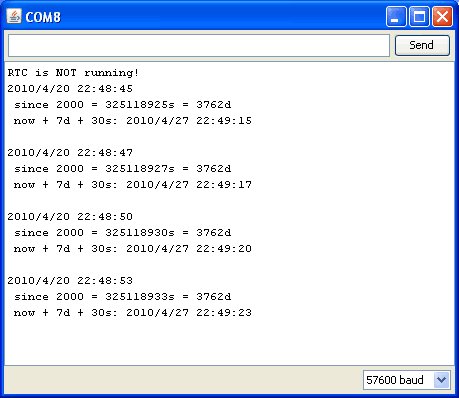
Then open up the Serial monitor window to show that the time has been set
From now on, you wont have to ever set the time again: the battery will last 5 or more years
Lire l'heure
Now that the RTC is merrily ticking away, we'll want to query it for the time. Lets look at the sketch again to see how this is done
void loop () {
    DateTime now = RTC.now();

    Serial.print(now.year(), DEC);
    Serial.print('/');
    Serial.print(now.month(), DEC);
    Serial.print('/');
    Serial.print(now.day(), DEC);
    Serial.print(' ');
    Serial.print(now.hour(), DEC);
    Serial.print(':');
    Serial.print(now.minute(), DEC);
    Serial.print(':');
    Serial.print(now.second(), DEC);
    Serial.println();
There's pretty much only one way to get the time using the RTClib, which is to call now(), a function that returns a DateTime object that describes the year, month, day, hour, minute and second when you called now().
There are some RTC libraries that instead have you call something like RTC.year() and RTC.hour() to get the current year and hour. However, there's one problem where if you happen to ask for the minute right at 3:14:59 just before the next minute rolls over, and then the second right after the minute rolls over (so at 3:15:00) you'll see the time as 3:14:00 which is a minute off. If you did it the other way around you could get 3:15:59 - so one minute off in the other direction.
Because this is not an especially unlikely occurance - particularly if you're querying the time pretty often - we take a 'snapshot' of the time from the RTC all at once and then we can pull it apart into day() or second() as seen above. Its a tiny bit more effort but we think its worth it to avoid mistakes!
We can also get a 'timestamp' out of the DateTime object by calling get which counts the number of seconds (not counting leapseconds) since midnight, January 1st 2000
    Serial.print(" since 2000 = ");
    Serial.print(now.get());
    Serial.print("s = ");
    Serial.print(now.get() / 86400L);
    Serial.println("d");
Since there are 60*60*24 = 86400 seconds in a day, we can easily count days since then as well. This might be useful when you want to keep track of how much time has passed since the last query, making some math a lot easier (like checking if its been 5 minutes later, just see if get() has increased by 300, you dont have to worry about hour changes)
Source: DS1307 Real Time Clock Breakout Board Kit. Ecrit par Tyler Cooper pour AdaFruit. Crédit AdaFruit Industries
Traduit par Meurisse D. pour MCHobby.be
Traduit avec l'autorisation d'AdaFruit Industries - Translated with the permission from Adafruit Industries - www.adafruit.com
Toute référence, mention ou extrait de cette traduction doit être explicitement accompagné du texte suivant : « Traduction par MCHobby (www.MCHobby.be) - Vente de kit et composants » avec un lien vers la source (donc cette page) et ce quelque soit le média utilisé.
L'utilisation commercial de la traduction (texte) et/ou réalisation, même partielle, pourrait être soumis à redevance. Dans tous les cas de figures, vous devez également obtenir l'accord du(des) détenteur initial des droits. Celui de MC Hobby s'arrêtant au travail de traduction proprement dit.


