Différences entre versions de « Rasp-Retro-Games-Arcade-Control »
| Ligne 52 : | Ligne 52 : | ||
Just as the layout and build technique of the control panel requires creative interpretation, so too will you need to decide on your own wiring methodology. We have some parts that can help. Aside from the aforementioned Perma-Proto board, there are ''quick-connect wires'' that work with the buttons and {{pl|82|assortiment de fil de connexion multifonctionnel}} in various lengths that can be used with a joystick or plug directly into the GPIO pins (without a Perma-Proto board). Options abound! You’ll likely need some combination of these, and may need to solder some connections. | Just as the layout and build technique of the control panel requires creative interpretation, so too will you need to decide on your own wiring methodology. We have some parts that can help. Aside from the aforementioned Perma-Proto board, there are ''quick-connect wires'' that work with the buttons and {{pl|82|assortiment de fil de connexion multifonctionnel}} in various lengths that can be used with a joystick or plug directly into the GPIO pins (without a Perma-Proto board). Options abound! You’ll likely need some combination of these, and may need to solder some connections. | ||
| + | |||
| + | == Raccordement == | ||
| + | === Le joystick === | ||
| + | |||
| + | {{ADFImage|Rasp-Retro-Games-Arcade-Control-20.png|640px}} | ||
| + | |||
| + | Here’s a pinout diagram for our arcade stick. Only one wire needs to go to GND, then each of the other four goes to a different GPIO pin. | ||
| + | |||
| + | These directions apply when the stick is oriented '''with the header at the top'''. It’s fine to install the stick in a different orientation, you’ll just need to adapt the wiring connections to match. | ||
| + | |||
| + | === Raccordement sur le GPIO === | ||
| + | The plugs on the ends of the Quick Connect Wires tend to block adjacent pins on the GPIO header. You can trim these down a bit using an X-Acto knife or Dremel tool, or cut the plugs off and solder the wires to a Perma Proto board, or simply plan out your wiring to avoid nearby pins. | ||
| + | |||
| + | Here’s a no-soldering wiring setup we use with one joystick and two buttons, using 5 female-to-female jumpers for the joystick and two unmodified quick connects for the buttons. It’s a pretty basic layout, but sufficient to accommodate quite a few classic games. For the remaining seldom-used functions (coin insert, start game), a regular USB keyboard is kept nearby. | ||
| + | |||
| + | If you dont mind doing some soldering, you can connect to the other pins - just make sure one pin of each button connects to a GPIO and the other button pin connects to one of the ground pins. You may need to edit/recompile our 'helper' | ||
| + | |||
| + | {{ADFImage|Rasp-Retro-Games-Arcade-Control-21.png|640px}} | ||
| + | |||
| + | {{asm-begin}} | ||
| + | |||
| + | {{asm-end}} | ||
| + | |||
| + | |||
| + | |||
{{Rasp-Retro-Games-TRAILER}} | {{Rasp-Retro-Games-TRAILER}} | ||
Version du 9 mars 2014 à 19:44
Ajouter un controleur d'Arcade
At this point you should have one (or more) games playable from the keyboard. The next step is adding arcade-style controls…
Now things take a creative turn. There’s no One Right Way to arrange controls that can cover every game. Instead, pick a few favorites and devise a layout that handles the most frequently-used inputs well. For everything else, you can still use a keyboard.
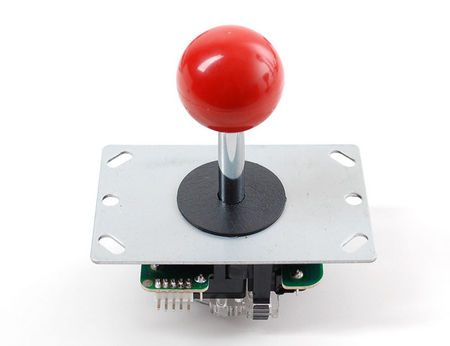
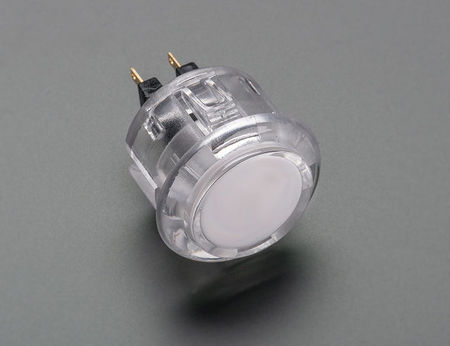
You’ll also need to build your control panel using the materials and tools best suited to your own skills. I’m fortunate to have access to a laser cutter that can work with acrylic, but that’s a tall order for most. Scrap plywood or a metal project box are viable materials (a cigar box works great too), while a drill, hole saw, Dremel tool or wood rasp are all reasonable tools for making holes. Improvise! Maybe you have a supply of buttons on hand. If not, we have a nice assortment of genuine arcade controls in the shop:
Les éléments
Crédit pour les images ci-dessous à AdaFruit Industries - All images here under are credited to AdaFruit Industries
A classic Atari or Commodore joystick can also be used. Most later gaming consoles used serial protocols for their controls…unfortunately, those won’t work here. USB game pads are another viable option.
| We offer a variety of arcade controls, but we don't sell COMMON SENSE. When drilling and cutting, take precautions such as wearing SAFETY GLASSES, always cut AWAY from yourself, etc. |
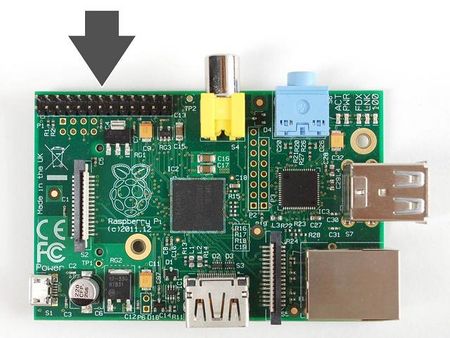
Broches du GPIO
Each pin on this header has a unique “GPIO number” distinct from the order of the pins on the header. Buttons and a joystick (each of 4 directions) will connect between any available GPIO pin and a ground (GND) connection.
Most Raspberry Pi boards follow the newer “Revision 2” pin arrangement:
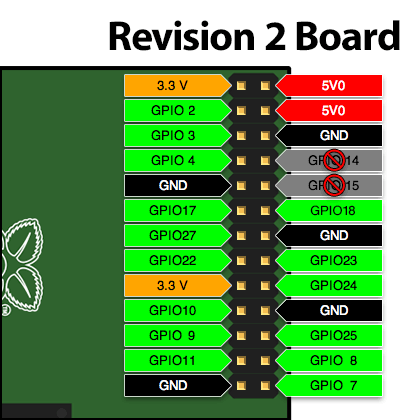
Crédit: AdaFruit Industries www.adafruit.com
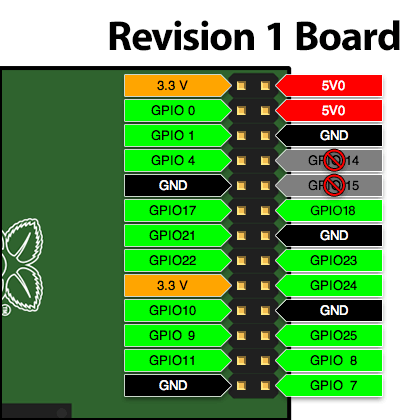
If you’re using an early Model B board (easy to spot — there’s no mounting holes), a few of the GPIO pin numbers are different:
Crédit: AdaFruit Industries www.adafruit.com
Notice that GPIO pins 14 and 15 are marked off-limits. These are set up as a serial port by default. There’s a way to disable this, but it’s somewhat annoying and there are plenty of other pins to work with, much simpler.
Revision 2 boards have four extra GPIO pins (28–31) on an adjacent header, but this requires some soldering. If you desperately need the extra inputs, power users can find that information in the Embedded Linux Wiki.
There are only five ground pins available on the header, but some gamers will need more controls than that. One of our medium Perma-Proto boards can be used to provide a single large “ground rail” where one side of all the buttons can be connected. Alternately, if you have extra unused GPIO pins and just need a couple extra ground connections, we’ll show a software work-around for this.
The processor in the Raspberry Pi has the ability to turn on 'internal' pullups so you do not need external pull-up resistors for the buttons or arcade controller
Just as the layout and build technique of the control panel requires creative interpretation, so too will you need to decide on your own wiring methodology. We have some parts that can help. Aside from the aforementioned Perma-Proto board, there are quick-connect wires that work with the buttons and assortiment de fil de connexion multifonctionnel in various lengths that can be used with a joystick or plug directly into the GPIO pins (without a Perma-Proto board). Options abound! You’ll likely need some combination of these, and may need to solder some connections.
Raccordement
Le joystick
Crédit: AdaFruit Industries www.adafruit.com
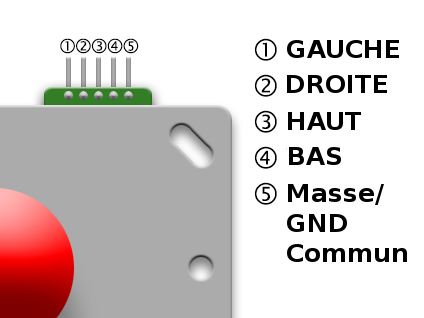
Here’s a pinout diagram for our arcade stick. Only one wire needs to go to GND, then each of the other four goes to a different GPIO pin.
These directions apply when the stick is oriented with the header at the top. It’s fine to install the stick in a different orientation, you’ll just need to adapt the wiring connections to match.
Raccordement sur le GPIO
The plugs on the ends of the Quick Connect Wires tend to block adjacent pins on the GPIO header. You can trim these down a bit using an X-Acto knife or Dremel tool, or cut the plugs off and solder the wires to a Perma Proto board, or simply plan out your wiring to avoid nearby pins.
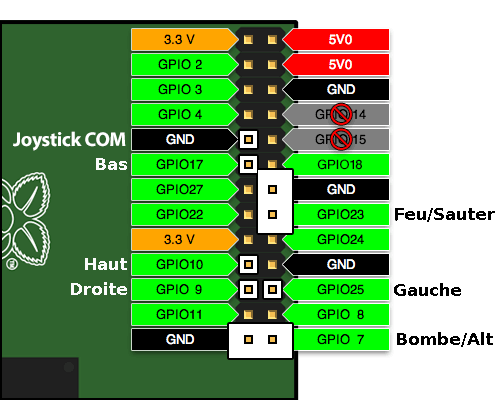
Here’s a no-soldering wiring setup we use with one joystick and two buttons, using 5 female-to-female jumpers for the joystick and two unmodified quick connects for the buttons. It’s a pretty basic layout, but sufficient to accommodate quite a few classic games. For the remaining seldom-used functions (coin insert, start game), a regular USB keyboard is kept nearby.
If you dont mind doing some soldering, you can connect to the other pins - just make sure one pin of each button connects to a GPIO and the other button pin connects to one of the ground pins. You may need to edit/recompile our 'helper'
Crédit: AdaFruit Industries www.adafruit.com
Source: Adafruit Retro Gaming with Raspberry Pi
Créé par Phillip Burgess pour AdaFruit Industries.
Traduction réalisée par Meurisse D pour MCHobby.be.
Toute référence, mention ou extrait de cette traduction doit être explicitement accompagné du texte suivant : « Traduction par MCHobby (www.MCHobby.be) - Vente de kit et composants » avec un lien vers la source (donc cette page) et ce quelque soit le média utilisé.
L'utilisation commercial de la traduction (texte) et/ou réalisation, même partielle, pourrait être soumis à redevance. Dans tous les cas de figures, vous devez également obtenir l'accord du(des) détenteur initial des droits. Celui de MC Hobby s'arrêtant au travail de traduction proprement dit.
Traduit avec l'autorisation d'AdaFruit Industries - Translated with the permission from Adafruit Industries - www.adafruit.com
