Différences entre versions de « Senseur IR Test »
(Page créée avec « {{SenseurIR-Nav}} == xxx == xxx {{ADF-Accord}} {{MCH-Accord}} ») |
(→xxx) |
||
| Ligne 1 : | Ligne 1 : | ||
{{SenseurIR-Nav}} | {{SenseurIR-Nav}} | ||
| − | + | Because there is a semiconductor/chip inside the sensor, it must be powered with 5V to function. Contrast this to photocells and FSRs where they act like resistors and thus can be simply tested with a multimeter. | |
| − | + | ||
| + | [[Fichier:pna4602pinout.jpg]] | ||
| + | |||
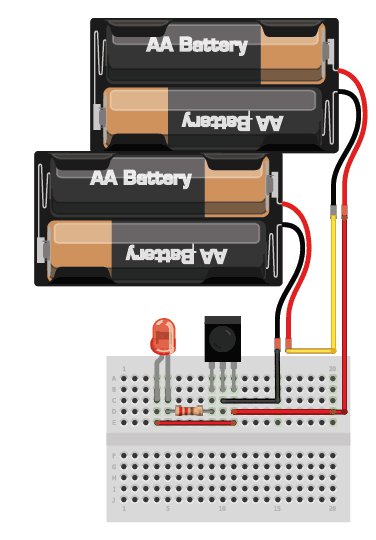
| + | Here we will connect the detector as such: | ||
| + | |||
| + | * Pin 1 is the output so we wire this to a visible LED and resistor | ||
| + | * Pin 2 is ground | ||
| + | * Pin 3 is VCC, connect to 5V | ||
| + | |||
| + | When the detector sees IR signal, it will pull the output low, turning on the LED - since the LED is red its much easier for us to see than IR! | ||
| + | |||
| + | [[Fichier:IR-test.jpg]] | ||
| + | |||
| + | We will use 4xAA 1.5V batteries so that the voltage powering the sensor is about 6V. 2 batteries (3V) is too little. You can also get 5V from a microcontroller like an Arduino if you have one around. Ground goes to the middle pin. | ||
| + | |||
| + | The positive (longer) head of the Red LED connects to the +6V pin and the negative (shorter lead) connects through a 200 to 1000 ohm resistor to the first pin on the IR sensor. | ||
| + | |||
| + | Now grab any remote control like for a TV, DVD, computer, etc. and point it at the detector while pressing some buttons, you should see the LED blink a couple times whenever the remote is pressed | ||
| + | |||
{{ADF-Accord}} | {{ADF-Accord}} | ||
{{MCH-Accord}} | {{MCH-Accord}} | ||
Version du 27 juillet 2012 à 10:48
Because there is a semiconductor/chip inside the sensor, it must be powered with 5V to function. Contrast this to photocells and FSRs where they act like resistors and thus can be simply tested with a multimeter.
Here we will connect the detector as such:
- Pin 1 is the output so we wire this to a visible LED and resistor
- Pin 2 is ground
- Pin 3 is VCC, connect to 5V
When the detector sees IR signal, it will pull the output low, turning on the LED - since the LED is red its much easier for us to see than IR!
We will use 4xAA 1.5V batteries so that the voltage powering the sensor is about 6V. 2 batteries (3V) is too little. You can also get 5V from a microcontroller like an Arduino if you have one around. Ground goes to the middle pin.
The positive (longer) head of the Red LED connects to the +6V pin and the negative (shorter lead) connects through a 200 to 1000 ohm resistor to the first pin on the IR sensor.
Now grab any remote control like for a TV, DVD, computer, etc. and point it at the detector while pressing some buttons, you should see the LED blink a couple times whenever the remote is pressed
Traduit avec l'autorisation d'AdaFruit Industries - Translated with the permission from Adafruit Industries - www.adafruit.com
Toute référence, mention ou extrait de cette traduction doit être explicitement accompagné du texte suivant : « Traduction par MCHobby (www.MCHobby.be) - Vente de kit et composants » avec un lien vers la source (donc cette page) et ce quelque soit le média utilisé.
L'utilisation commercial de la traduction (texte) et/ou réalisation, même partielle, pourrait être soumis à redevance. Dans tous les cas de figures, vous devez également obtenir l'accord du(des) détenteur initial des droits. Celui de MC Hobby s'arrêtant au travail de traduction proprement dit.
