TSL2561-Utiliser
Pour utiliser ce senseur, il faut mettre en oeuvre beaucoup de fonctions mathématiques pour calculer les Lux. Il faut avouer que cela n'est pas franchement marrant. Vous pouvez prendre connaissance de ces transformations mathématiques dans la fiche technique mais ce n'est ni vraiment intuitif, ni très éducatif - c'est juste la façon dont le senseur fonctionne. AdaFruit a donc écrit une librairie Arduino pour prendre soin de toute cette complexité à notre place.
Vous pouvez trouver la librairie Arduino ici sur github pour l'installer. Cliquez sur le bouton "ZIP" pour télécharger l'archive ZIP compressée et installez la. Notre tutoriel vous aidera à installer une telle librairie si vous n'avez jamais installé un librairie Arduino.
Vous aurez également besoin de la librairie des senseurs AdaFruit (Adafruit Sensor Library). Si vous ne l'avez pas encore installée, vous pouvez télécharger l'archive compressée "ZIP" depuis le GitHub d'AdaFruit. Installez là comme vous l'avez fait pour l'autre librairie.
Redémarrez l'IDE Arduino
Now you can run the File->Examples->Adafruit_TSL2561->sensorapi example program which will read and calculate the lux readings for you.
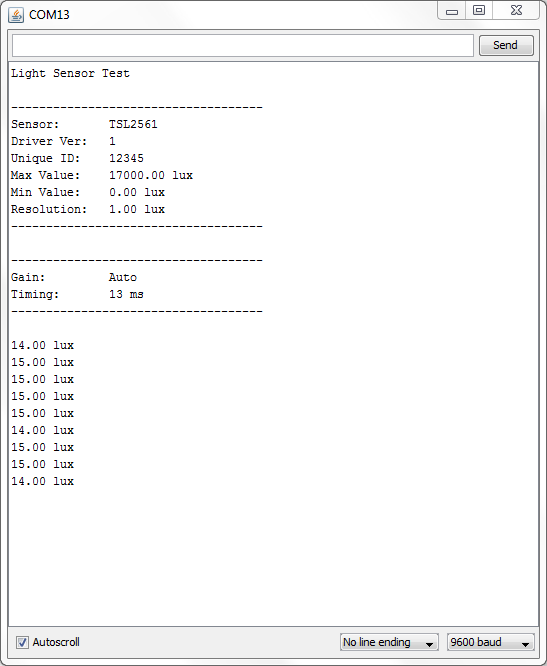
Open up the serial monitor at 9600 baud to see the measurements. Use a lamp or your hand to illuminate/shade the sensor to see the values change.
The library is fairly simple to use. The first line of code in the example is the 'constructor' where you can supply the I2C ADDR (in case you want to change it), and a unique ID to attach to this sensor (you can just leave this to the default value of 12345 for now). By modifying the I2C address we can have up to three TSL2561 sensors connected on the same board:
// The address will be different depending on whether you leave
// the ADDR pin float (addr 0x39), or tie it to ground or vcc. In those cases
// use TSL2561_ADDR_LOW (0x29) or TSL2561_ADDR_HIGH (0x49) respectively
Adafruit_TSL2561 tsl = Adafruit_TSL2561(TSL2561_ADDR_FLOAT, 12345);
Next up, you will want to configure the sensor with the gain and integration time.
You can have either a gain of 0 (no extra gain, good in low light situations) or a gain of 16 which will boost the light considerably in dim situations.
You can also change the integration time, which is how long it will collect light data for. The longer the integration time, the more precision the sensor has when collecting light samples.
New to v2.0 of the driver, there is also an auto-gain option that is useful when measuring in mixed lighting-situations. This will automatically enable or disable the gain depending on the light level. This is still an experimental feature and the trigger levels to switch may need to be tweeked, but this should be useful to collect light both indoors and outdoors without having to change the code yourself.
    /**************************************************************************/
    /*
    Configures the gain and integration time for the TSL2561
    */
    /**************************************************************************/
    void configureSensor(void)
    {
    /* You can also manually set the gain or enable auto-gain support */
    // tsl.setGain(TSL2561_GAIN_1X); /* No gain ... use in bright light to avoid sensor saturation */
    // tsl.setGain(TSL2561_GAIN_16X); /* 16x gain ... use in low light to boost sensitivity */
    tsl.enableAutoGain(true); /* Auto-gain ... switches automatically between 1x and 16x */
    /* Changing the integration time gives you better sensor resolution (402ms = 16-bit data) */
    tsl.setIntegrationTime(TSL2561_INTEGRATIONTIME_13MS); /* fast but low resolution */
    // tsl.setIntegrationTime(TSL2561_INTEGRATIONTIME_101MS); /* medium resolution and speed */
    // tsl.setIntegrationTime(TSL2561_INTEGRATIONTIME_402MS); /* 16-bit data but slowest conversions */

    /* Update these values depending on what you've set above! */
    Serial.println("------------------------------------");
    Serial.print ("Gain: "); Serial.println("Auto");
    Serial.print ("Timing: "); Serial.println("13 ms");
    Serial.println("------------------------------------");
    }
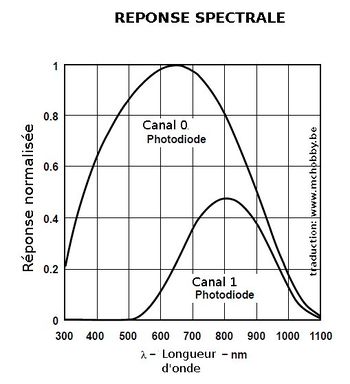
By default, the driver will return light in standard SI lux units, which are a result of some complex calculations based on both photo diodes on the TSL2561 (one for full spectrum and one for IR). The sensitivity of the two diodes can be seen in the chart below:
When you're ready to get your measurement in standard SI lux units, simply call getEvent with a reference to the 'sensors_event_t' object where the sensor data will be stored. This example assumes we are using the 'tsl' instance of Adafruit_TSL2561 at the top of the example code:
     /* Get a new sensor event */
    sensors_event_t event;
    tsl.getEvent(&event);
    /* Display the results (light is measured in lux) */
    if (event.light)
    {
    Serial.print(event.light); Serial.println(" lux");
    }
    else
    {
    /* If event.light = 0 lux the sensor is probably saturated
    and no reliable data could be generated! */
    Serial.println("Sensor overload");
    }
This function will return a reading in SI lux units, which is probably the easiest unit to understand when working with light.
If you wish to manually read the individual photo diodes, though, you can still do this in the latest library by calling the getLuminosity function, and passing in two variables where the sensor data will be stored:
    uint16_t broadband = 0;
    uint16_t infrared = 0;

    /* Populate broadband and infrared with the latest values */
    getLuminosity (&broadband, &infrared);
That's it! The example should be easy to understand and work into your own projects from here!
Réalisé par LadyAda Pour AdaFruit Insdustries.
Source: [1]
Traduit avec l'autorisation d'AdaFruit Industries - Translated with the permission from Adafruit Industries - www.adafruit.com
Toute référence, mention ou extrait de cette traduction doit être explicitement accompagné du texte suivant : « Traduction par MCHobby (www.MCHobby.be) - Vente de kit et composants » avec un lien vers la source (donc cette page) et ce quelque soit le média utilisé.
L'utilisation commercial de la traduction (texte) et/ou réalisation, même partielle, pourrait être soumis à redevance. Dans tous les cas de figures, vous devez également obtenir l'accord du(des) détenteur initial des droits. Celui de MC Hobby s'arrêtant au travail de traduction proprement dit.

