UniPi-Configuration-Cavalier
|
|
En cours de traduction/élaboration. |
Source d'alimentation 12V interne
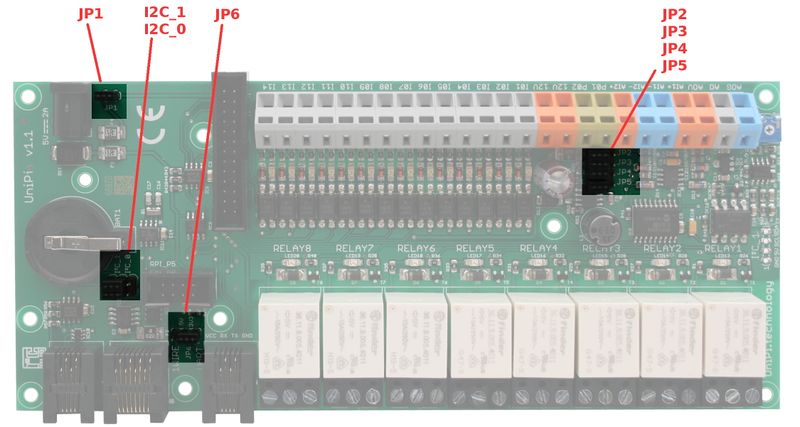
5-12V Step-up (internal 12V power supply) All inputs are primarily set to be driven by the internal 12V power supply. The 12V line is wired out via the orange connector marked as 12V
| Do not exceed 200ma current draw. |
Configuration des cavaliers
In case of using external power source, inputs must be configured by JP2 - JP5 jumpers. The configuration must be done before powering up the UniPi. Using the external power supply and proper jumper configuration provides galvanic isolation for its inputs.
Jumper configuration when using external power source:
- JP2
- Switching this jumper to the side of the JP2 label causes the P02 (green connector) to act as an input for ground from the external power source. Otherwise P02 is connected to the internal 12V.
- This step must be done as first when changing jumper settings.
- Please note that after this step, the GND of UniPi is connected to P02! Make sure to proceed with JP3 settings after this step.
- JP3
- When switched to the side of the JP3 label, inputs I01 and I02 act as inputs for signal from the connected peripheral device via the external power source.
- The ground of power supply for this inputs must be connected to the P02.
- Please note that to set I01 and I02 for ext. power source make sure to switch JP2 first and then JP3, after that you can safely connect the peripheral device
- JP4
- When switched to the side of the JP4 label, inputs I03 and I04 act as inputs for signal from the connected peripherals via the external power source.
- The ground of power supply for this inputs must be connected to P01.
- JP5
- When switched to the side of the JP5 label, inputs I05 - I14 act as inputs for signal from the connected peripherals via the external power source.
- The ground of power supply for this inputs must be connected to P01.
- Please note that I13 and I14 are wired out via the P5 header of Raspberry Pi (models before the PLUS versions).
Toute référence, mention ou extrait de cette traduction doit être explicitement accompagné du texte suivant : « Traduction par MCHobby (www.MCHobby.be) - Vente de kit et composants » avec un lien vers la source (donc cette page) et ce quelque soit le média utilisé.
L'utilisation commercial de la traduction (texte) et/ou réalisation, même partielle, pourrait être soumis à redevance. Dans tous les cas de figures, vous devez également obtenir l'accord du(des) détenteur initial des droits. Celui de MC Hobby s'arrêtant au travail de traduction proprement dit.
