Différences entre versions de « UniPi-entree-digitale »
| Ligne 7 : | Ligne 7 : | ||
[[Fichier:UniPi-entree-digitale-01.png]] | [[Fichier:UniPi-entree-digitale-01.png]] | ||
| + | |||
| + | {| class="wikitable" border="1" | ||
| + | |- | ||
| + | | align="center" | Notation | ||
| + | | align="center" | Description | ||
| + | |- style="font-size: 90%" | ||
| + | | align="left" | DI | ||
| + | | align="left" | Entrée digitale. Entrée de I01 à I12 (voir tutoriel concernant I13 et I14) | ||
| + | |- style="font-size: 90%" | ||
| + | | align="left" | Device | ||
| + | | align="left" | Périphérique (contact) | ||
| + | |- style="font-size: 90%" | ||
| + | | align="left" | xx | ||
| + | | align="left" | yyyy | ||
| + | |} | ||
So if you activate the connected device, the voltage turns on the input and the signal is evaluated as logic HIGH(1). If the device is deactivated (turned off), the state is evaulated as a logic LOW(0). Using this, you can read for example S0 impulses from energy meters (water meter, electricity meter, ...) or buttons, movement (PIR) sensors or magnetic contacts and many others. | So if you activate the connected device, the voltage turns on the input and the signal is evaluated as logic HIGH(1). If the device is deactivated (turned off), the state is evaulated as a logic LOW(0). Using this, you can read for example S0 impulses from energy meters (water meter, electricity meter, ...) or buttons, movement (PIR) sensors or magnetic contacts and many others. | ||
Version du 23 juillet 2017 à 07:56
|
|
En cours de traduction/élaboration. |
Utiliser une entrée analogique
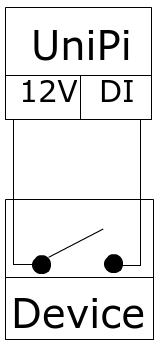
Digital input serves for reading of/off state of connected devices like buttons, contacts etc. The following picture describes connection of external device to UniPi 1 while using the integrated 12V power supply, that is designed for such purpose.
| Notation | Description |
| DI | Entrée digitale. Entrée de I01 à I12 (voir tutoriel concernant I13 et I14) |
| Device | Périphérique (contact) |
| xx | yyyy |
So if you activate the connected device, the voltage turns on the input and the signal is evaluated as logic HIGH(1). If the device is deactivated (turned off), the state is evaulated as a logic LOW(0). Using this, you can read for example S0 impulses from energy meters (water meter, electricity meter, ...) or buttons, movement (PIR) sensors or magnetic contacts and many others.
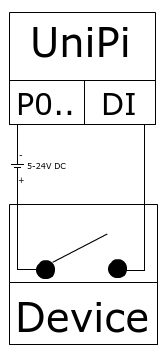
To preserve galvanic isolation of the connected device and internal parts of UniPi, we recommend using external 5 - 24V DC power supply and follow the schematics shown below. Before connecting the device, make sure that jumpers JP2 - JP5 are configured acconrding to the documentation of UniPi 1. Please note that the negative pole of the power supply is be connected to the POx connector.
Toute référence, mention ou extrait de cette traduction doit être explicitement accompagné du texte suivant : « Traduction par MCHobby (www.MCHobby.be) - Vente de kit et composants » avec un lien vers la source (donc cette page) et ce quelque soit le média utilisé.
L'utilisation commercial de la traduction (texte) et/ou réalisation, même partielle, pourrait être soumis à redevance. Dans tous les cas de figures, vous devez également obtenir l'accord du(des) détenteur initial des droits. Celui de MC Hobby s'arrêtant au travail de traduction proprement dit.

