Différences entre versions de « ENG-CANSAT-NEOPIXEL »
| (5 versions intermédiaires par le même utilisateur non affichées) | |||
| Ligne 1 : | Ligne 1 : | ||
{{ENG-CANSAT-NAV}} | {{ENG-CANSAT-NAV}} | ||
| − | |||
| − | |||
== What are NeoPixels? == | == What are NeoPixels? == | ||
| Ligne 26 : | Ligne 24 : | ||
The great thing about this NeoPixel is that we can take the control of it from your Arduino sketch. | The great thing about this NeoPixel is that we can take the control of it from your Arduino sketch. | ||
| − | + | We just need to know the pin to use ('''pin 8''') and install the Adafruit NeoPixel Library for ATSAMD21 microcontroller :-) | |
| + | |||
| + | The NeoPixel should be viewed as the very first LED of a NeoPixel Strand having only one single LED. | ||
== Installing the library == | == Installing the library == | ||
| Ligne 38 : | Ligne 38 : | ||
[[Fichier:ENG-CANSAT-NEOPIXEL-20.png|480px]] | [[Fichier:ENG-CANSAT-NEOPIXEL-20.png|480px]] | ||
| + | |||
| + | == Test script == | ||
| + | The following script demonstrate how to manipulate the onboard NeoPixel. | ||
| + | |||
| + | As there is only one pixel (one pixel on the strand), the function {{fname|pixel.setPixelColor()}} will always have the first parameter is set to 0! | ||
| + | |||
| + | This means that we change the color of the LED #0 on the ''pixel strand''. | ||
| + | |||
| + | <syntaxhighlight lang="c"> | ||
| + | #include <Adafruit_NeoPixel.h> | ||
| + | |||
| + | #define NEOPIXEL 8 | ||
| + | #define NUMPIXELS 1 | ||
| + | |||
| + | Adafruit_NeoPixel pixel = Adafruit_NeoPixel(NUMPIXELS, NEOPIXEL, NEO_GRB + NEO_KHZ800); | ||
| + | |||
| + | void setup() { | ||
| + | pixel.begin(); | ||
| + | // switch OFF the pixel 0 | ||
| + | pixel.setPixelColor(0, pixel.Color(0,0,0)); | ||
| + | pixel.show(); | ||
| + | } | ||
| + | |||
| + | int red = 0; | ||
| + | int green = 0; | ||
| + | int blue = 0; | ||
| + | |||
| + | void loop(){ | ||
| + | pixel.setPixelColor(0, pixel.Color(red,green,blue)); | ||
| + | pixel.show(); | ||
| + | red += 10; | ||
| + | if( red > 255 ){ | ||
| + | red = 0; | ||
| + | green += 10; | ||
| + | } | ||
| + | if( green > 255 ){ | ||
| + | green = 0; | ||
| + | blue += 10; | ||
| + | } | ||
| + | if( blue > 255 ){ | ||
| + | blue = 0; | ||
| + | } | ||
| + | // Wait 100ms | ||
| + | delay( 100 ); | ||
| + | } | ||
| + | </syntaxhighlight> | ||
{{ENG-CANSAT-TRAILER}} | {{ENG-CANSAT-TRAILER}} | ||
Version actuelle datée du 30 octobre 2018 à 14:50
What are NeoPixels?
NeoPixel is a brand from Adafruit Industries. It concerns individually addressable LEDs that can be controlled with a single data line. Individually addressable means that you can control the color of each LED independently of the other.
NeoPixel are usually sold in strand but is also very popular is various form-factor.
The NeoPixels contains a small microcontroller used to decode the information send on the Data Line and using PWM generator to drive the LEDs.
It also include a constant current supply for the LED, which means that the color would not change with the supply voltage.
NeoPixel is a very powerful technology. You can learn more about it from the Adafruit's neoPixel User Guide or the translated NeoPixel user guide.
Feather M0 NeoPixel
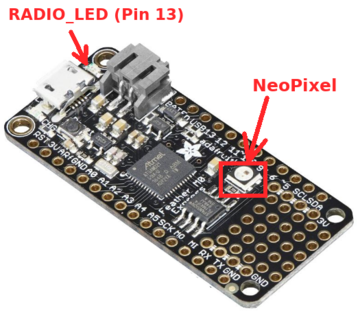
The Feather M0 Express also contains a NeoPixel LED. This LED is used by the Microcontroller to inform the user about its running status (red or green).
The great thing about this NeoPixel is that we can take the control of it from your Arduino sketch.
We just need to know the pin to use (pin 8) and install the Adafruit NeoPixel Library for ATSAMD21 microcontroller :-)
The NeoPixel should be viewed as the very first LED of a NeoPixel Strand having only one single LED.
Installing the library
You can also use the "Library Manager" to ease the installation of the BMP280 library.
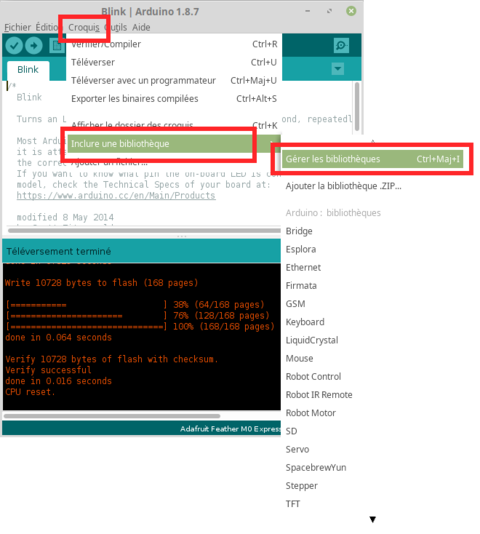
From the "Sketch" menu, select the sub-menu "Include library" --> "Library Manager" like shown on the picture here under.
In the library manager, key-in the value "neopixel" in the search box. Then click on the install button in the front of the Adafruit DMA NeoPixel Library by Adafruit. This library is suited for the ATSAMD21 microcontroller as used on this Feather M0 plateform.
Test script
The following script demonstrate how to manipulate the onboard NeoPixel.
As there is only one pixel (one pixel on the strand), the function pixel.setPixelColor() will always have the first parameter is set to 0!
This means that we change the color of the LED #0 on the pixel strand.
#include <Adafruit_NeoPixel.h>

#define NEOPIXEL       8
#define NUMPIXELS      1

Adafruit_NeoPixel pixel = Adafruit_NeoPixel(NUMPIXELS, NEOPIXEL, NEO_GRB + NEO_KHZ800);

void setup() {
  pixel.begin();
  // switch OFF the pixel 0
  pixel.setPixelColor(0, pixel.Color(0,0,0));
  pixel.show();
}

int red = 0;
int green = 0;
int blue = 0;

void loop(){
  pixel.setPixelColor(0, pixel.Color(red,green,blue));
  pixel.show();
  red += 10;
  if( red > 255 ){
    red = 0;
    green += 10;
  }
  if( green > 255 ){
    green = 0;
    blue += 10;
  }
  if( blue > 255 ){
    blue = 0;
  }
  // Wait 100ms
  delay( 100 );
}
Written by Meurisse D. from MC Hobby - License: CC-SA-BY.

