Différences entre versions de « Rasp-Hat-Moteur-Empiler-les-Hats »
| Ligne 5 : | Ligne 5 : | ||
{{ADFImage|Rasp-Hat-Moteur-Empiler-les-Hats-00.jpg|640px}} | {{ADFImage|Rasp-Hat-Moteur-Empiler-les-Hats-00.jpg|640px}} | ||
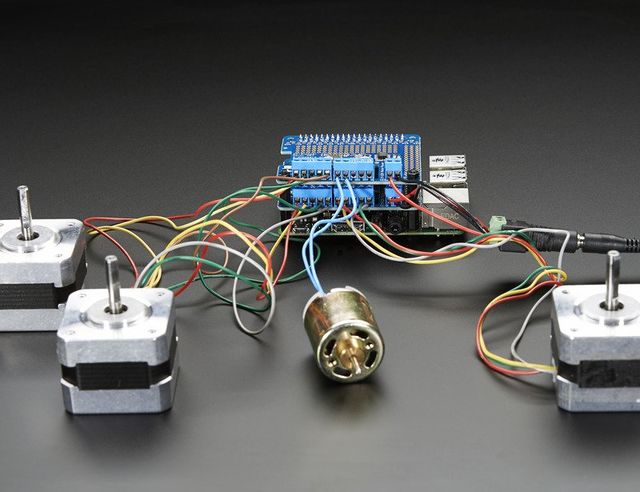
| − | + | Une des choses intéressantes prévue dans la conception du HAT est qu'il est est possible de les empiler. Chaque HAT est capable de contrôler deux moteurs pas-à-pas ou 4 moteurs continu (ou un mix des deux). | |
| − | + | Il est possible d'empiler jusqu'à 32 HATs pour un total de 64 moteurs pas-à-pas ou 128 moteurs continu! La plupat des utilisateurs n'aurons probablement besoin que d'empiler 2 ou 3 d'entre eux... mais on ne sait jamais. (PS: Envoyez nous une photo si, un jour, vous pilotiez 64 moteurs pas-à-pas depuis un Raspberry-Pi) | |
| − | {{pl|580| | + | {{pl|580|Si vous avez également de nombreux servo-moteurs à contrôler, vous pouvez empiler un {{pl|580|HAT servo pour Raspberry-Pi}} avec ce HAT. Cela permet, en plus, de contrôler beaucoup de servo-moteurs.}} |
| − | + | Empiler les HAT est vraiment très simple. {{pl|485|Chaque HAT à empiler doit être équipé d'un stacking header}}. Le HAT du haut ne doit pas nécessairement avoir de stacking header sauf si vous comptez ajouter un autre HAT par dessus. | |
| − | + | La seule chose à laquelle il faut être attentif c'est que chaque carte dispose d'une adresse I2C unique. L'adresse par défaut du HAT est '''0x60''', adresse que vous pouvez ajuster de 0x60 à 0x80 (soit un total de 32 adresses uniques). | |
| − | == | + | == Modifier l'adresse d'un HAT == |
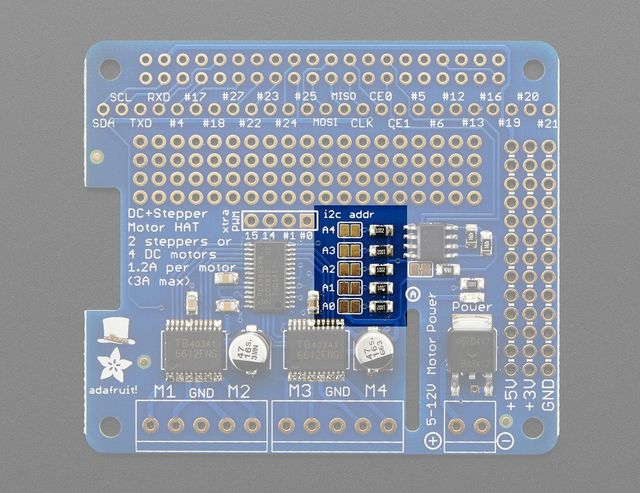
| − | + | Chaque carte dans la pile (empilement de carte) doit recevoir une adresse unique. C'est fait à l'aide des cavalier d'adresse visible sur la partie gauche de la carte. L'adresse de base est 0x60. La valeur binaire qui est programmée avec les cavaliers d'adresse vient s'ajouter à l'adresse I2C de base de la carte. | |
| − | + | Pour programmer le décalage d'adresse, utilisez une pointe de soudure pour ponter chaque "cavalier binaire" (1) de l'adresse. | |
The bottom-most jumper is address bit #0, then the one above of that is address bit #1, etc up to address bit #5 | The bottom-most jumper is address bit #0, then the one above of that is address bit #1, etc up to address bit #5 | ||
Version du 7 septembre 2017 à 20:35

Crédit: AdaFruit Industries www.adafruit.com
Une des choses intéressantes prévue dans la conception du HAT est qu'il est est possible de les empiler. Chaque HAT est capable de contrôler deux moteurs pas-à-pas ou 4 moteurs continu (ou un mix des deux).
Il est possible d'empiler jusqu'à 32 HATs pour un total de 64 moteurs pas-à-pas ou 128 moteurs continu! La plupat des utilisateurs n'aurons probablement besoin que d'empiler 2 ou 3 d'entre eux... mais on ne sait jamais. (PS: Envoyez nous une photo si, un jour, vous pilotiez 64 moteurs pas-à-pas depuis un Raspberry-Pi)
Si vous avez également de nombreux servo-moteurs à contrôler, vous pouvez empiler un [https://shop.mchobby.be/product.php?id_product=580 HAT servo pour Raspberry-Pi avec ce HAT. Cela permet, en plus, de contrôler beaucoup de servo-moteurs.]
Empiler les HAT est vraiment très simple. Chaque HAT à empiler doit être équipé d'un stacking header. Le HAT du haut ne doit pas nécessairement avoir de stacking header sauf si vous comptez ajouter un autre HAT par dessus.
La seule chose à laquelle il faut être attentif c'est que chaque carte dispose d'une adresse I2C unique. L'adresse par défaut du HAT est 0x60, adresse que vous pouvez ajuster de 0x60 à 0x80 (soit un total de 32 adresses uniques).
Modifier l'adresse d'un HAT
Chaque carte dans la pile (empilement de carte) doit recevoir une adresse unique. C'est fait à l'aide des cavalier d'adresse visible sur la partie gauche de la carte. L'adresse de base est 0x60. La valeur binaire qui est programmée avec les cavaliers d'adresse vient s'ajouter à l'adresse I2C de base de la carte.
Pour programmer le décalage d'adresse, utilisez une pointe de soudure pour ponter chaque "cavalier binaire" (1) de l'adresse.
The bottom-most jumper is address bit #0, then the one above of that is address bit #1, etc up to address bit #5

Crédit: AdaFruit Industries www.adafruit.com
Board 0: Address = 0x60 Offset = binary 0000 (no jumpers required) Board 1: Address = 0x61 Offset = binary 0001 (bridge A0) Board 2: Address = 0x62 Offset = binary 0010 (bridge A1, the one above A0) Board 3: Address = 0x63 Offset = binary 0011 (bridge A0 & A1, two bottom jumpers) Board 4: Address = 0x64 Offset = binary 0100 (bridge A2, middle jumper)
etc.
| Note that address 0x70 is the "all call" address for the controller chip on the HAT. All boards will respond to address 0x70 - regardless of the address jumper settings. |
Empiler (le code)
We have an example in our Python library called StackingTest.py
The key part is to create two MotorHAT objects:
# bottom hat is default address 0x60
bottomhat = Adafruit_MotorHAT(addr=0x60)
# top hat has A0 jumper closed, so its address 0x61
tophat = Adafruit_MotorHAT(addr=0x61)
then use other of those for getting motors. We recommend using threading for control of the steppers to make them turn together
Source: Adafruit DC and Stepper Motor HAT for Raspberry Pi
Créé par LadyAda pour AdaFruit Industries.
Traduction réalisée par Meurisse D pour MCHobby.be.
Toute référence, mention ou extrait de cette traduction doit être explicitement accompagné du texte suivant : « Traduction par MCHobby (www.MCHobby.be) - Vente de kit et composants » avec un lien vers la source (donc cette page) et ce quelque soit le média utilisé.
L'utilisation commercial de la traduction (texte) et/ou réalisation, même partielle, pourrait être soumis à redevance. Dans tous les cas de figures, vous devez également obtenir l'accord du(des) détenteur initial des droits. Celui de MC Hobby s'arrêtant au travail de traduction proprement dit.
Traduit avec l'autorisation d'AdaFruit Industries - Translated with the permission from Adafruit Industries - www.adafruit.com
