Différences entre versions de « ENG-CANSAT-MISSION1-RECEIVE »
(→Putty) |
|||
| Ligne 249 : | Ligne 249 : | ||
Here how it should be configured to capture the data. | Here how it should be configured to capture the data. | ||
| − | [[Fichier:ENG-CANSAT-MISSION1-RECEIVE- | + | [[Fichier:ENG-CANSAT-MISSION1-RECEIVE-30.png]] |
Putty also offers some logging capability that may be useful. | Putty also offers some logging capability that may be useful. | ||
| − | + | ||
=== With terminal Software === | === With terminal Software === | ||
If you are addict to Linux or Raspberry-Pi board then you can easily view and capture the data with the following commnands. | If you are addict to Linux or Raspberry-Pi board then you can easily view and capture the data with the following commnands. | ||
Version du 30 octobre 2018 à 21:41
Introduction
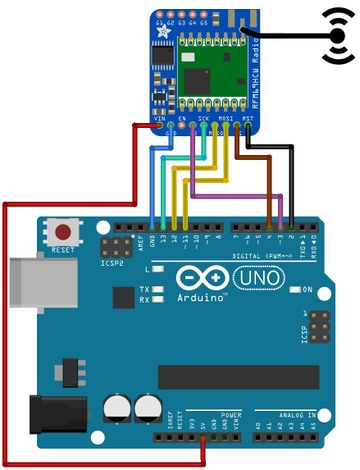
The following wiring will prepare the "Receiver Station" for the mission 1. From the "RFM69HCW Testing" section, we will use an Arduino UNO and RFM69HCW module to redirect the Radio Messages to the serial port.
Wiring
| Feather M0 Express | RFM69 |
| 5V | VIN |
| GND | GND |
| 11 | MOSI |
| 12 | MISO |
| 13 | SCK |
| 4 | CS |
| 3 | G0 |
| 2 | RST |
Download the code
The code is available for download on the GitHub associated to this wiki.
About testing
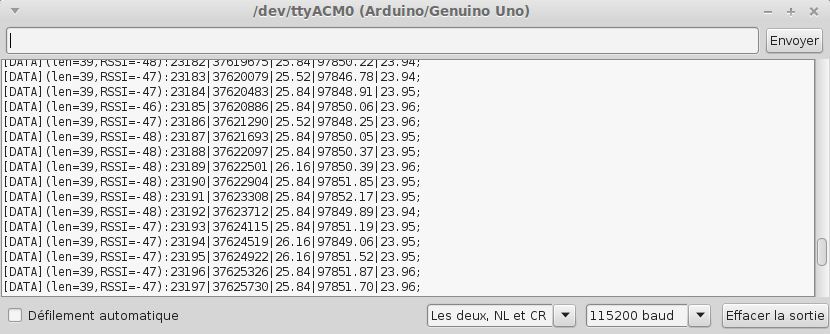
Once uploaded to your Arduino, open the Serial Monitor and set it to 115200 bauds.
You should see the following messages appears on the Serial Monitor.
Where we could see the received messages with additional information.
[DATA](len=<data_len>,RSSI=<radio_rssi>)<transmitted_data>
- Each data received and send to the serial connexion are prefixed with [DATA]
- The prefix is followed by information enclosed between parenthesis (), this concerns the received data.
Entries are key=value pairs separated by coma. - At the end, we retrieve the transmitted data (as they have been sent).
In the informations:
- data_len: length of the data stream received.
- RSSI: indicated the strength of the signal (-15 at best, -90 at worst).
- transmitted_data: the data as transmitted by the emitter. As designed in the emitter, it starts with : and ends with ;\r\n
In the transmitted_data, we can identify:
- The packet counter
- The time counter (milliseconds)
- The temperature (from tmp36)
- The atmospheric pressure (from bmp280)
- The temperature2 (from bmp280)
The code explained
Here some explanation about the mission1-serial-radio-receiver.ino sketch used in the CanSat.
This Arduino sketch would:
- Collect the sensor data over the radio connexion
- Reply an ACK to the Emitter
- Send it the data to the serial connexion
First, the script will includes all the needed libraries.
#include <SPI.h>
#include <RH_RF69.h>
Then, it defines the parameters for the radio module and the pinout used to wire the RFM69HCW radio. The code adapt himself to the the board selected in the compiler.
The last line create the object rf69 to control the module.
#define RF69_FREQ 433.0

#if defined (__AVR_ATmega32U4__) // Feather 32u4 w/Radio
  #define RFM69_CS      8
  #define RFM69_INT     7
  #define RFM69_RST     4
  #define LED           13
#endif

#if defined(ARDUINO_SAMD_FEATHER_M0) // Feather M0 w/Radio
  #define RFM69_CS      8
  #define RFM69_INT     3
  #define RFM69_RST     4
  #define LED           13
#endif

#if defined (__AVR_ATmega328P__)  // Feather 328P w/wing (or Arduino UNO)
  #define RFM69_INT     3  //
  #define RFM69_CS      4  //
  #define RFM69_RST     2  // "A"
  #define LED           13
#endif

#if defined(ESP8266)    // ESP8266 feather w/wing
  #define RFM69_CS      2    // "E"
  #define RFM69_IRQ     15   // "B"
  #define RFM69_RST     16   // "D"
  #define LED           0
#endif

#if defined(ESP32)    // ESP32 feather w/wing
  #define RFM69_RST     13   // same as LED
  #define RFM69_CS      33   // "B"
  #define RFM69_INT     27   // "A"
  #define LED           13
#endif

// Singleton instance of the radio driver
RH_RF69 rf69(RFM69_CS, RFM69_INT);
The setup() function:
- initialize the serial connexion @ 115200 bauds
- initialze the radio module
void setup() {
  Serial.begin(115200);

  pinMode(LED, OUTPUT);
  pinMode(RFM69_RST, OUTPUT);
  digitalWrite(RFM69_RST, LOW);

  Serial.println("[INFO] CanSat Belgium Radio Receiver (Radio to Serial)!");

  // manual reset
  digitalWrite(RFM69_RST, HIGH);
  delay(10);
  digitalWrite(RFM69_RST, LOW);
  delay(10);

  if (!rf69.init()) {
    Serial.println("[ERROR] RFM69 radio init failed");
    while (1);
  }
  Serial.println("[INFO] RFM69 radio init OK!");

  // Defaults after init are 434.0MHz, modulation GFSK_Rb250Fd250, +13dbM (for low power module)
  // No encryption
  if (!rf69.setFrequency(RF69_FREQ)) {
    Serial.println("[ERROR] setFrequency failed");
  }

  // When using High Power RF69, RFM69HW then the Tx power ishighpowermodule
  // flag MUST be with to TRUE
  rf69.setTxPower(20, true);  // Power range 14-20

  // The encryption key has to be the same as the one in the server
  uint8_t key[] = { 0x01, 0x02, 0x03, 0x04, 0x05, 0x06, 0x07, 0x08,
                    0x01, 0x02, 0x03, 0x04, 0x05, 0x06, 0x07, 0x08};
  rf69.setEncryptionKey(key);

  pinMode(LED, OUTPUT);

  Serial.print("[INFO] RFM69 radio @");
  Serial.print((int)RF69_FREQ);
  Serial.println(" MHz");
}
The main loop() function just check if a new message arrives.
If so, it read the message and store it into buf buffer.
Then, several Serial.print() statement are used to send the data over the serial connexion.
Finally, the sketch sends an ACK confirmation message.
void loop() {
 if (rf69.available()) {
    // Should be a message for us now
    uint8_t buf[RH_RF69_MAX_MESSAGE_LEN];
    uint8_t len = sizeof(buf);
    if (rf69.recv(buf, &len)) {
      if (!len) return;
      buf[len] = 0;
      Serial.print("[DATA](len=" );
      Serial.print(len);
      Serial.print(",RSSI=");
      Serial.print(rf69.lastRssi(), DEC);
      Serial.print(")");
      Serial.print((char*)buf); // Data send by remote is supposed to contains the \r\n

      // Send a reply!
      uint8_t data[] = "ACK";
      rf69.send(data, sizeof(data));
      rf69.waitPacketSent();
      Blink(LED, 50, 1); //blink LED 1 times, 50ms between blinks
    }
  }
  else {
    Blink(LED, 50, 3); //blink LED 3 times, 50ms between blinks
  }
}
The Blink() function is used to signal error code (blink once when a message received, blink 3 times when having a communication error).
void Blink(byte PIN, byte DELAY_MS, byte loops) {
  for (byte i=0; i<loops; i++)  {
    digitalWrite(PIN,HIGH);
    delay(DELAY_MS);
    digitalWrite(PIN,LOW);
    delay(DELAY_MS);
  }
}
Compile and upload
Select the proper board in the menu Tools -> Type of board : Arduino/Genuino UNO
Select the proper port in the menu Tools -> Port
Then press the "upload" button.
Capturing data to file
Having data available in the Arduino Serial Monitor is great... but capturing it without Arduino would be even better.
Putty
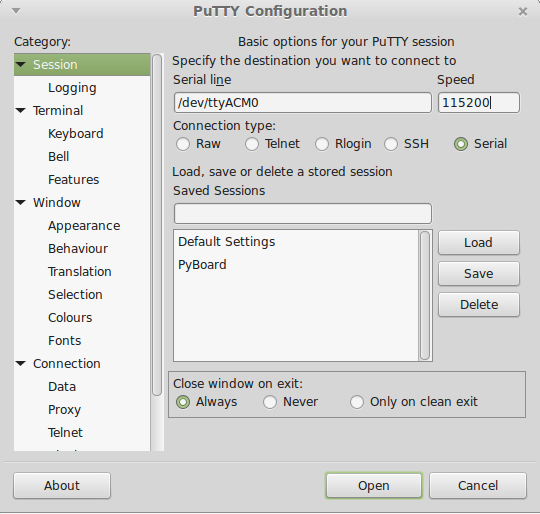
The putty software (available on Windows, Mac, Linux) can be also be used to connect to the Arduino Serial Port interface
Here how it should be configured to capture the data.
Putty also offers some logging capability that may be useful.
With terminal Software
If you are addict to Linux or Raspberry-Pi board then you can easily view and capture the data with the following commnands.
cat /dev/ttyACM0 > output.dat
This command will redirect the content of the USB port to a file named output.dat .
With Python
The following Python script will capture a serial port (see baud_rate variable) and write the content to a file (see write_to_file_path variable).
The content of the file is reset when the script is started.
| Openning the Serial Port will issue the automatic Reset feature of the Arduino board. |
import serial

serial_port = '/dev/ttyACM0';
# depend on Serial.begin(baud_rate) in Arduino
baud_rate = 115200;
write_to_file_path = "output.txt";

output_file = open(write_to_file_path, "w+")
ser = serial.Serial(serial_port, baud_rate)
try:
    while True:
        line = ser.readline()
        line = line.encode("utf-8") #ser.readline returns a binary, convert to string
        print(line)
        output_file.write(line)
except KeyboardInterrupt:
    print( 'User abord' )
output_file.close()
ser.close()
Written by Meurisse D. from MC Hobby - License: CC-SA-BY.


