Différences entre versions de « Pololu-Romi-32U4-Programmer-Pilotes-windows »
| Ligne 30 : | Ligne 30 : | ||
8. Windows XP vous avertira que le pilote n'a pas été testé par Microsoft et recommande d'interrompre l'installation. Cliquez sur "Continuer de toute façon". | 8. Windows XP vous avertira que le pilote n'a pas été testé par Microsoft et recommande d'interrompre l'installation. Cliquez sur "Continuer de toute façon". | ||
| − | 9. | + | 9. Lorsque vous avez terminé avec le Wizard, pressez simplement sur "Terminer". |
== Détails du port COM == | == Détails du port COM == | ||
Version du 8 décembre 2019 à 20:47
Installer les pilotes Windows
| Si vous utilisez Windows XP, il sera nécessaire d'avoir le Service Pack 3 ou Hotfix KB918365 installé avant de pouvoir installer les pilotes A-Star. Certains utilisateur ayant installer le hotfix ont rencontrés des problèmes qui auraient été résolus en faisait la mise à jour du Service Pack 3, Pololu recommande donc d'installer le Service Pack 3 au dessus de l'Hotfix. |
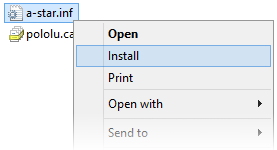
Avant de connecter votre Pololu A-Star 32U4 (ou autre cartes de la famille 32U4) sur un ordinateur Windows, vous devriez installer ses pilotes: 1. Télécharger le pilote A-Star pour Windows (7k zip) et extraire le contenu du fichier ZIP dans un répertoire temporaire. (Ces pilotes sont également disponibles dans le répertoires "drivers" sur dépôt GitHub A-Star.) 2. Ouvrir le répertoire "a-star-windows". Faire un click droit sur le fichier "a-star.inf" et selectionner "Install" (Installer).
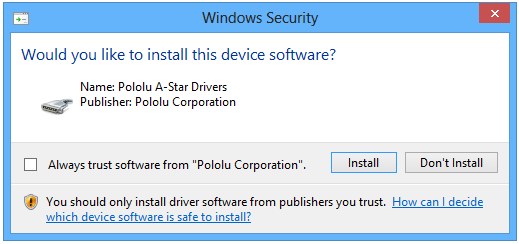
3. Windows demandera s'il faut installer le pilote. Clicker sur "Install" (Installer... pour Windows 10, 8, 7 et Vista) ou "Continue Anyway" (continuer quand même... pour Windows XP).
4. Windows ne vous informera pas de la fin de l'installation, mais cela ne devrait prendre que quelques secondesw.
{{underline|Utilisateurs de Windows 10, Windows 8, Windows 7 et Windows Vista:} après avoir installé les pilotes, votre ordinateur devrait automatiquement reconnaître le périphérique lorsqu'il est connecté sur le port USB. Il n'y a pas d'autres action requises. Cependant, la première fois que vous connectez un périphérique A-Star sur votre ordinateur, Windows prendra plusieurs secondes pour détecter et le configurer correctement. La première fois que vous programmerez le périphérique, Windows prendra quelques secondes pour détecter le bootloader USB de l'A-Star et il se pourrait que l'opération de programmation pourrait échouer la première fois. De même, Windows aura besoin de refaire l'opération de détection du bootloader si la carte est connectée sur un nouveau port USB.
{{underline|Utilisateur de Windows XP:} Après avoir installé les pilotes, il sera nécessaire de suivre les étapes 5 à 9 pour chaque nouveau périphérique A-Star connecté sur l'ordinateur. Vous aurez besoin de suivre ces étapes la première fois que qu'un nouveau A-Star est connecté sur un nouveau port USB:
5. Connecter le périphérique sur le port USB de votre ordinateur.
6. Lorsque le Wizard "Un nouveau périphérique détecté", selectionner "Non, pas maintenant" et cliquer sur "Suivant".
7. Sur le second écran du Wizard, selectionner "Installer automatiquement le logiciel" et cliquer sur "Next".
8. Windows XP vous avertira que le pilote n'a pas été testé par Microsoft et recommande d'interrompre l'installation. Cliquez sur "Continuer de toute façon".
9. Lorsque vous avez terminé avec le Wizard, pressez simplement sur "Terminer".
Détails du port COM
After installing the drivers and plugging in an A-Star, in the “Ports (COM & LPT)” category of the Device Manager, you should see a COM port for the A-Star’s running sketch named “Pololu A-Star 32U4”.
You might see that the COM port is named “USB Serial Device” in the Device Manager instead of having a descriptive name. This can happen if you are using Windows 10 or later and you plugged the A-Star into your computer before installing our drivers for it. In that case, Windows will set up your A-Star using the default Windows serial driver (usbser.inf), and it will display “USB Serial Device” as the name for the port. The port will still be usable, but it will be hard to tell if it is the right one because of the generic name shown in the Device Manager. We recommend fixing the names in the Device Manager by right-clicking on each “USB Serial Device” entry, selecting “Update Driver Software…”, and then selecting “Search automatically for updated driver software”. Windows should find the drivers you already installed, which contain the correct name for the port.
If you are using Windows 10 or later and choose not to install the drivers, the A-Star will still be usable. To tell which “USB Serial Device” in your Device Manager is the A-Star, double-click on each one and look at the “Hardware Ids” property in the “Details” tab. An A-Star running a sketch will have the ID USB\VID_1FFB&PID_2300&MI_00, while an A-Star in bootloader mode will have the ID USB\VID_1FFB&PID_0101.
If you want to change the COM port numbers assigned to your A-Star, you can do so using the Device Manager. Double-click a COM port to open its properties dialog, and click the “Advanced…” button in the “Port Settings” tab.
Basé sur "Guide utilisateur de la carte de contrôle Romi 32U4" de Pololu (https://www.pololu.com/docs/0J69) - Traduit en Français par shop.mchobby.be CC-BY-SA pour la traduction
Toute copie doit contenir ce crédit, lien vers cette page et la section "crédit de traduction". Traduit avec l'autorisation expresse de Pololu (www.pololu.com)
Based on "Pololu Romi 32U4 Control Board User’s Guide" from Pololu (https://www.pololu.com/docs/0J69) - Translated to French by shop.mchobby.be CC-BY-SA for the translation
Copies must includes this credit, link to this page and the section "crédit de traduction" (translation credit). Translated with the Pololu's authorization (www.pololu.com)


