Différences entre versions de « ENG-CANSAT-PICO-THONNY »
| Ligne 145 : | Ligne 145 : | ||
* En pressant la combinaison de touche "Ctrl+C" | * En pressant la combinaison de touche "Ctrl+C" | ||
| − | === Use the plotter == | + | === Use the plotter === |
Le plotter peut être activé par l'intermédiaire du menu "View | Plotter". | Le plotter peut être activé par l'intermédiaire du menu "View | Plotter". | ||
| Ligne 158 : | Ligne 158 : | ||
La correction gamma permet de corriger cet inconvénient de non proportionnalité. | La correction gamma permet de corriger cet inconvénient de non proportionnalité. | ||
| − | + | <syntaxhighlight lang="python"> | |
| + | from machine import Pin, PWM | ||
import time | import time | ||
led = PWM( Pin(25 )) | led = PWM( Pin(25 )) | ||
| Ligne 176 : | Ligne 177 : | ||
print( pwm_val ) | print( pwm_val ) | ||
time.sleep_ms( 20 )</nowiki> | time.sleep_ms( 20 )</nowiki> | ||
| + | </syntaxhighlight> | ||
Ce qui produit le résultat suivant dans Thonny. La valeur numérique produite dans la session REPL est également reproduite dans le Plotter. | Ce qui produit le résultat suivant dans Thonny. La valeur numérique produite dans la session REPL est également reproduite dans le Plotter. | ||
{{ENG-CANSAT-PICO-TRAILER}} | {{ENG-CANSAT-PICO-TRAILER}} | ||
Version du 19 février 2022 à 02:22
Abstract
There is no need for a specific development environment to work with a MicroPython plateforms.
A simple text editor is quite enough to write python scripts.
Command line utility like mpremote can be used to copy/run python scripts on the board.
Thonny editor
By the way, a enhanced tool like Thonny IDE can definitively improve the user experience and interaction with the Pico.
Thonny is multi-plateform editor running on Linux, Windows, Mac.
The beauty about Thonny Python Script editor is that Thonny is written in Python.
Thonny IDE is a great python script editor can also be used with MicroPython Microcontrolers:
- Raspberry-Pi Pico
- RP2040 base MicroPython board (like PYBStick RP2040 or MicroMod-RP2040, etc)
- ESP32 under MicroPython
- ESP8266 under MicroPython
- etc
Thonny offers great features for MicroPython microconroler:
- transfer script to MicroPython microcontroler.
- manage files on the MicroPython microcontroler.
- run script against MicroPython microcontroler.
- using the micropython interactive command line (named REPL)
- generating graphical data (an awesome feature)
Install Thonny IDE
| It is important to have a recent version of thonny and plug-ins to use it with MicroPython boards. |
Thonny website contains the required instruction to install Thonny IDE.
On Raspberry-Pi
Just open a terminal and execute the following command line:
$ sudo apt update && sudo apt upgrade -y
This will upgrade the operating system and install the latest version of Thonny IDE.
On Linux
Python3 is available on almost every Linux operating system. So Thonny (which is written in Python) is installed with the pip3 Python Install Package software.
$ pip3 install thonny
Windows & Mac
Refer to the official Thonny.org documentation.
Working with Thonny
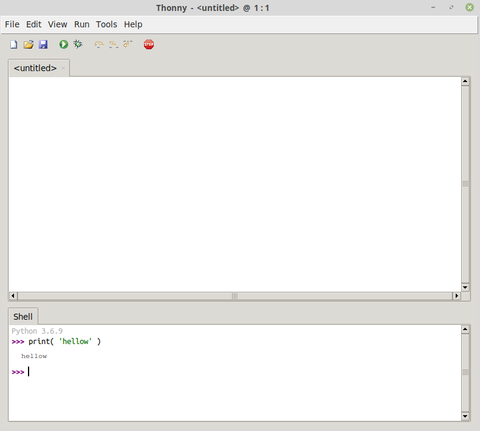
The Thonny environment look very sober at first sight.
Don't be fooled by this simplicity, Thonny do have everything you need under the hood.
From top to bottom:
- The Menubar,
- The Toolbar (with icones),
- Text/code editor is the main part
- A Shell interface (at the bottom) used to quickly test Python code.
Thonny and MicroPython
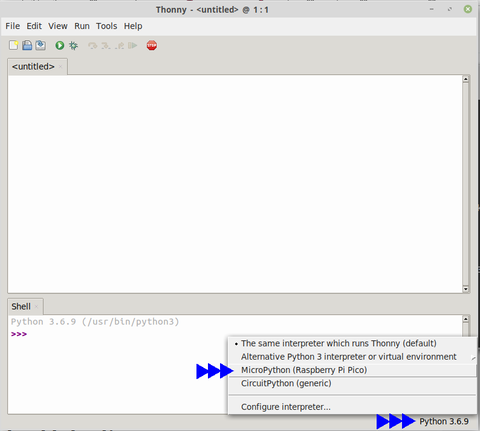
By default, Thonny use the computer's Python interpreter in the "Shell" section.
So to work with a MicroPython board, the user must inform Thonny to use the appropriate shell.
For instance the REPL shell exposed by the MicroPython microcontroler on its serial interface.
Just click and the "shell selection" popup at the bottom-right corner of the screen. In the popup menu selects the "MicroPython" entry attached to the MicroPython board.
Once the entry selected, Thonny does establish a connection with the MicroPython command line interpreter (REPL) running on the MicroPython board.
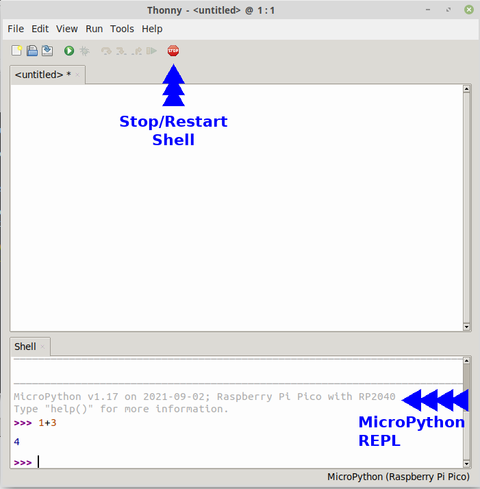
If the connection fails then you can press the "stop" button on the toolbar to make a new connection attempt.
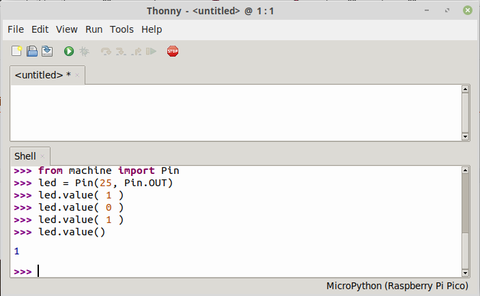
The image here below MicroPython shell (REPL, as it is executed on the microcontroler). This would work the same for any of the RP2040 based microcontroler (like the MicroMod-RP2040, PYBStick RP2040, etc).
LED Blinking
Now that we have selected the MicroPython REPL as interactive shell, can use it to control the Pico onboard LED.
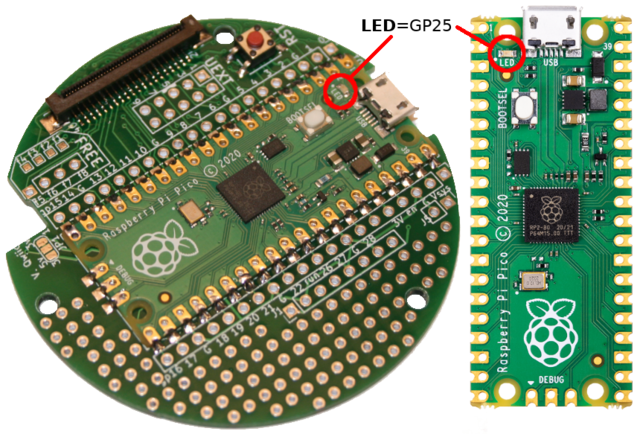
The Pico onboard LED is attached to the pin GP25.
It can be controled with few lines of codes, just key-in them directly in the REPL session
from machine import Pin
led = Pin(25, Pin.OUT)
led.value(1) # allume la LED
led.value(0) # éteint la LED
The following screen capture just show the results of entering the command lines.
by entering led.value() without parameter, you can query the current pin state (1 for High level, 0 for Low level).
Run a file
Thonny permet également d'écrire du code Python dans un fichier et de l'exécuter en une seule fois sur la plateforme MicroPython cible.
Dans l'exemple suivant la luminosité de la LED de statut est contrôlée à l'aide d'un signal PWM (valeur entre 0 et 65534 pour un cycle utile de 0 à 100% .
C'est le cas de code suivant:
import time
led = PWM( Pin(25 ))
counter = 0
while True:
    print( counter )
    counter += 1
    for i in range( 0, 100, 5 ):
        led.duty_u16( int(65534*i/100) )
        time.sleep_ms( 50 )
    for i in range( 0, 100, 5 ):
        led.duty_u16( int(65534*(100-i)/100) )
        time.sleep_ms( 50 )
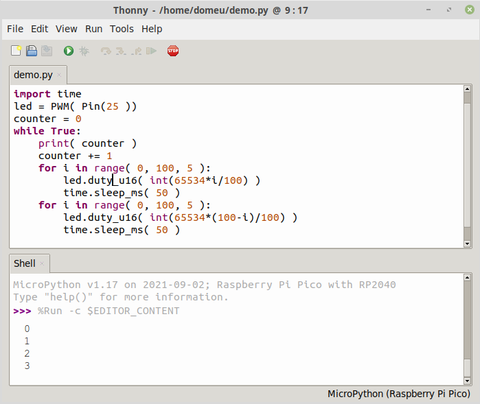
Que l'on sauve dans un fichier sous le nom "demo.py" soit sur l'ordinateur, soit sur la carte microcontrôleur.
Peu importe l'emplacement du fichier (ordinateur ou microcontrôleur), il sera exécuté sur le microcontrôleur dans une session REPL.
Pour exécuter le script il faut presser:
L'exécution du script affiche également les messages print() dans la section Shell en plus de faire pulser la LED de statut sur la carte.
Le script peut être arrêté:
- En pressant le bouton "Stop"
- En pressant la combinaison de touche "Ctrl+C"
Use the plotter
Le plotter peut être activé par l'intermédiaire du menu "View | Plotter".
Cette action affiche un outil graphique dans la section shell.
Le Plotter reprend les données numériques affichée dans session REPL. Lorsque la ligne contient exclusivement une valeur numérique, celle-ci est reprise dans le plotter.
Dans l'exemple suivant, nommé demo2.py, utilise une fonction gamma pour faire pulser la LED de statut sur le GPIO. C'est qu'une progression proportionnel du signal PWM ne produit pas une évolution proportionnelle de la luminosité de la LED (voir livre MicroPython et Pyboard, Edition ENI, in French).
La correction gamma permet de corriger cet inconvénient de non proportionnalité.
from machine import Pin, PWM
import time
led = PWM( Pin(25 ))

def gamma( pc ):
    return pow(pc/100,2.2)*100

while True:
    for i in range( 0, 100, 5 ):
        pwm_val = int(gamma(i)*65534/100)
        led.duty_u16( pwm_val )
        print( pwm_val )
        time.sleep_ms( 20 )
    for i in range( 0, 100, 5 ):
        pwm_val = int(gamma(100-i)*65534/100)
        led.duty_u16( pwm_val )
        print( pwm_val )
        time.sleep_ms( 20 )</nowiki>
Ce qui produit le résultat suivant dans Thonny. La valeur numérique produite dans la session REPL est également reproduite dans le Plotter.
Written by Meurisse D. for MCHobby
