Spark-Photon-Matériel
Présentation
Vous connaissiez le Spark Core de Spark Labs Inc ? Nous vous présentons le Particle Photon, digne successeur du Spark Core.
Photon Kit est un kit de développement IoT (Internet of Things) de Particle.IO. Le Photon offre tout ce dont vous avez besoin pour réaliser un projet connecté. Spark Labs Inc à réalisé le Photon à l'aide d'un puissant microcontrôleur ARM Cortex M3 cadencé à 120Mhz, accompagné d'une support WiFi prit en charge par Broadcom, le tout dans un mini module nommé PØ (P-Zero) pas plus grand qu'un ongle. Le Photon kit inclus le "photon" équipé de connecteurs, un petit breadboard, un câble USB et quelques petits composants permettant de vous lancer directement dans la découverte de l'internet des objets.
Faire du prototypage est vraiment aisé puisque le Photon s'insère directement dans un breadboard (ou plaque de prototypage). Vous pouvez également le connecter directement sur une carte disposant de connecteurs 2x12 broches (par exemple, ce produit ou encore le module relais). Le Photon n'est pas seulement puissant mais aussi facile à utiliser. Son petit facteur de forme en fait un composant idéal pour les projets IoT ayant besoin d'une connectivité sur le Cloud. Pour aider les Maker a démarrer rapidement, Spark Lab Inc à ajouter une excellente et robuste alimentation 3.3V continu de type SMPS. L'alimentation, le P0, l'interface RF et utilisateur tiennent tous sur cette toute petite carte.
Le Photon inclus un accès au Cloud de Particle et services cloud gratuit. Le Cloud de particle dispose que fonctionnalités géniales pour réaliser des objets/projets connectés, avec, en autre,:
- la mise-à-jour/programmation du firmware via la connexion WiFi,
- Une interface de programmation REST facile à utiliser,
- Un environnement de développement en ligne (appelé build) et un environnement de développement IDE que vous pouvez installer sur votre ordinateur.
Spécification
- Module Wi-Fi PØ Wi-Fi de Particle
- Puce WiFi Broadcom BCM43362
- WiFi 802.11b/g/n
- STM32F205 120Mhz ARM Cortex M3
- 1MB flash, 128KB RAM
- Une LED RGB (sur la carte) indiquant le statut du Core (pilotage externe autorisé)
- 18 signaux GPIO - diverses fonctionnalités et périphériques avancé
- Conception Open-Source
- Systèmes d'exploitation temps réel (FreeRTOS)
- Configuration du point d'accès via logiciel (Soft AP setup)
- Certifié FCC, CE et IC
Interface
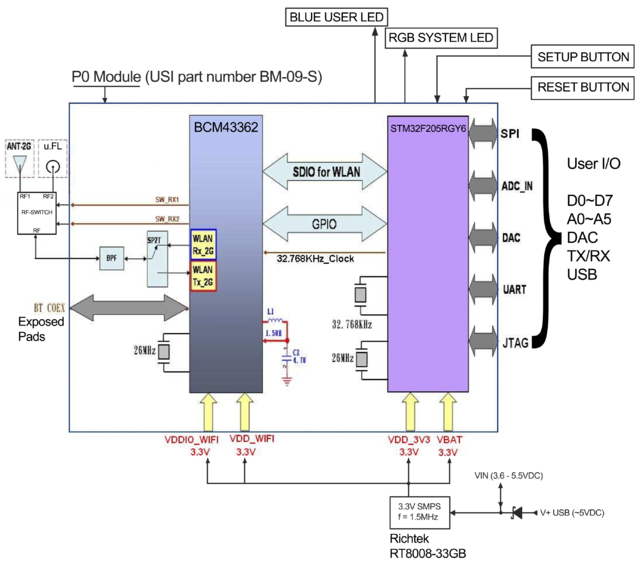
Diagramme

Crédit: Particle.IO www.particle.io
Alimentation
Power to the Photon is supplied via the on-board USB Micro B connector or directly via the VIN pin. If power is supplied directly to the VIN pin, the voltage should be regulated between 3.6VDC and 5.5VDC. When the Photon is powered via the USB port, VIN will output a voltage of approximately 4.8VDC due to a reverse polarity protection series schottky diode between V+ of USB and VIN. When used as an output, the max load on VIN is 1A.
Typical current consumption is 80mA with a 5V input. Deep sleep quiescent current is 160uA. When powering the Photon from the USB connector, make sure to use a quality cable to minimize IR drops (current x resistance = voltage) in the wiring. If a high resistance cable (i.e., low current) is used, peak currents drawn from the Photon when transmitting and receiving will result in voltage sag at the input which may cause a system brown out or intermittent operation. Likewise, the power source should be sufficient enough to source 1A of current to be on the safe side.
RF
The RF section of the Photon is a finely tuned impedance controlled network of components that optimize the efficiency and sensitivity of the Wi-Fi communications.
An RF feed line runs from the PØ module into a SPDT RF-switch. Logic level control lines on the PØ module select which of the two ports of the RF-switch is connected to the RF feed line. A 100pF decoupling capacitor is located on each control line. One port is connected to a PCB ceramic chip antenna, and the other is connected to a u.FL connector for external antenna adaptation. The default port will be set to the chip antenna.
Additionally, a user API is available to switch between internal, external and even an automatic mode which continuously switches between each antenna and selects the best signal. All three RF ports on the RF-switch have a 10pF RF quality DC-blocking capacitor in series with them. These effectively pass 2.4GHz frequencies freely while blocking unwanted DC voltages from damaging the RF-switch. All RF traces are considered as tiny transmission lines that have a controlled 50 ohm impedance.
The chip antenna is impedance matched to the 50 ohm RF feed line via a Pi network comprised of three RF inductors (1 series, 2 shunt). These values are quite specific to the Photon due to the PCB construction and layout of the RF section. Even if the Photon's layout design is copied exactly, to achieve the best performance it would be worth re-examining the Pi network values on actual samples of the PCB in question.
Périphériques et GPIO
The Photon has ton of capability in a small footprint, with analog, digital and communication interfaces.
| Type de périphérique | Quantité | Entrée/Input(I) - Sortie/Output(O) | FT[1] / 3V3[2] |
| Digital | 18 | I/O | FT/3V3 |
| Analog (ADC) | 8 | I | 3V3 |
| Analog (DAC) | 2 | O | 3V3 |
| SPI | 2 | I/O | 3V3 |
| I2S | 1 | I/O | 3V3 |
| I2C | 1 | I/O | FT |
| CAN | 1 | I/O | FT |
| USB | 1 | I/O | 3V3 |
| PWM | 93 | O | 3V3 |
Notes:
[1] FT = 5.0V tolerant pins. All pins except A3 and DAC are 5V tolerant (when not in analog mode). If used as a 5V input the pull-up/pull-down resistor must be disabled.
[2] 3V3 = 3.3V max pins.
[3] PWM is available on D0, D1, D2, D3, A4, A5, WKP, RX, TX with a caveat: PWM timer peripheral is duplicated on two pins (A5/D2) and (A4/D3) for 7 total independent PWM outputs. For example: PWM may be used on A5 while D2 is used as a GPIO, or D2 as a PWM while A5 is used as an analog input. However A5 and D2 cannot be used as independently controlled PWM outputs at the same time.
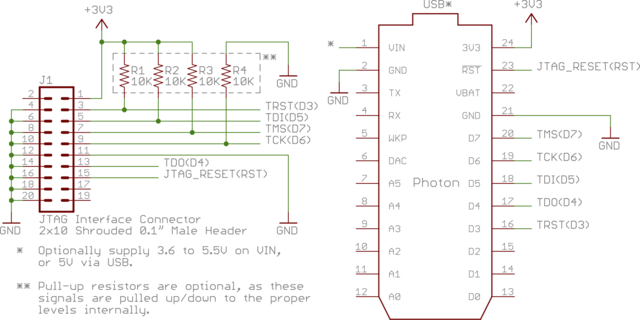
JTAG
| Photon Pin | Description | STM32 Pin | PØ Pin # | PØ Pin Name | Default Internal[1] |
| D7 | JTAG_TMS | PA13 | 44 | MICRO_JTAG_TMS | ~40k pull-up |
| D6 | JTAG_TCK | PA14 | 40 | MICRO_JTAG_TCK | ~40k pull-down |
| D5 | JTAG_TDI | PA15 | 43 | MICRO_JTAG_TDI | ~40k pull-up |
| D4 | JTAG_TDO | PB3 | 41 | MICRO_JTAG_TDO | Floating |
| D3 | JTAG_TRST | PB4 | 42 | MICRO_JTAG_TRSTN | ~40k pull-up |
| 3V3 | Power | ||||
| GND | Ground | ||||
| RST | Reset |
Notes:
[1] Default state after reset for a short period of time before these pins are restored to GPIO (if JTAG debugging is not required, i.e. USE_SWD_JTAG=y is not specified on the command line.
A standard 20-pin 0.1" shrouded male JTAG interface connector should be wired as follows:

Crédit: Particle.IO www.particle.io
Interface Externe Coexistante
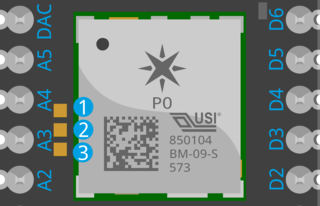
The Photon supports coexistence with Bluetooth and other external radios via the three gold pads on the top side of the PCB near pin A3. These pads are 0.035" square, spaced 0.049" apart. This spacing supports the possibility of tacking on a small 1.25mm - 1.27mm pitch 3-pin male header to make it somewhat easier to interface with.

Crédit: Particle.IO www.particle.io
When two radios occupying the same frequency band are used in the same system, such as Wi-Fi and Bluetooth, a coexistence interface can be used to coordinate transmit activity, to ensure optimal performance by arbitrating conflicts between the two radios.
| Pad # | PØ Pin Name | PØ Pin # | I/O | Description |
| 1 | BTCX_RF_ACTIVE | 9 | I | Signals Bluetooth is active |
| 2 | BTCX_STATUS | 10 | I | Signals Bluetooth priority status and TX/RX direction |
| 3 | BTCX_TXCONF | 11 | O |
When these pads are programmed to be used as a Bluetooth coexistence interface, they're set as high impedance on power up and reset. Alternatively, they can be individually programmed to be used as GPIOs through software control. They can also be programmed to have an internal pull-up or pull-down resistor.
Source: Particle Photon Hardware créé par Particle.IO.
Traduction réalisée par Meurisse D pour MCHobby.be - Translated by Meurisse D. for MCHobby.be
Traduit avec l'autorisation de Particle.IO - Translated with the permission from Particle.IO - Particle.IO
Toute référence, mention ou extrait de cette traduction doit être explicitement accompagné du texte suivant : « Traduction par MCHobby (www.MCHobby.be) - Vente de kit et composants » avec un lien vers la source (donc cette page) et ce quelque soit le média utilisé.
L'utilisation commercial de la traduction (texte) et/ou réalisation, même partielle, pourrait être soumis à redevance. Dans tous les cas de figures, vous devez également obtenir l'accord du(des) détenteur initial des droits. Celui de MC Hobby s'arrêtant au travail de traduction proprement dit.
