ENG-CANSAT-TMP36
About the TMP36 Sensor
The TMP36 is the reference analogue temperature sensor in the Arduino world. It is affordable, small et power efficient. For sure there are better temperature sensors but this one will do the job for almost nothing :-)
This sensor is very common and easy to use. It is also one of the components of the ARDX development kit.
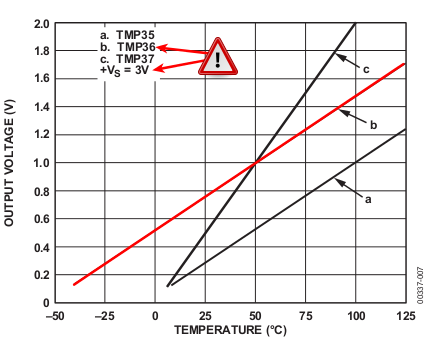
With the TMP36, it is possible to measure a temperature from -50°C to 125°C, the output voltage is proportional to the temperature.
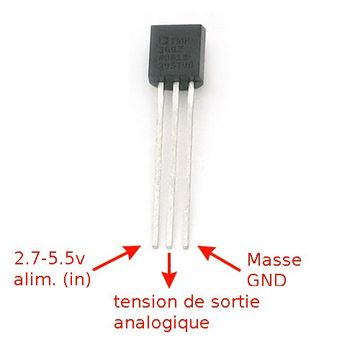
Don't be fooled, the TMP36 looks like a transistor (eg: P2N2222AG) but it isn't a transistor. It is a complex sensor within a package identical to a transistor.
There are 3 pins on the TMP36.
- the ground (on the left),
- the output signal (center position),
- the +5 volts (on the right)
The sensor output signal does output 10 millivolts per degree (with 500mV offset for temperature under 0°C).
Eg:
- 25° C --> output = 750 mV
- 0° C --> output = 500mV
Technical detail
- Analog output (see graphics)
- Temperature range: from -50°C to 125°C
- Power supply range: 2.7 to 5.5v
- TMP36 datasheet (analog.com, html)
How to measure the temperature
It will be necessary to convert the analogue voltage intro degree. As the TMP36 can also measure negative temperature, the 0 degree Celcius is placed at 500 mV offset. So, any voltage under 0.5 Volt is a negative temperature.
Here is the formula to use with a TMP36 powered at 3.3v:
Temp in °C = ( output_voltage_in_mV - 500) / 10
So, if we do have an output voltage of exactly 1 Volt (1000 mV) then the temperature would be
temp = (1000 - 500)/10
So 50 Celcius degrees.
Wiring
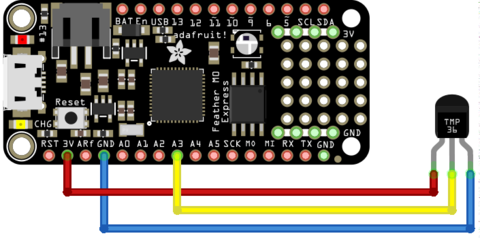
To use the TMP36, connect:
- The pin 1 (on the left) to a power source (3.3V),
- The pin 3 (the the right droite) to the ground/GND.
- The pin 2 (middle one) to the A3 analogue input.
The TMP36 output voltage would range from 0V @ -50°C to 1.75V @ 125°C. So no risk for our 3V based microcontroler.
Testing the sensor
In the both case, the measured would be identical.
However, by default, the Arduino's analogRead() use a 10 bit coding. So the range of possible value return by analogRead() is 0 to 1024 (for 0 to 3.3v). This means that the accuracy of reading is 3.3 / 1024 = 0.0032 Volts, so 3.2 mV.
As the M0 does have an ADC (Analog-to-Digital Converter) with a precision of 12 bits, we could also use the analogReadResolution( 12 ) to upgrade the analogRead() resolution to 12 bits. In such case, the range of possible value return by analogRead() is 0 to 4095 (for 0 to 3.3v). As we have a real 12bit ADC, we can rely on that accuracy (it is not a 10 bits ADC storing the data into a 12 bits integer). with 12bits we have an reading accuracy of 3.3 / 4095 = 0.000805 Volts, so 0.805 mV.
Low resolution reading
// where is wired the TMP36
const int temperaturePin = A3; // analogue input

// Executed once when starting the microcontroler
void setup() {
   // start serial connexion with the computer
   Serial.begin(9600);
}

// Executed again and again
void loop() {
   // read the voltage of TMP36
   float voltage = getVoltage(temperaturePin);
   Serial.print( "Voltage : " );
   Serial.print( voltage );
   Serial.println( " Volts" );
   // convert voltage to temperature
   //   Degrees = (voltage - 500mV) multiplied by 100
   float temperature = (voltage - .5) *100;
   Serial.print( "Temperature: " );
   Serial.print(temperature);
   Serial.println( " °C" );
   Serial.println( " " );
   delay(1000); // wait 1 second
}

/*
 * getVoltage() - return the voltage of an analog pin
 */
float getVoltage(int pin){

   // Convert digital value between 0 & 4095 to
   //    voltage between 0 & 3.3 volts.
   //    (each unit equal 3.3 / 4095 = 0.805 millivolts)
   return (analogRead(pin) * .000805);
}
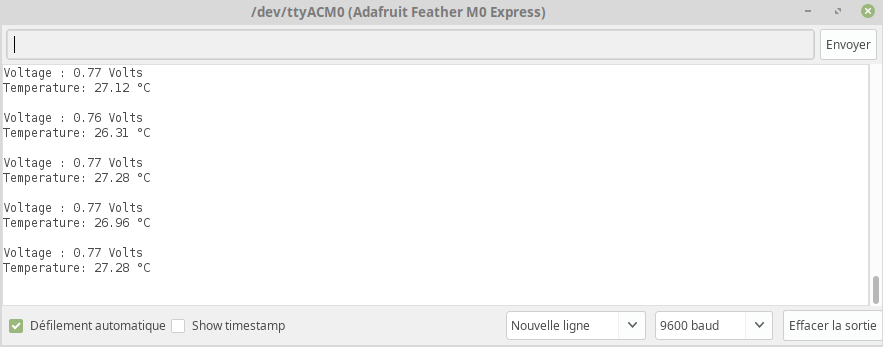
Once the sketch uploaded to the board, you can start the Serial Monitor
Which produce the following result on the Serial Monitor
Written by Meurisse D. from MC Hobby - License: CC-SA-BY.
High resolution reading
// where is wired the TMP36
const int temperaturePin = A3; // analogue input

// Executed once when starting the microcontroler
void setup() {
   // start serial connexion with the computer
   Serial.begin(9600);
   // Upgrade the ADC resolution from 10 to 12 bits.
   analogReadResolution( 12 );
}

// Executed again and again
void loop() {
   // read the voltage of TMP36
   float voltage = getVoltage(temperaturePin);
   Serial.print( "Voltage : " );
   Serial.print( voltage );
   Serial.println( " Volts" );
   // convert voltage to temperature
   //   Degrees = (voltage - 500mV) multiplied by 100
   float temperature = (voltage - .5) *100;
   Serial.print( "Temperature: " );
   Serial.print(temperature);
   Serial.println( " °C" );
   Serial.println( " " );
   delay(1000); // wait 1 second
}

/*
 * getVoltage() - return the voltage of an analog pin
 */
float getVoltage(int pin){
   // Convert digital value between 0 & 4095 to
   //    voltage between 0 & 3.3 volts.
   //    (each unit equal 3.3 / 4095 = 0.805 millivolts)
   return (analogRead(pin) * .000805);
}
Once the sketch uploaded to the board, you can start the Serial Monitor
Which produce the following result on the Serial Monitor
Written by Meurisse D. from MC Hobby - License: CC-SA-BY.


