Rasp-Hat-Moteur-Moteurs-pas-a-pas
Utiliser des moteurs pas-à-pas
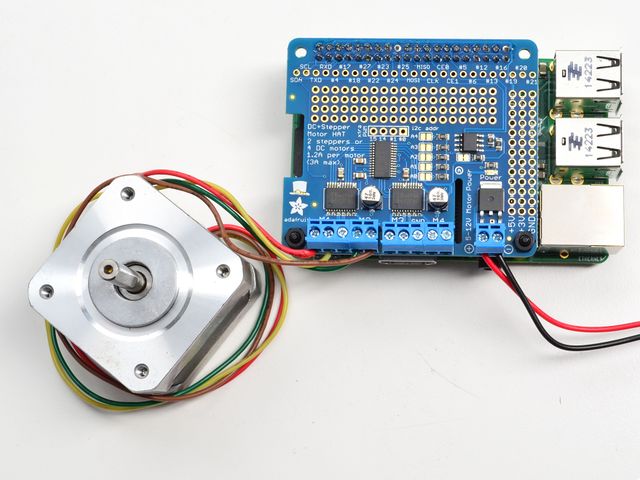
Les moteurs pas-à-pas sont vraiment géniaux pour un contrôle (semi-)précis. Ils sont parfait pour de nombreux robots, projets CNC et impression 3D. Ce HAT supporte jusqu'à 2 moteurs pas-à-pas. La bibliothèque Python fonctionne de manière identique pour les moteurs unipolaires et les moteurs bipolaires.
Faire tourner un moteur pas-à-pas est un peu plus complexe que de faire tourner un moteur continu même si cela reste encore très simple.

Crédit: AdaFruit Industries www.adafruit.com
Connecter des moteurs pas-à-pas
Pour cette démonstration, utilisé M1 et M2 pour connecter le moteur.
Après avoir raccordé le moteur (voir ci-dessous), rendez vous dans le répertoire Adafruit-Motor-HAT-Python/examples et exécutez la commande sudo python StepperTest.py pour voir le moteur pas-à-pas tourner dans un sens puis l'autre.
Pour les moteurs unipolaires
Pour connecter un moteur pas-à-pas, vous devez d'abord identifier quels sont les fils branchés sur les différentes bobines du moteur. Sur un moteur 6 fils, il faut identifier quels sont les fils correspondant à la connexion centrale de chaque bibine. Sur un moteur 5 fils, il faut identifier le fils qui est connecté sur les sur la connexion centrale des deux bobines. Il existe de nombreux tutoriels expliquant comment faire du "reverse ingeneering" du brochage des moteurs.
La/les connexion(s) centrale(s) des bobines doit/doivent être raccordés ensemble sur le bornier GND du bloc moteur. Ensuite, la bobine 1 devrait être connectée sur l'un des ports moteur, disons M1 et la bobine 2 connectée sur l'autre port, donc M2.
Il est bien entendu possible d'utiliser M3 et M4 à la place des port M1 + M2.
Pour les moteurs bipolaires
Les moteurs bipolaires n'ont pas de 5ieme fils à connecter à la masse. Le code fonctionne à l'identique.
S'il n'y a que 4 fils sur votre moteur pas-à-pas la bobine 1 devrait être connectée sur l'un des ports moteur, disons M1 et la bobine 2 connectée sur l'autre port, donc M2.
Il est bien entendu possible d'utiliser M3 et M4 à la place des ports M1 + M2.
Contrôler un moteur pas-à-pas
Nous allons réviser le contenu du code permettant de prendre le contrôle du moteur à l'aide de la bibliothèque MotorHAT.
Nous commençons par importer les éléments nécessaires pour qu'ils puissent être utilisé par notre script :
#!/usr/bin/python
from Adafruit_MotorHAT import Adafruit_MotorHAT, Adafruit_DCMotor, Adafruit_StepperMotor

import time
import atexit
La bibliothèque MotorHAT contient quelques classes, il y a la classe MotorHAT qui est le principal contrôleur du générateur PWM. Vous aurez toujours besoin de créer un objet et de fixer l'adresse. L'adresse par défaut est 0x60 (voyez la concernant l'empilement des HATs où il sera nécessaire de changer l'adresse).
# Créer l'objet par défaut, indiquer l'adresse I2C (celle par défaut), pas de changement de fréquence.
mh = Adafruit_MotorHAT(addr = 0x60)
Même si cet exemple n'utilise pas de moteur continu, il reste très important de mentionner que le contrôleur PWM fonctionne toujours de façon autonome. Cela signifie que même si le programme plante (ou si le module noyau crashe), le générateur PWM continue à générer un signal PWM.
Les moteurs pas-à-pas ne continuerons pas à bouger si le script plante mais il est fortement recommandé de garder la section de code at exit pour désactiver le générateur PWM:
# Il est recommandé de faire une auto-désactivation des moteurs
# lors de l'arrêt du programme!
def turnOffMotors():
        mh.getMotor(1).run(Adafruit_MotorHAT.RELEASE)
        mh.getMotor(2).run(Adafruit_MotorHAT.RELEASE)
        mh.getMotor(3).run(Adafruit_MotorHAT.RELEASE)
        mh.getMotor(4).run(Adafruit_MotorHAT.RELEASE)

atexit.register(turnOffMotors)
Créer un objet moteur pas-à-pas
OK now that you have the motor HAT object, note that each HAT can control up to 2 steppers. And you can have multiple HATs!
To create the actual Stepper motor object, you can request it from the MotorHAT object you created above with getStepper(steps, portnum) where steps is how many steps per rotation for the stepper motor (usually some number between 35 - 200) ith a value between 1 and 2. Port #1 is M1 and M2, port #2 is M3 and M4
myStepper = mh.getStepper(200, 1) # 200 steps/rev, motor port #1
Next, if you are planning to use the 'blocking' step() function to take multiple steps at once you can set the speed in RPM. If you end up using oneStep() then this step isn't necessary. Also, the speed is approximate as the Raspberry Pi can't do precision delays the way an Arduino would. Anyways, we wanted to keep the Arduino and Pi versions of this library similar so we kept setSpeed() in:
myStepper.setSpeed(30) # 30 RPM
Les pas
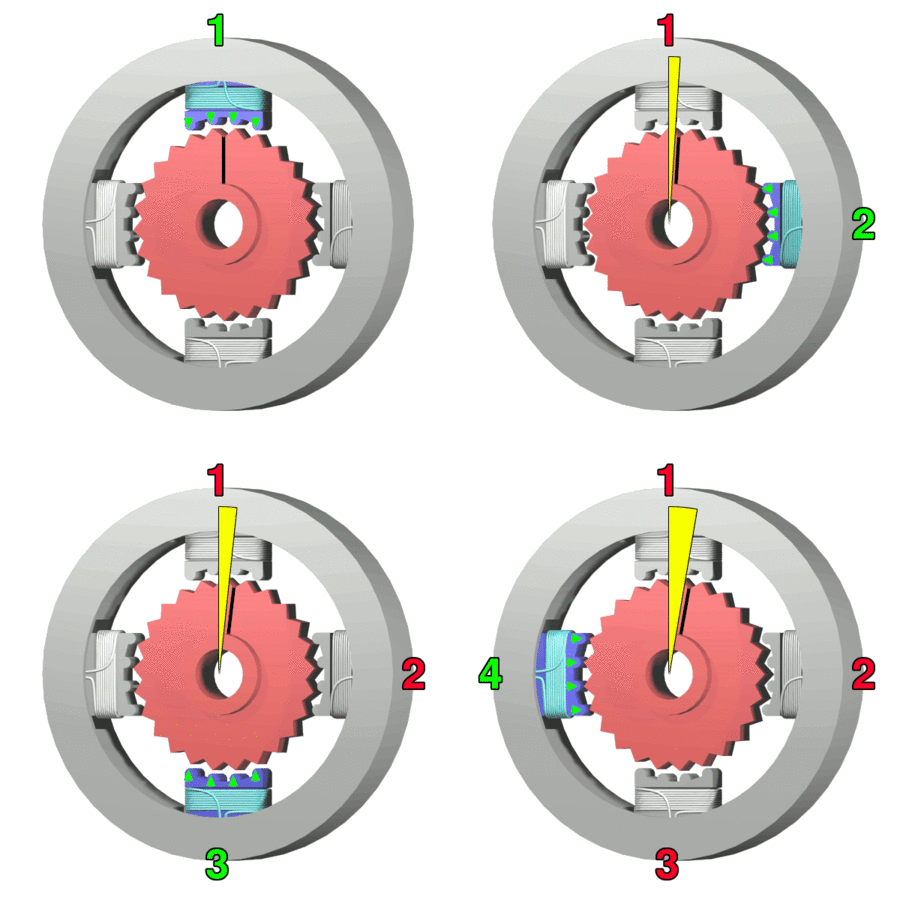
Stepper motors differ from DC motors in that the controller (in this case, Raspberry Pi) must tick each of the 4 coils in order to make the motor move. Each two 'ticks' is a step. By alternating the coils, the stepper motor will spin all the way around. If the coils are fired in the opposite order, it will spin the other way around.
If the python code or Pi crashes or stops responding, the motor will no longer move. Compare this to a DC motor which has a constant voltage across a single coil for movement.

"StepperMotor" par Wapcaplet; Teravolt.
There are four essential types of steps you can use with your Motor HAT. All four kinds will work with any unipolar or bipolar stepper motor
- Single Steps - this is the simplest type of stepping, and uses the least power. It uses a single coil to 'hold' the motor in place, as seen in the animated GIF above
- Double Steps - this is also fairly simple, except instead of a single coil, it has two coils on at once. For example, instead of just coil #1 on, you would have coil #1 and #2 on at once. This uses more power (approx 2x) but is stronger than single stepping (by maybe 25%)
- Interleaved Steps - this is a mix of Single and Double stepping, where we use single steps interleaved with double. It has a little more strength than single stepping, and about 50% more power. What's nice about this style is that it makes your motor appear to have 2x as many steps, for a smoother transition between steps
- Microstepping - this is where we use a mix of single stepping with PWM to slowly transition between steps. It's slower than single stepping but has much higher precision. We recommend 8 microstepping which multiplies the # of steps your stepper motor has by 8.
while (True):
	print("Single coil steps")
	myStepper.step(100, Adafruit_MotorHAT.FORWARD, Adafruit_MotorHAT.SINGLE)
	myStepper.step(100, Adafruit_MotorHAT.BACKWARD, Adafruit_MotorHAT.SINGLE)
	print("Double coil steps")
	myStepper.step(100, Adafruit_MotorHAT.FORWARD, Adafruit_MotorHAT.DOUBLE)
	myStepper.step(100, Adafruit_MotorHAT.BACKWARD, Adafruit_MotorHAT.DOUBLE)
	print("Interleaved coil steps")
	myStepper.step(100, Adafruit_MotorHAT.FORWARD, Adafruit_MotorHAT.INTERLEAVE)
	myStepper.step(100, Adafruit_MotorHAT.BACKWARD, Adafruit_MotorHAT.INTERLEAVE)
	print("Microsteps")
	myStepper.step(100, Adafruit_MotorHAT.FORWARD, Adafruit_MotorHAT.MICROSTEP)
	myStepper.step(100, Adafruit_MotorHAT.BACKWARD, Adafruit_MotorHAT.MICROSTEP)
step() - fonction bloquante
As you can see above, you can step mulitple steps at a time with step()
step(number_de_pas, direction, type)
Where nombre_de_pas is the number of steps to take, direction is either FORWARD or BACKWARD and type is SINGLE, DOUBLE, INTERLEAVE or MICROSTEP
| Note that INTERLEAVE will move half the distance of SINGLE or DOUBLE because there are twice as many steps. And MICROSTEP will move 1/8 the distance because each microstep counts as a step! |
This is the easiest way to move your stepper but is blocking - that means that the Python program is completely busy moving the motor. If you have two motors and you call these two procedures in a row:
stepper1.step(100, Adafruit_MotorHAT.FORWARD, Adafruit_MotorHAT.SINGLE)
stepper2.step(100, Adafruit_MotorHAT.BACKWARD, Adafruit_MotorHAT.SINGLE)
Then the first stepper will move 100 steps, stop, and then the second stepper will start moving.
Chances are you'd like to have your motors moving at once!
For that, you'll need to take advantage of Python's ability to multitask with threads which you can see in DualStepperTest.py
The key part of the DualStepperTest example code is that we define a function that will act as a 'wrapper' for the step() procedure:
      def stepper_worker(stepper, numsteps, direction, style):
	#print("Steppin!")
	stepper.step(numsteps, direction, style)
	#print("Done")
We have some commented-out print statements in case you want to do some debugging.
Then, whenever you want to make the first stepper move, you can call:
st1 = threading.Thread(target=stepper_worker, args=(myStepper1, numsteps, direction, stepping_style))
st1.start()
Which will spin up a background thread to move Stepper1 and will return immediately. You can then do the same with the second stepper:
st2 = threading.Thread(target=stepper_worker, args=(myStepper2, numsteps, direction, stepping_style))
st2.start()
You can tell when the stepper is done moving because the stepper thread you created will 'die' - test it with st2.isAlive() or st2.isAlive() - if you get True that means the stepper is still moving.
oneStep() - fonction non bloquante
OK lets say you want a lot of control over your steppers, you can use the one oneStep(direction, stepstyle) which will make a single step in the style you request, with no delay. This will let you step exactly when you like, for the most control
Source: Adafruit DC and Stepper Motor HAT for Raspberry Pi
Créé par LadyAda pour AdaFruit Industries.
Traduction réalisée par Meurisse D pour MCHobby.be.
Toute référence, mention ou extrait de cette traduction doit être explicitement accompagné du texte suivant : « Traduction par MCHobby (www.MCHobby.be) - Vente de kit et composants » avec un lien vers la source (donc cette page) et ce quelque soit le média utilisé.
L'utilisation commercial de la traduction (texte) et/ou réalisation, même partielle, pourrait être soumis à redevance. Dans tous les cas de figures, vous devez également obtenir l'accord du(des) détenteur initial des droits. Celui de MC Hobby s'arrêtant au travail de traduction proprement dit.
Traduit avec l'autorisation d'AdaFruit Industries - Translated with the permission from Adafruit Industries - www.adafruit.com
