Différences entre versions de « ENG-CANSAT-TMP36 »
| Ligne 56 : | Ligne 56 : | ||
== Testing the sensor == | == Testing the sensor == | ||
| + | In the both case, the measured would be identical. | ||
| + | However, by default, the Arduino's {{fname|analogRead()}} use a 10 bit coding. So the range of possible value return by {{fname|analogRead()}} is 0 to 1024 (for 0 to 3.3v). This means that the accuracy of reading is 3.3 / 1024 = 0.0032 Volts, so 3.2 mV. | ||
| + | |||
| + | As the M0 does have an Analog-to-digital converter with a precision of 12 bits, we could also use the {{fname|analogReadResolution( 12 )}} to upgrade the {{fname|analogRead()}} resolution to 12 bits. In such case, the range of possible value return by {{fname|analogRead()}} is 0 to 4095 (for 0 to 3.3v). This means that the accuracy of reading is 3.3 / 4095 = 0.000805 Volts, so 0.805 mV. | ||
| + | |||
| + | === Low resolution reading === | ||
| + | |||
| + | |||
| + | === High resolution reading === | ||
| + | |||
| + | /* --------------------------------------------- | ||
| + | * | Code d'exemple du kit d'expérimentation | ||
| + | * | Arduino | ||
| + | * | CIRC-10 .: Température :. | ||
| + | * --------------------------------------------- | ||
| + | * Un programme simple qui affiche la température | ||
| + | * actuelle dans la fenêtre de monitoring/débogage | ||
| + | */ | ||
| + | |||
| + | // Variable pour broche du TMP36 | ||
| + | const int temperaturePin = A3; // entrée analogique | ||
| + | // sur laquelle la broche Vout du TMP36 est | ||
| + | // connectée. La résolution est 10mv/degré | ||
| + | // centigrade avec 500 mV de décalage/offset | ||
| + | // pour permettre la lecture de température | ||
| + | // négative. | ||
| + | |||
| + | void setup() { | ||
| + | Serial.begin(9600); // Démarrer la connexion série avec l'ordinateur. | ||
| + | // Pour voir le le résultat, ouvrez le « moniteur série », le | ||
| + | // dernier bouton dans la barre d'outil. | ||
| + | // (celui qui ressemble à une boite ayant une antenne). | ||
| + | analogReadResolution( 12 ); | ||
| + | } | ||
| + | |||
| + | void loop() { // s'exécute encore et encore | ||
| + | // Acquérir la tension lue sur le senseur de température. | ||
| + | float voltage = getVoltage(temperaturePin); | ||
| + | Serial.print( "Voltage : " ); | ||
| + | Serial.print( voltage ); | ||
| + | Serial.println( " Volts" ); | ||
| + | // conversion de 10mV par degré avec un décalage (offset) de 500 mV. | ||
| + | // Degrés = ((tension - 500mV) fois 100) | ||
| + | float temperature = (voltage - .5) *100; | ||
| + | Serial.print( "Temperature: " ); | ||
| + | Serial.print(temperature); //affiche résultat | ||
| + | Serial.println( " °C" ); | ||
| + | Serial.println( " " ); | ||
| + | delay(1000); // Attendre une seconde. | ||
| + | } | ||
| + | |||
| + | /* | ||
| + | * getVoltage() - retourne la tension d'une entrée analogique identifiée par 'pin' | ||
| + | */ | ||
| + | float getVoltage(int pin){ | ||
| + | // Convertir valeur digital de 0 à 4095 vers une valeur entre 0 et 3.3 volts. | ||
| + | // (chaque unité lue vaut ~ 3.3 / 4095 = 0.805 millivolts | ||
| + | Serial.println( analogRead(pin) ); | ||
| + | return (analogRead(pin) * .000805); | ||
| + | } | ||
{{ENG-CANSAT-TRAILER}} | {{ENG-CANSAT-TRAILER}} | ||
Version du 3 octobre 2018 à 20:46
About the TMP36 Sensor
The TMP36 is the reference analogue temperature sensor in the Arduino world. It is affordable, small et power efficient. For sure there are better temperature sensors but this one will do the job for almost nothing :-)
This sensor is very common and easy to use. It is also one of the components of the ARDX development kit.
With the TMP36, it is possible to measure a temperature from -50°C to 125°C, the output voltage is proportional to the temperature.
Don't be fooled, the TMP36 looks like a transistor (eg: P2N2222AG) but it isn't a transistor. It is a complex sensor within a package identical to a transistor.
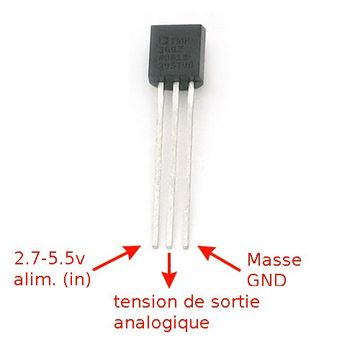
There are 3 pins on the TMP36.
- the ground (on the left),
- the output signal (center position),
- the +5 volts (on the right)
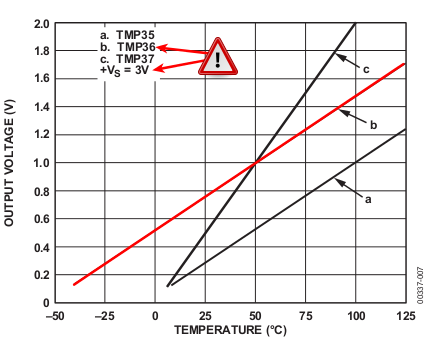
The sensor output signal does output 10 millivolts per degree (with 500mV offset for temperature under 0°C).
Eg:
- 25° C --> output = 750 mV
- 0° C --> output = 500mV
Technical detail
- Analog output (see graphics)
- Temperature range: from -50°C to 125°C
- Power supply range: 2.7 to 5.5v
- TMP36 datasheet (analog.com, html)
How to measure the temperature
It will be necessary to convert the analogue voltage intro degree. As the TMP36 can also measure negative temperature, the 0 degree Celcius is placed at 500 mV offset. So, any voltage under 0.5 Volt is a negative temperature.
Here is the formula to use with a TMP36 powered at 3.3v:
Temp in °C = ( output_voltage_in_mV - 500) / 10
So, if we do have an output voltage of exactly 1 Volt (1000 mV) then the temperature would be
temp = (1000 - 500)/10
So 50 Celcius degrees.
Wiring
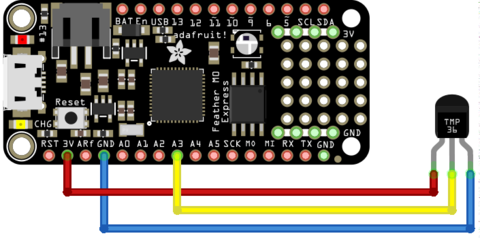
To use the TMP36, connect:
- The pin 1 (on the left) to a power source (3.3V),
- The pin 3 (the the right droite) to the ground/GND.
- The pin 2 (middle one) to the A3 analogue input.
The TMP36 output voltage would range from 0V @ -50°C to 1.75V @ 125°C. So no risk for our 3V based microcontroler.
Testing the sensor
In the both case, the measured would be identical.
However, by default, the Arduino's analogRead() use a 10 bit coding. So the range of possible value return by analogRead() is 0 to 1024 (for 0 to 3.3v). This means that the accuracy of reading is 3.3 / 1024 = 0.0032 Volts, so 3.2 mV.
As the M0 does have an Analog-to-digital converter with a precision of 12 bits, we could also use the analogReadResolution( 12 ) to upgrade the analogRead() resolution to 12 bits. In such case, the range of possible value return by analogRead() is 0 to 4095 (for 0 to 3.3v). This means that the accuracy of reading is 3.3 / 4095 = 0.000805 Volts, so 0.805 mV.
Low resolution reading
High resolution reading
/* ---------------------------------------------
* | Code d'exemple du kit d'expérimentation
* |    Arduino
* | CIRC-10 .: Température :.
* ---------------------------------------------
* Un programme simple qui affiche la température
* actuelle dans la fenêtre de monitoring/débogage
*/
// Variable pour broche du TMP36 const int temperaturePin = A3; // entrée analogique
  // sur laquelle la broche Vout du TMP36 est
  // connectée. La résolution est 10mv/degré
  // centigrade avec 500 mV de décalage/offset
  // pour permettre la lecture de température
  // négative.
void setup() {
  Serial.begin(9600); // Démarrer la connexion série avec l'ordinateur.
     // Pour voir le le résultat, ouvrez le « moniteur série », le
     // dernier bouton dans la barre d'outil.
     // (celui qui ressemble à une boite ayant une antenne).
  analogReadResolution( 12 );
}
void loop() { // s'exécute encore et encore
  // Acquérir la tension lue sur le senseur de température.
  float voltage = getVoltage(temperaturePin);
  Serial.print( "Voltage : " );
  Serial.print( voltage );
  Serial.println( " Volts" );
  // conversion de 10mV par degré avec un décalage (offset) de 500 mV.
  //   Degrés = ((tension - 500mV) fois 100)
  float temperature = (voltage - .5) *100;
  Serial.print( "Temperature: " );
  Serial.print(temperature); //affiche résultat
  Serial.println( " °C" );
  Serial.println( " " );
  delay(1000); // Attendre une seconde.
}
/*
* getVoltage() - retourne la tension d'une entrée analogique identifiée par 'pin'
*/
float getVoltage(int pin){
  // Convertir valeur digital de 0 à 4095 vers une valeur entre 0 et 3.3 volts.
  // (chaque unité lue vaut ~ 3.3 / 4095 = 0.805 millivolts
  Serial.println( analogRead(pin) );
  return (analogRead(pin) * .000805);
}
Written by Meurisse D. from MC Hobby - License: CC-SA-BY.


