MicroPython-Hack-first-script
|
|
En cours de traduction/élaboration. |
Introduction
Commençons par exécuter notre premier script sur la PyBoard. Après tout, c'est pour cela que vous avez acheté votre PyBoard!
Connecter le PyBoard
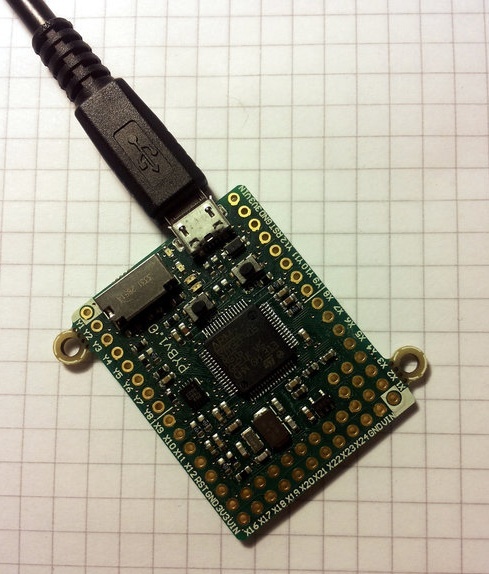
Connectez votre pyboard sur votre PC (Windows, Mac ou Linux) avec un câble Micro USB. Il n'y a qu'une seule façon de connecter le câble, vous ne pouvez donc pas faire d'erreur.

Crédit: MicroPython micropython.org
Lorsque la carte PyBoard est connectée sur votre PC elle est sous-tension et entame le processus de démarrage (la séquence de "boot"). La LED verte devrait l'éclairer pendant environ une demi-seconde puis s'éteindre, indiquant ainsi que processus de démarrage/boot est terminé.
Ouvrir le lecteur USB du PyBoard
Votre PC devrait maintenant reconnaître la PyBoard. Ce qui arrive ensuite dépend du type de PC surlequel vous avez connecté la carte:
- Windows: Votre pyboard appartit comme une lecteur Flash (removable USB flash drive). Windows pourrait faire apparaître automatiquement une fenêtre ou vous pourriez avoir besoin d'utiliser un explorateur de fichier.
Windows verra également la carte pyboard comme un périphérique série et va essayé de le configurer automatiquement. Si c'est la cas, vous pouvez abandonner le processus, nous ferons en sorte de faire fonctionner le périphérique série dans un prochain tutoriel. - Mac: La carte pyboard sera affichée comme un disque (removable disc) sur le bureau. Il sera probablement appelé "NONAME". Cliquer dessus pour ouvrir le répertoire sur le pyboard.
- Linux: Votre PyBoard apparaîtra comme un média ejectable (removable medium). Sur Ubuntu, ce média est monté automatiquement et une fenêtr de navigation de fichier est automatiquement ouverte. Sur les autres distributions Linux pourrait être monté automatiquement... si ce n'était pas le cas, vous devrez monter le média manuellement. Dans un terminal en ligne de commande, tapez la commande lsblk pour voir la liste des lecteurs connectés et ensuite mount /dev/sdb1 xxxxxxxxxxxxxxxxxxx (replace sdb1 with the appropriate device). You may need to be root to do this.
Okay, so you should now have the pyboard connected as a USB flash drive, and a window (or command line) should be showing the files on the pyboard drive.
The drive you are looking at is known as /flash by the pyboard, and should contain the following 4 files:
- boot.py - this script is executed when the pyboard boots up. It sets
up various configuration options for the pyboard. - main.py - this is the main script that will contain your Python program.
It is executed after boot.py. - README.txt - this contains some very basic information about getting started with the pyboard.
- pybcdc.inf - this is a Windows driver file to configure the serial USB device. More about this in the next tutorial.
Editer main.py
Now we are going to write our Python program, so open the main.py file in a text editor. On Windows you can use notepad, or any other editor. On Mac and Linux, use your favourite text editor. With the file open you will see it contains 1 line:
# main.py -- put your code here! (Placez votre code ici!)
This line starts with a # character, which means that it is a comment. Such lines will not do anything, and are there for you to write notes about your program.
Let’s add 2 lines to this main.py file, to make it look like this:
# main.py -- put your code here!
import pyb
pyb.LED(4).on()
The first line we wrote says that we want to use the pyb module. This module contains all the functions and classes to control the features of the pyboard.
The second line that we wrote turns the blue LED on: it first gets the LED class from the pyb module, creates LED number 4 (the blue LED), and then turns it on.
Réinitialiser la carte PyBoard
To run this little script, you need to first save and close the main.py file, and then eject (or unmount) the pyboard USB drive. Do this like you would a normal USB flash drive.
When the drive is safely ejected/unmounted you can get to the fun part: press the RST switch on the pyboard to reset and run your script. The RST switch is the small black button just below the USB connector on the board, on the right edge.
When you press RST the green LED will flash quickly, and then the blue LED should turn on and stay on.
Congratulations! You have written and run your very first Micro Python program!
Source: Running your first script écrit par/written by Damien P.George
Traduit par Meurisse D. pour MCHobby.be - Translated by Meurisse D. for MCHobby.be
Traduit avec l'autorisation de micropython.org - Translated with the authorisation of micropython.org
Toute référence, mention ou extrait de cette traduction doit être explicitement accompagné du texte suivant : « Traduction par MCHobby (www.MCHobby.be) - Vente de kit et composants » avec un lien vers la source (donc cette page) et ce quelque soit le média utilisé.
L'utilisation commercial de la traduction (texte) et/ou réalisation, même partielle, pourrait être soumis à redevance. Dans tous les cas de figures, vous devez également obtenir l'accord du(des) détenteur initial des droits. Celui de MC Hobby s'arrêtant au travail de traduction proprement dit.