Différences entre versions de « Pololu-Romi-32U4-Programmer-Arduino-IDE »
| Ligne 45 : | Ligne 45 : | ||
{{ambox-stop|text=The A-Star 32U4 boards are similar enough to the Arduino Leonardo that you do not actually have to install the add-on. If you want to, you can just select the “Arduino Leonardo” board in the Arduino IDE. Note that if you upload a sketch to the device this way, your computer will then recognize it as a Leonardo (for example, its entry in the Windows Device Manager will display “Arduino Leonardo”).}} | {{ambox-stop|text=The A-Star 32U4 boards are similar enough to the Arduino Leonardo that you do not actually have to install the add-on. If you want to, you can just select the “Arduino Leonardo” board in the Arduino IDE. Note that if you upload a sketch to the device this way, your computer will then recognize it as a Leonardo (for example, its entry in the Windows Device Manager will display “Arduino Leonardo”).}} | ||
| − | + | After you succeed in programming your device from the Arduino IDE, there are many resources you can use to learn more: | |
| + | * The Arduino IDE has [http://arduino.cc/en/Tutorial/HomePage many examples] that can run on A-Stars. | ||
| + | * The Arduino website has a [http://arduino.cc/en/Reference/HomePage Language Reference], a wiki called the [http://playground.arduino.cc/ The Arduino Playground], and other resources. | ||
| + | * The A-Star 32U4 boards are similar to the Arduino Leonardo and Arduino Micro, so you can search the Internet for relevant projects that use one of those boards. | ||
| + | * The Related Resources section lists many more resources. | ||
{{Pololu-Romi-32U4-TRAILER}} | {{Pololu-Romi-32U4-TRAILER}} | ||
Version du 16 novembre 2019 à 23:32
|
|
En cours de traduction/élaboration. |
Programmer en utilisant Arduino IDE
Our 32U4 family of boards can be programmed from the popular Arduino integrated development environment (IDE). The Arduino IDE is a cross-platform, open source application that integrates a C++ code editor, the GNU C++ compiler, and a program upload utility. To get started programming your device with the Arduino IDE (version 1.6.4 or later), follow these steps:
Download the Arduino IDE from the Arduino Download page, install it, and start it.
1. In the Arduino IDE, open the File menu (Windows/Linux) or the Arduino menu (macOS) and select “Preferences”.
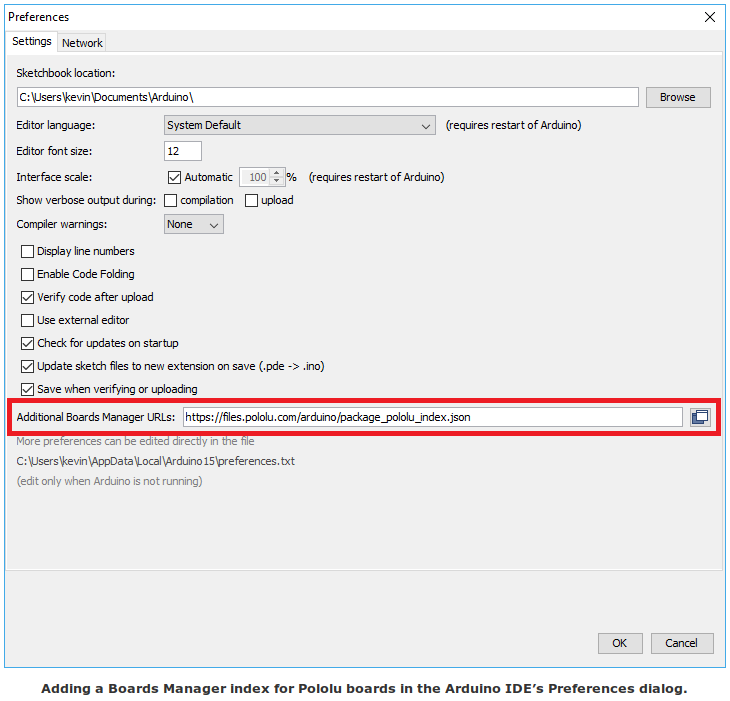
2. In the Preferences dialog, find the “Additional Boards Manager URLs” text box (highlighted in the picture below). Copy and paste the following URL into this box:
https://files.pololu.com/arduino/package_pololu_index.json
If there are already other URLs in the box, you can either add this one separated by a comma or click the button next to the box to open an input dialog where you can add the URL on a new line.
3. Click the “OK” button to close the Preferences dialog.
4. In the Tools > Board menu, select “Boards Manager…” (at the top of the menu).
5. In the Boards Manager dialog, search for “Pololu A-Star Boards”.
6. Select the “Pololu A-Star Boards” entry in the list, and click the “Install” button.
7. After the installation finishes, click the “Close” button to close the Boards Manager dialog.
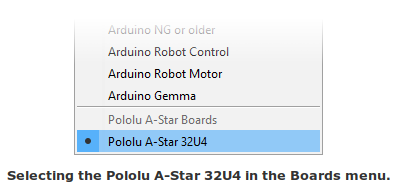
8. In the Tools > Board menu, select the “Pololu A-Star 32U4” entry. If you do not see your device listed in the Board menu, try restarting the Arduino IDE.
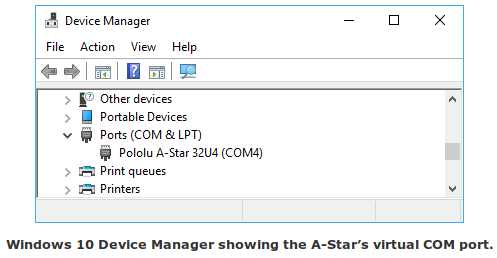
9. In the Tools > Port menu, select the port for the device. On Windows you can determine what COM port the device is assigned to by looking at the “Ports (COM & LPT)” section of the Device Manager. On Linux, the port name will begin with “/dev/ttyACM”. On Mac OS X, the port name will begin with “/dev/tty.usbmodem”.
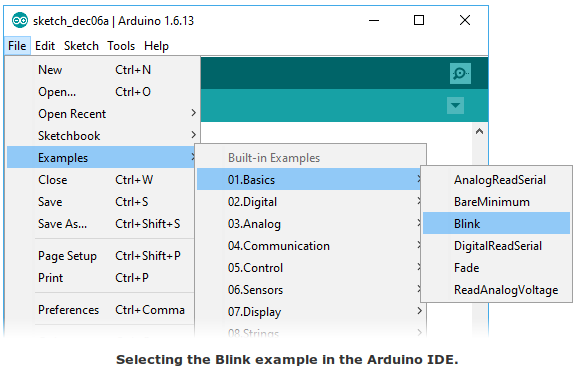
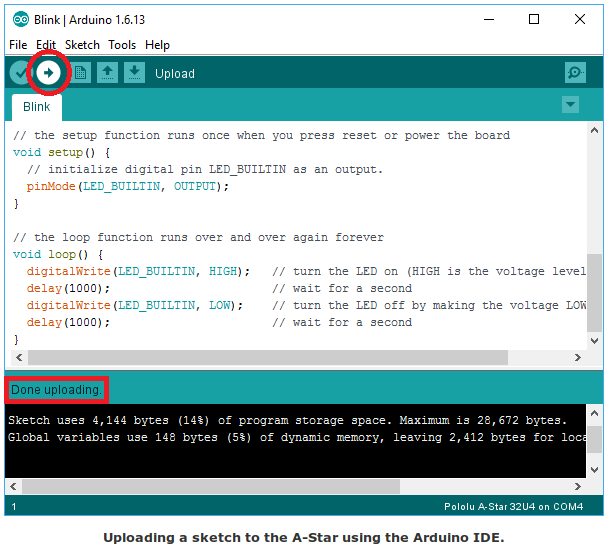
10. Open up the “Blink” Arduino example, which can be found under File > Examples > 01.Basics > Blink. The code in this example will blink the yellow LED. When you select the Blink example, a new Arduino IDE window will open up. It is OK to close the first window.
11. Press the “Upload” button to compile the sketch and upload it to the device. If everything goes correctly, you will see the message “Done uploading” appear near the bottom of the window. If you are using Windows and you have not previously programmed an A-Star device on this USB port, then Windows might take several seconds to recognize the A-Star bootloader. The bootloader times out after 8 seconds and goes back to running the sketch, so the upload might fail if Windows does not recognize it quickly enough. If this happens, try again. If you are using Windows XP and have not programmed an A-Star on this USB port, you will have to go through the Found New Hardware Wizard again as described in the previous section, but the second time you try to upload it should work. If the Arduino IDE has trouble connecting to the port or using it, try unplugging the device, closing any programs that might be using the serial port, restarting the Arduino IDE, and then plugging the device back in.
12. f you uploaded the Blink sketch, then the yellow LED should be blinking once every two seconds. However, we ship some A-Stars with that same example already programmed onto it, so you might not be convinced that anything has changed. Try changing the delay values in the sketch to something else and uploading again to see if you can change the speed of the LED.
| The A-Star 32U4 boards are similar enough to the Arduino Leonardo that you do not actually have to install the add-on. If you want to, you can just select the “Arduino Leonardo” board in the Arduino IDE. Note that if you upload a sketch to the device this way, your computer will then recognize it as a Leonardo (for example, its entry in the Windows Device Manager will display “Arduino Leonardo”). |
After you succeed in programming your device from the Arduino IDE, there are many resources you can use to learn more:
- The Arduino IDE has many examples that can run on A-Stars.
- The Arduino website has a Language Reference, a wiki called the The Arduino Playground, and other resources.
- The A-Star 32U4 boards are similar to the Arduino Leonardo and Arduino Micro, so you can search the Internet for relevant projects that use one of those boards.
- The Related Resources section lists many more resources.
Basé sur "Guide utilisateur de la carte de contrôle Romi 32U4" de Pololu (https://www.pololu.com/docs/0J69) - Traduit en Français par shop.mchobby.be CC-BY-SA pour la traduction
Toute copie doit contenir ce crédit, lien vers cette page et la section "crédit de traduction". Traduit avec l'autorisation expresse de Pololu (www.pololu.com)
Based on "Pololu Romi 32U4 Control Board User’s Guide" from Pololu (https://www.pololu.com/docs/0J69) - Translated to French by shop.mchobby.be CC-BY-SA for the translation
Copies must includes this credit, link to this page and the section "crédit de traduction" (translation credit). Translated with the Pololu's authorization (www.pololu.com)
