Rasp-Hat-Moteur-Alimenter
|
|
En cours de traduction/élaboration. |
Alimenter les moteurs
Les moteurs ont besoin de beaucoup d'énergie, plus particulièrement pour les moteurs bon marchés qui ont souvent un mauvais rendement.
Les besoins en tension
La première chose importante à connaître est la tension du moteur que vous allez utiliser. Certains petit moteurs hobbyistes fonctionnent uniquement à 1.5V mais la plupart des moteurs hobbyiste fonctionnent entre 6 et 12V. Le contrôleur moteurs présent sur le HAT est conçu pour des moteurs de 5V à 12V.
LA PLUPART DES MOTEURS 1.5-3V NE FONCTIONNERONS PAS ou seront endommagés lors d'une utilisation sous 5V.
Exigences en courant
The second thing to figure out is how much current your motor will need. The motor driver chips that come with the kit are designed to provide up to 1.2 A per motor, with 3A peak current. Note that once you head towards 2A you'll probably want to put a heat-sink on the motor driver, otherwise you will get thermal failure, possibly burning out the chip.
| You can't run motors off of a 9V battery so don't waste your time/batteries! |
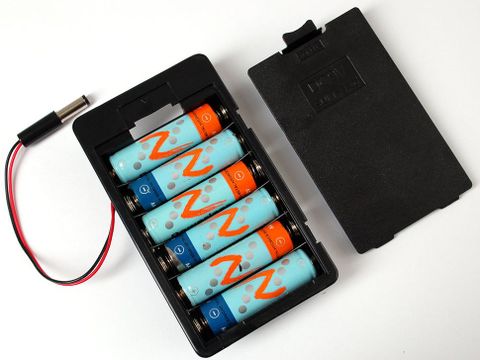
Honestly, for portable we recommend you use a big Lead Acid or multiple-AA NiMH battery pack - use 4 to 8 batteries to vary the voltage from about 6V to 12V as your motors require

Crédit: AdaFruit Industries www.adafruit.com
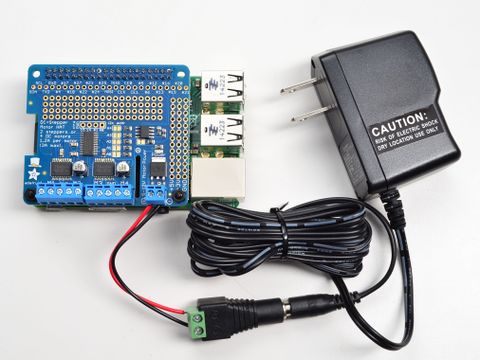
If you don't have to take your project on the go, a 9V 1A, 12V 1A, or 12V 5A will work nicely.
99% of 'weird motor problems' are due to having a voltage mismatch (too low a voltage, too high a voltage) or not having a powerful enough supply! Even small DC motors can draw up to 3 Amps when they stall.

Crédit: AdaFruit Industries www.adafruit.com
Alimenter la carte
Wire up your battery pack to the Power terminal block on the right side of the HAT. It is polarity protected but still its a good idea to check your wire polarity. Once the HAT has the correct polarity, you'll see the green LED light up
Please note the HAT does not power the Raspberry Pi, and we strongly recommend having two seperate power supplies - one for the Pi and one for the motors, as motors can put a lot of noise onto a power supply and it could cause stability problems!
Source: Adafruit DC and Stepper Motor HAT for Raspberry Pi
Créé par LadyAda pour AdaFruit Industries.
Traduction réalisée par Meurisse D pour MCHobby.be.
Toute référence, mention ou extrait de cette traduction doit être explicitement accompagné du texte suivant : « Traduction par MCHobby (www.MCHobby.be) - Vente de kit et composants » avec un lien vers la source (donc cette page) et ce quelque soit le média utilisé.
L'utilisation commercial de la traduction (texte) et/ou réalisation, même partielle, pourrait être soumis à redevance. Dans tous les cas de figures, vous devez également obtenir l'accord du(des) détenteur initial des droits. Celui de MC Hobby s'arrêtant au travail de traduction proprement dit.
Traduit avec l'autorisation d'AdaFruit Industries - Translated with the permission from Adafruit Industries - www.adafruit.com