Différences entre versions de « Rasp-Hat-Moteur-Empiler-les-Hats »
| Ligne 4 : | Ligne 4 : | ||
{{ADFImage|Rasp-Hat-Moteur-Empiler-les-Hats-00.jpg|640px}} | {{ADFImage|Rasp-Hat-Moteur-Empiler-les-Hats-00.jpg|640px}} | ||
| + | |||
| + | One of the cool things about this HAT design is that it is possible to stack them. Every HAT you stack can control another 2 steppers or 4 DC motors (or a mix of the two) | ||
| + | |||
| + | You can stack up to 32 HAT for a total of 64 steppers or 128 DC motors! Most people will probably just stack two or maybe three but hey, you never know. (PS if you drive 64 steppers from one Raspberry Pi send us a photo, OK?) | ||
| + | |||
| + | {{pl|580|If you need to control a bunch of servos as well, you can use our 16-channel servo HAT and stack it with this HAT to add a crazy large # of servos.}} | ||
| + | |||
| + | Stacking HATs is very easy. {{pl|485|Each HAT you want to stack on top of must have stacking headers installed}}. The top HAT does not have to have stacking headers unless you eventually want to put something on top of it. | ||
| + | |||
| + | The only thing to watch for when stacking HATs is every HAT must have a unique I2C address. The default address is '''0x60'''. You can adjust the address of the motor HATs to range from 0x60 to 0x80 for a total of 32 unique addresses. | ||
| + | |||
| + | == Donner des adresses aux HATs == | ||
| + | Each board in the stack must be assigned a unique address. This is done with the address jumpers on the left side of the board. The I2C base address for each board is 0x60. The binary address that you program with the address jumpers is added to the base I2C address. | ||
| + | |||
| + | To program the address offset, use a drop of solder to bridge the corresponding address jumper for each binary '1' in the address. | ||
| + | |||
| + | The bottom-most jumper is address bit #0, then the one above of that is address bit #1, etc up to address bit #5 | ||
| + | |||
| + | {{ADFImage|Rasp-Hat-Moteur-Empiler-les-Hats-01.jpg|640px}} | ||
| + | |||
| + | Board 0: Address = 0x60 Offset = binary 0000 (no jumpers required) | ||
| + | Board 1: Address = 0x61 Offset = binary 0001 (bridge A0) | ||
| + | Board 2: Address = 0x62 Offset = binary 0010 (bridge A1, the one above A0) | ||
| + | Board 3: Address = 0x63 Offset = binary 0011 (bridge A0 & A1, two bottom jumpers) | ||
| + | Board 4: Address = 0x64 Offset = binary 0100 (bridge A2, middle jumper) | ||
| + | |||
| + | etc. | ||
| + | |||
| + | {{ambox-stop|text= Note that address 0x70 is the "all call" address for the controller chip on the HAT. All boards will respond to address 0x70 - regardless of the address jumper settings.}} | ||
| + | |||
| + | == Empiler (le code) == | ||
| + | We have an example in our Python library called StackingTest.py | ||
| + | |||
| + | The key part is to create two MotorHAT objects: | ||
| + | |||
| + | <syntaxhighlight lang="python"> | ||
| + | # bottom hat is default address 0x60 | ||
| + | bottomhat = Adafruit_MotorHAT(addr=0x60) | ||
| + | # top hat has A0 jumper closed, so its address 0x61 | ||
| + | tophat = Adafruit_MotorHAT(addr=0x61) | ||
| + | </syntaxhighlight> | ||
| + | |||
| + | then use other of those for getting motors. We recommend using threading for control of the steppers to make them turn together | ||
{{Rasp-Hat-Moteur-TRAILER}} | {{Rasp-Hat-Moteur-TRAILER}} | ||
Version du 31 août 2017 à 14:32
|
|
En cours de traduction/élaboration. |

Crédit: AdaFruit Industries www.adafruit.com
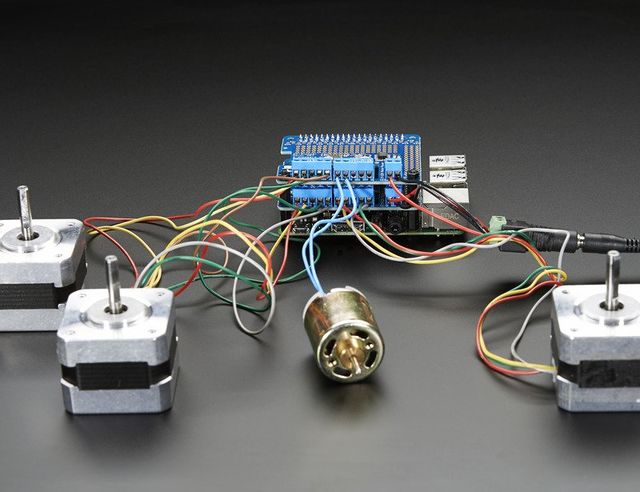
One of the cool things about this HAT design is that it is possible to stack them. Every HAT you stack can control another 2 steppers or 4 DC motors (or a mix of the two)
You can stack up to 32 HAT for a total of 64 steppers or 128 DC motors! Most people will probably just stack two or maybe three but hey, you never know. (PS if you drive 64 steppers from one Raspberry Pi send us a photo, OK?)
Stacking HATs is very easy. Each HAT you want to stack on top of must have stacking headers installed. The top HAT does not have to have stacking headers unless you eventually want to put something on top of it.
The only thing to watch for when stacking HATs is every HAT must have a unique I2C address. The default address is 0x60. You can adjust the address of the motor HATs to range from 0x60 to 0x80 for a total of 32 unique addresses.
Donner des adresses aux HATs
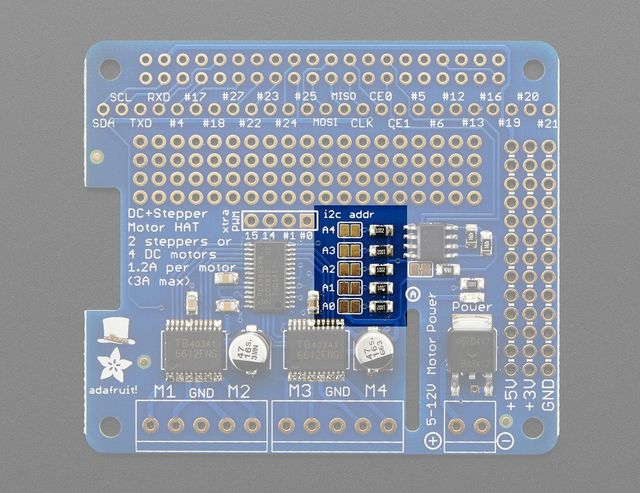
Each board in the stack must be assigned a unique address. This is done with the address jumpers on the left side of the board. The I2C base address for each board is 0x60. The binary address that you program with the address jumpers is added to the base I2C address.
To program the address offset, use a drop of solder to bridge the corresponding address jumper for each binary '1' in the address.
The bottom-most jumper is address bit #0, then the one above of that is address bit #1, etc up to address bit #5

Crédit: AdaFruit Industries www.adafruit.com
Board 0: Address = 0x60 Offset = binary 0000 (no jumpers required) Board 1: Address = 0x61 Offset = binary 0001 (bridge A0) Board 2: Address = 0x62 Offset = binary 0010 (bridge A1, the one above A0) Board 3: Address = 0x63 Offset = binary 0011 (bridge A0 & A1, two bottom jumpers) Board 4: Address = 0x64 Offset = binary 0100 (bridge A2, middle jumper)
etc.
| Note that address 0x70 is the "all call" address for the controller chip on the HAT. All boards will respond to address 0x70 - regardless of the address jumper settings. |
Empiler (le code)
We have an example in our Python library called StackingTest.py
The key part is to create two MotorHAT objects:
# bottom hat is default address 0x60
bottomhat = Adafruit_MotorHAT(addr=0x60)
# top hat has A0 jumper closed, so its address 0x61
tophat = Adafruit_MotorHAT(addr=0x61)
then use other of those for getting motors. We recommend using threading for control of the steppers to make them turn together
Source: Adafruit DC and Stepper Motor HAT for Raspberry Pi
Créé par LadyAda pour AdaFruit Industries.
Traduction réalisée par Meurisse D pour MCHobby.be.
Toute référence, mention ou extrait de cette traduction doit être explicitement accompagné du texte suivant : « Traduction par MCHobby (www.MCHobby.be) - Vente de kit et composants » avec un lien vers la source (donc cette page) et ce quelque soit le média utilisé.
L'utilisation commercial de la traduction (texte) et/ou réalisation, même partielle, pourrait être soumis à redevance. Dans tous les cas de figures, vous devez également obtenir l'accord du(des) détenteur initial des droits. Celui de MC Hobby s'arrêtant au travail de traduction proprement dit.
Traduit avec l'autorisation d'AdaFruit Industries - Translated with the permission from Adafruit Industries - www.adafruit.com