Différences entre versions de « Spark.IO-Connect »
| Ligne 48 : | Ligne 48 : | ||
If you are connecting multiple Cores, you'll go through this naming process for each Core. You'll know which one is which by the rainbow signal. | If you are connecting multiple Cores, you'll go through this naming process for each Core. You'll know which one is which by the rainbow signal. | ||
| − | {{Spark-Vine|Spark.IO-Connect-14.jpg|Le Core | + | {{Spark-Vine|Spark.IO-Connect-14.jpg|Le Core affichant un "Arc-En-Ciel" de couleur est celui à qui vous donnez un nom|https://vine.co/v/hFdPKul226i}} |
Version du 18 novembre 2014 à 22:09
La source
Ce document est issus des informations provenant de la page Connect sur Spark.IO (Spark, Anglais)
Connecter votre Core
|
|
En cours de traduction/élaboration. |
The easiest way to connect the Spark Core to Wi-Fi is using the Spark mobile app for iPhone or Android. But in case that's not working for you or you don't have an iOS/Android phone, there are other methods as well.
For all of the following methods, the Spark Core must be in Listening Mode, which you'll know by its flashing blue LED.
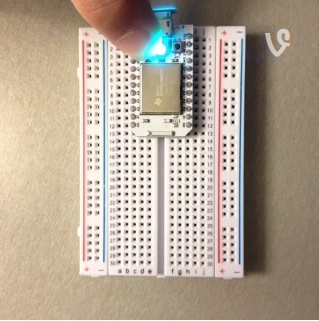
Mode "recherche des identification WiFi" (Listening for WiFi Credentials) Accès direct à la vidéo sur Vine
Listening mode
|
|
En cours de traduction/élaboration. |
The Core boots into listening mode by default, so if your Core is brand new, it should go straight into listening mode. Otherwise, hold the MODE button for three seconds. The RGB LED will be flashing blue in this mode. To completely clear all stored Wi-Fi credentials, continue to hold the MODE button for 10 seconds until the RGB LED flashes blue quickly, signaling that all profiles have been deleted. The RGB LED should now be flashing blue again.
Configuration intelligente
Configuration intelligente avec l'application Spark.
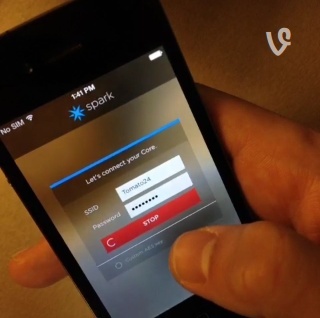
Once you've downloaded the Spark Core app from the App Store or Google Play, you should create an account. Afterwards, you'll be asked to connect your Core using a process called Smart Config. If your Core has a u.FL connector, you must connect an external antenna before initiating Smart Config.
NOTE: Your phone must be connected to the Wi-Fi network that you want to connect the Core to. Wi-Fi Hotspots generated from the phone you are running this app on typically will yield an error claiming there is no Wi-Fi available. Please try to Connect over USB and enter your Hotspot credentials manually.
When connected to Wi-Fi, the app will automatically fill the SSID field with the name of the network that your phone is connected to. Enter your Wi-Fi password and hit connect.
|
|
En cours de traduction/élaboration. |
NOTE: In places like a conference or workshop where multiple cores are connected, Smart Config is not preferred. Claiming a Core over USB will prevent confusion with accidentally claiming of another Core.
Smart Config can take up to a minute, so be patient. The closer your phone to your Spark Core, the faster it will connect. Once the Core hears the signal, it will go through the following sequence of lights:
- Solid blue: Credentials captured
- Flashing green: Connecting to Wi-Fi network
- Flashing cyan: Connecting to Spark Cloud
- Breathing cyan: Connected to Spark Cloud
Once the Spark Core has connected, your phone will "claim" the Core and attach it to your account. Then you'll get to name your Core. If you're uncertain, you can confirm that the claim process was successful by logging into the Spark Web IDE and clicking the "Cores" icon at the bottom of the page. Is your Core listed? Great! The world is perfect.
NOTE: The Core MUST be online (breathing cyan) in order for the claiming process to work. If the Spark Core has been claimed by someone else, the app won't recognize it. If you need to transfer a Spark Core to another account, email us at hello@spark.io.
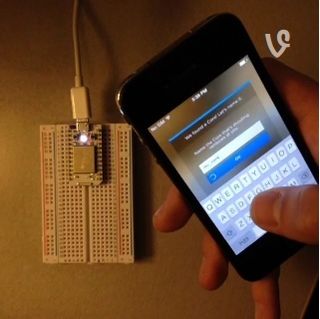
If you are connecting multiple Cores, you'll go through this naming process for each Core. You'll know which one is which by the rainbow signal.
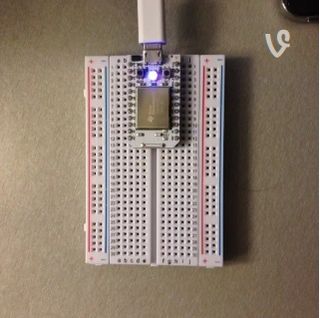
Le Core affichant un "Arc-En-Ciel" de couleur est celui à qui vous donnez un nom Accès direct à la vidéo sur Vine
XXXXXXXX A POURSUIVRE XXXXXXXX
connexion via USB
|
|
En cours de traduction/élaboration. |
Déclarer votre core
Connu sous l'appellation "Claiming your core".
Une fois votre Core connecté, il a besoin de se déclarer (claimed) de façon à être associé à votre compte Spark. C'est ce qui vous permet de contrôler votre Core et empêcher quiconque d'autre d'en prendre le contrôle.
Si vous utilisez l'application mobile pour initialiser votre Core, cette phase de déclaration doit normalement être réalisée automatiquement. Cependant, si vous vous connectez sur votre Core via USB, ou si le processus de déclaration échoue, vous pouvez effectuer cette déclaration manuellement.
La façon la plus simple de déclarer manuellement votre Core via USB est d'utiliser l'Interface en ligne de commande de Spark (nommé CLI pour Command Line Interface). Une fois installé, vous pouvez simplement taper spark setup et suivre les instructions.
Comme alternative, si vous avez des problèmes pour installer l'outil d'interface en ligne de commande, vous pouvez obtenir le Core ID par l'intermédiaire de la connexion série et le déclarer via Spark Build.
Vous pouvez realiser cela en ouvrant une connection série sur le Core puis en pressant la touche i (voyez les instructions ci-dessus pour vous connecter via USB). Cela devrait afficher un nombre similaire à ceci:

Crédit: Particle.IO www.particle.io
# Exemple de "Core ID" (Identification d'un Spark Core)
55ff68064989495329092587
Ouvrez ensuite le Spark Build et cliquez sur l'icone 'Cores'. Cliquez sur le bouton qui indique 'Add a Core' (ajouter un Core) et encodez ensuite votre identification (ID) dans la zone d'encodage.
Annexes
|
|
En cours de traduction/élaboration. |
Source: Particle Core Hardware créé par Particle.IO.
Traduction réalisée par Meurisse D pour MCHobby.be - Translated by Meurisse D. for MCHobby.be
Traduit avec l'autorisation de Spark.IO - Translated with the permission from Particle.IO - Particle.IO
Toute référence, mention ou extrait de cette traduction doit être explicitement accompagné du texte suivant : « Traduction par MCHobby (www.MCHobby.be) - Vente de kit et composants » avec un lien vers la source (donc cette page) et ce quelque soit le média utilisé.
L'utilisation commercial de la traduction (texte) et/ou réalisation, même partielle, pourrait être soumis à redevance. Dans tous les cas de figures, vous devez également obtenir l'accord du(des) détenteur initial des droits. Celui de MC Hobby s'arrêtant au travail de traduction proprement dit.