Différences entre versions de « ENG-CANSAT-PICO-THONNY »
| Ligne 66 : | Ligne 66 : | ||
* A Shell interface (at the bottom) used to quickly test Python code. | * A Shell interface (at the bottom) used to quickly test Python code. | ||
| + | === Thonny and MicroPython === | ||
| + | |||
| + | By default, Thonny use the computer's Python interpreter in the "Shell" section. | ||
| + | |||
| + | So to work with a MicroPython board, the user must inform Thonny to use the appropriate shell. | ||
| + | |||
| + | For instance the REPL shell exposed by the MicroPython microcontroler on its serial interface. | ||
| + | |||
| + | [[Fichier:ENG-CANSAT-PICO-THONNY-01.png|480px]] | ||
| + | |||
| + | Just click and the shell selection popup at the bottom-right corner of the screen and select the "MicroPython" entry attached to the MicroPython board. | ||
| + | |||
{{ENG-CANSAT-PICO-TRAILER}} | {{ENG-CANSAT-PICO-TRAILER}} | ||
Version du 19 février 2022 à 01:08
Abstract
There is no need for a specific development environment to work with a MicroPython plateforms.
A simple text editor is quite enough to write python scripts.
Command line utility like mpremote can be used to copy/run python scripts on the board.
Thonny editor
By the way, a enhanced tool like Thonny IDE can definitively improve the user experience and interaction with the Pico.
Thonny is multi-plateform editor running on Linux, Windows, Mac.
The beauty about Thonny Python Script editor is that Thonny is written in Python.
Thonny IDE is a great python script editor can also be used with MicroPython Microcontrolers:
- Raspberry-Pi Pico
- RP2040 base MicroPython board (like PYBStick RP2040 or MicroMod-RP2040, etc)
- ESP32 under MicroPython
- ESP8266 under MicroPython
- etc
Thonny offers great features for MicroPython microconroler:
- transfer script to MicroPython microcontroler.
- manage files on the MicroPython microcontroler.
- run script against MicroPython microcontroler.
- using the micropython interactive command line (named REPL)
- generating graphical data (an awesome feature)
Install Thonny IDE
| It is important to have a recent version of thonny and plug-ins to use it with MicroPython boards. |
Thonny website contains the required instruction to install Thonny IDE.
On Raspberry-Pi
Just open a terminal and execute the following command line:
$ sudo apt update && sudo apt upgrade -y
This will upgrade the operating system and install the latest version of Thonny IDE.
On Linux
Python3 is available on almost every Linux operating system. So Thonny (which is written in Python) is installed with the pip3 Python Install Package software.
$ pip3 install thonny
Windows & Mac
Refer to the official Thonny.org documentation.
Working with Thonny
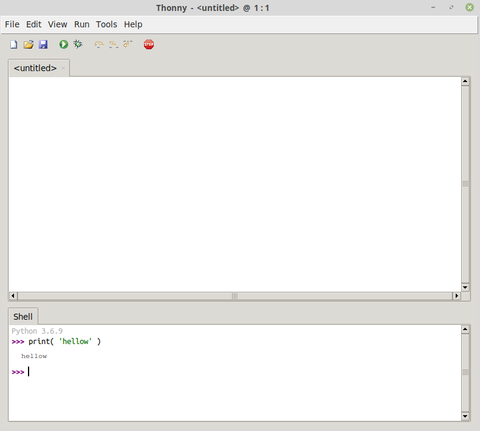
The Thonny environment look very sober at first sight.
Don't be fooled by this simplicity, Thonny do have everything you need under the hood.
From top to bottom:
- The Menubar,
- The Toolbar (with icones),
- Text/code editor is the main part
- A Shell interface (at the bottom) used to quickly test Python code.
Thonny and MicroPython
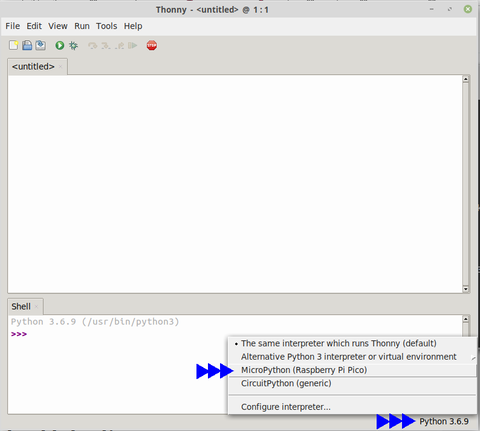
By default, Thonny use the computer's Python interpreter in the "Shell" section.
So to work with a MicroPython board, the user must inform Thonny to use the appropriate shell.
For instance the REPL shell exposed by the MicroPython microcontroler on its serial interface.
Just click and the shell selection popup at the bottom-right corner of the screen and select the "MicroPython" entry attached to the MicroPython board.
Written by Meurisse D. for MCHobby

