ENG-CANSAT-PICO-THONNY
Abstract
There is no need for a specific development environment to work with a MicroPython plateforms.
A simple text editor is quite enough to write python scripts.
Command line utility like mpremote can be used to copy/run python scripts on the board.
Thonny editor
By the way, a enhanced tool like Thonny IDE can definitively improve the user experience and interaction with the Pico.
Thonny is multi-plateform editor running on Linux, Windows, Mac.
The beauty about Thonny Python Script editor is that Thonny is written in Python.
Thonny IDE is a great python script editor can also be used with MicroPython Microcontrolers:
- Raspberry-Pi Pico
- RP2040 base MicroPython board (like PYBStick RP2040 or MicroMod-RP2040, etc)
- ESP32 under MicroPython
- ESP8266 under MicroPython
- etc
Thonny offers great features for MicroPython microconroler:
- transfer script to MicroPython microcontroler.
- manage files on the MicroPython microcontroler.
- run script against MicroPython microcontroler.
- using the micropython interactive command line (named REPL)
- generating graphical data (an awesome feature)
Install Thonny IDE
| It is important to have a recent version of thonny and plug-ins to use it with MicroPython boards. |
Thonny website contains the required instruction to install Thonny IDE.
On Raspberry-Pi
Just open a terminal and execute the following command line:
$ sudo apt update && sudo apt upgrade -y
This will upgrade the operating system and install the latest version of Thonny IDE.
On Linux
Python3 is available on almost every Linux operating system. So Thonny (which is written in Python) is installed with the pip3 Python Install Package software.
$ pip3 install thonny
Windows & Mac
Refer to the official Thonny.org documentation.
Working with Thonny
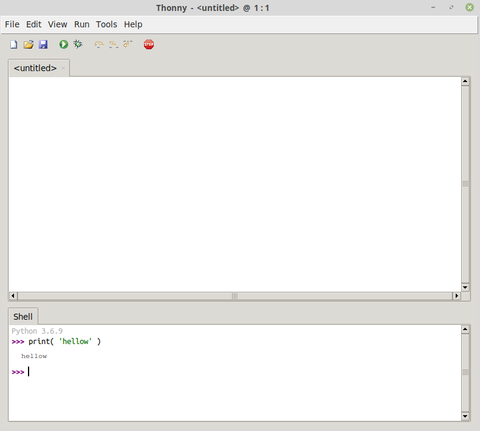
The Thonny environment look very sober at first sight.
Don't be fooled by this simplicity, Thonny do have everything you need under the hood.
From top to bottom:
- The Menubar,
- The Toolbar (with icones),
- Text/code editor is the main part
- A Shell interface (at the bottom) used to quickly test Python code.
Thonny and MicroPython
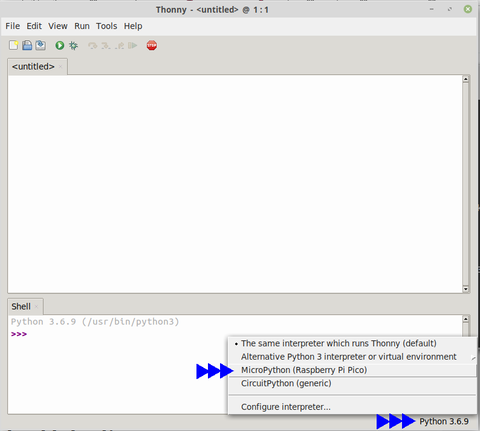
By default, Thonny use the computer's Python interpreter in the "Shell" section.
So to work with a MicroPython board, the user must inform Thonny to use the appropriate shell.
For instance the REPL shell exposed by the MicroPython microcontroler on its serial interface.
Just click and the "shell selection" popup at the bottom-right corner of the screen. In the popup menu selects the "MicroPython" entry attached to the MicroPython board.
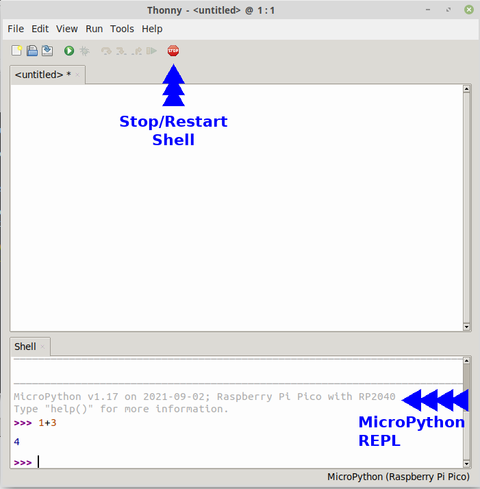
Once the entry selected, Thonny does establish a connection with the MicroPython command line interpreter (REPL) running on the MicroPython board.
If the connection fails then you can press the "stop" button on the toolbar to make a new connection attempt.
The image here below MicroPython shell (REPL, as it is executed on the microcontroler). This would work the same for any of the RP2040 based microcontroler (like the MicroMod-RP2040, PYBStick RP2040, etc).
LED Blinking
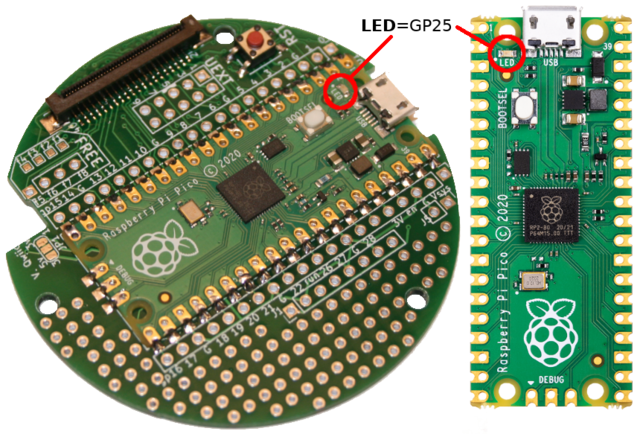
Now that we have selected the MicroPython REPL as interactive shell, can use it to control the Pico onboard LED.
The Pico onboard LED is attached to the pin GP25.
It can be controled with few lines of codes, just key-in them directly in the REPL session
from machine import Pin
led = Pin(25, Pin.OUT)
led.value(1) # allume la LED
led.value(0) # éteint la LED
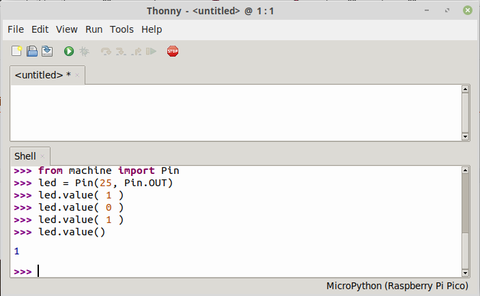
The following screen capture just show the results of entering the command lines.
by entering led.value() without parameter, you can query the current pin state (1 for High level, 0 for Low level).
Run & Stop a file
With Thonny you can also write Python code inside a file and execute it at once on the target MicroPython board.
In the following example, the status LED (GP25) is pulsed by controling the output pin with PWM signal.
PWM stand for Pulse Width Modulation, see this animation on ElectronicWings clearly show a PWM signal with its duty cycle and results on a LED.
Under MicroPython, the duty cycle is set with duty_16( value ) where value is a number from 0 to 65534 (for duty cycle from 0 to 100% .
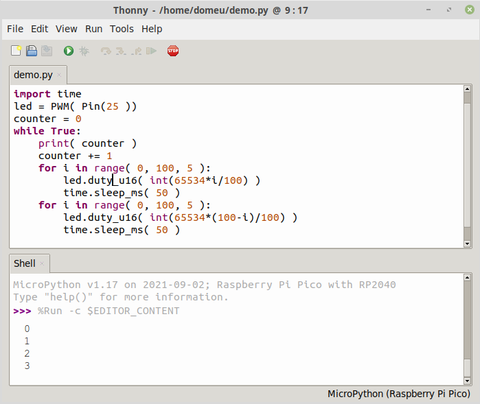
Key-in the following code into the main's Thonny section (the code editor):
import time
led = PWM( Pin(25 ))
counter = 0
while True:
    print( counter )
    counter += 1
    for i in range( 0, 100, 5 ):
        led.duty_u16( int(65534*i/100) )
        time.sleep_ms( 50 )
    for i in range( 0, 100, 5 ):
        led.duty_u16( int(65534*(100-i)/100) )
        time.sleep_ms( 50 )
Then save the file under the name "demo.py" either on the computer, either on the microcontroler board.
No matter where it is saved (computer or microcontroler), it can be executed against the microcontroler and shows the results into the REPL/shell session.
To execute the script, you can either:
- Press the "Start" button
 of the toolbar
 - Select the menu "Run | Run current script"
- Press the "F5" key
The script execution will displays the print() messages into the Shell section of Thonny.
As you may guess, the onboard status LED is also pulsing.
To stop the script (since it run infinitly), you can either:
- press the "Stop" button on the toolbar
- Press the "Ctrl+C" combination into the shell section
Use the plotter
The plotter is a graphical tool displaying script outputs generated with print() as graphics.
The graphics is updated each time a new information appears in the output.
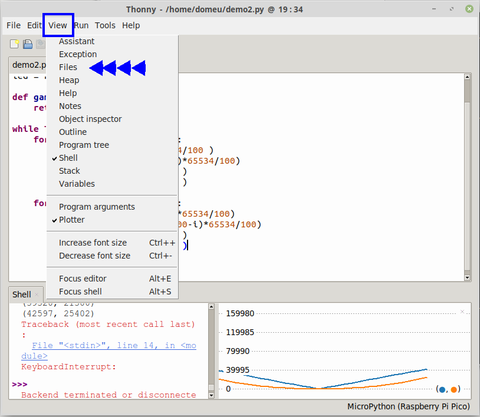
The Plotter can be activated with the "View | Plotter" menu.
That action displays a graphical tool aside the shell section.
The Plotter catch the numeric values sends/print in the REPL/Shell and displays it in the chart.
Only lines containing numeric values are used by the plotter.
On the following example, named demo2.py, we do use the gamma function to make the LED pulsing in a more natural way. Indeed, a progressive PWM signal increase would not offers a proportional luminosity increase on the LED (voir livre MicroPython et Pyboard, Edition ENI, in French).
We do use the gamma() function to rectify the apparent proportionality between the PWM and emitted light.
from machine import Pin, PWM
import time
led = PWM( Pin(25 ))

def gamma( pc ):
    return pow(pc/100,2.2)*100

while True:
    for i in range( 0, 100, 5 ):
        pwm_val = int(gamma(i)*65534/100)
        led.duty_u16( pwm_val )
        print( pwm_val )
        time.sleep_ms( 20 )
    for i in range( 0, 100, 5 ):
        pwm_val = int(gamma(100-i)*65534/100)
        led.duty_u16( pwm_val )
        print( pwm_val )
        time.sleep_ms( 20 )</nowiki>
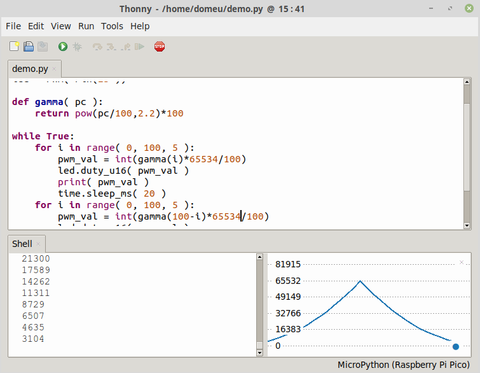
Which produce the following results in Thonny.
La valeur numérique produite dans la session REPL est également reproduite dans le Plotter.
Drawing several curves
En modifiant un peu le code du script, il est possible de retourner la valeur PWM sans correction gamma et avec correction gamme. En encodant ces valeurs dans un tuple, le plotter peut alors dessiner plusieurs courbes.
from machine import Pin, PWM
import time
led = PWM( Pin(25 ))

def gamma( pc ):
    return pow(pc/100,2.2)*100

while True:
    for i in range( 0, 100, 5 ):
        pwm       = int( i*65534/100 )
        pwm_gamma = int(gamma(i)*65534/100)
        led.duty_u16( pwm_gamma )
        print( (pwm, pwm_gamma) )
        time.sleep_ms( 20 )
    for i in range( 0, 100, 5 ):
        pwm       = int((100-i)*65534/100)
        pwm_gamma = int(gamma(100-i)*65534/100)
        led.duty_u16( pwm_gamma )
        print( (pwm, pwm_gamma) )
        time.sleep_ms( 20 )
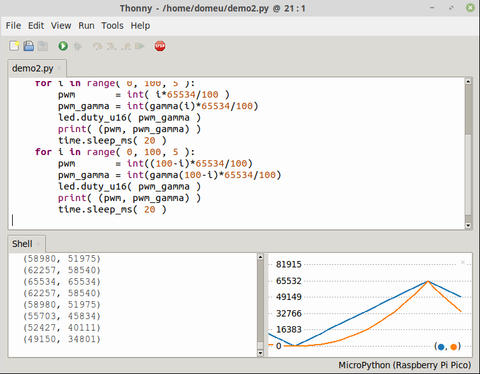
Ce qui produit le résultat suivant dans Thonny.
Le lecteur notera que les données sont retournée sous forme d'un tuple (pwm, pwm_gamma) . Par conséquent, la première valeur est la courbe proportionnelle et la seconde la courbe corrigée.
Le graphique du Plotter indique, dans son coin inférieur droit, quel est la couleur correspondante à la position de la donnée dans le tuple.
System Shell - Pure
Il est également possible de démarrer une session REPL avec la plateforme MicroPython dans un vrai terminal (donc sans passer par le volet "Shell" de Thonny.
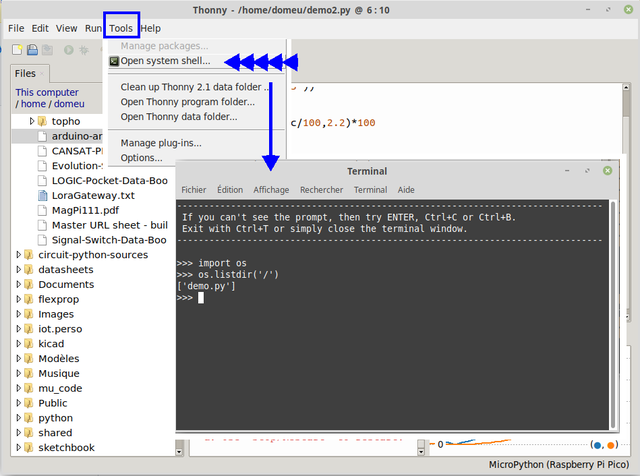
Le menu "Tools | Open System Shell.." ouvre une fenêtre terminal.
Cela permet, par exemple, d'interagir directement avec le REPL de la plateforme MicroPython sans couche logiciel intermédiaire (celle de Thonny).
Notes:
- Thonny doit être connecté sur la plateforme MicroPython pour que cette fonctionnalité fonctionne correctement.
- Le gestionnaire de fichiers permet de voir facilement si Thonny est connecté ou non sur la carte MicroPython.
- Il n'est pas possible d'ouvrir deux sessions terminal en même temps sur le microcontrôleur MicroPython.
File manager
xxx
Written by Meurisse D. for MCHobby
