Adafruit Motor Shield V2-Logiciel
Installer la bibliothèque
To use the shield on an Arduino, you'll need to install the Adafruit Motorshield v2 library. This library is not compatible with the older AF_Motor library used for v1 shields. However, if you have code for the older shield, adapting the code to use the new shield isn't difficult. We had to change the interface a little to support shield stacking, & we think its worth it!
Start by downloading the zip of the library from the Github repository. You can also just click the button below Download latest Adafruit Motor Shield V2 Library Copy the folder inside the zip file to the Libraries folder inside your Arduino Sketchbook folder and re-name it to Adafruit_Motorshield For more details on how to install Arduino libraries, check out our detailed tutorial!
Exécuter les exemples
Moteur continu
The library comes with a few examples to get you started up fast. We suggest getting started with the DC motor example. You can use any DC motor that can be powered by 6V-12VDC
First, restart the IDE to make sure the new library is loaded.
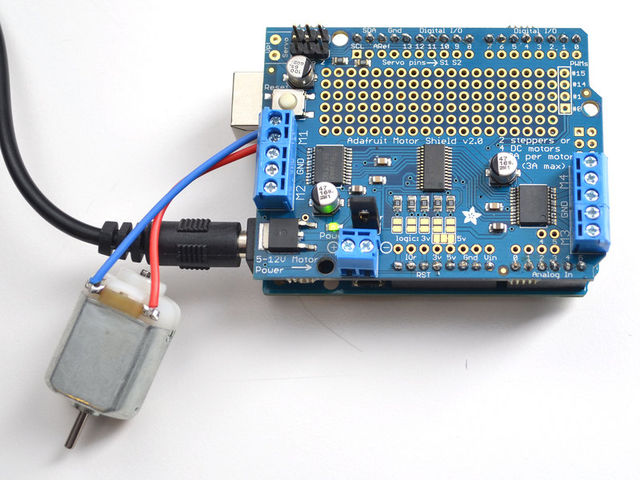
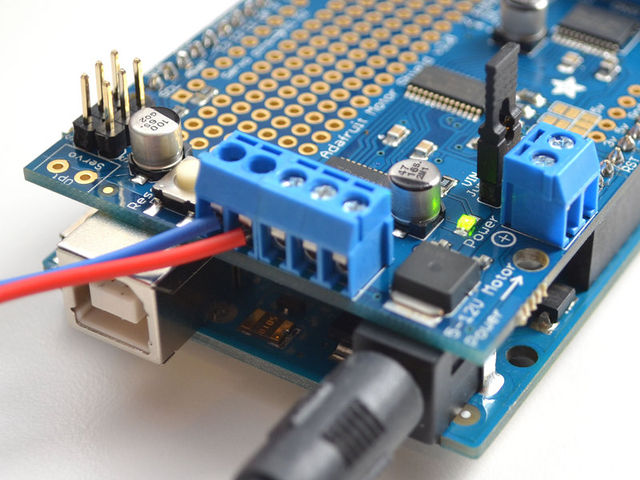
Plug the shield into the Arduino and connect a DC motor to motor port 1 - it does not matter which wire goes into which terminal block as motors are bi-directional. Connect to the top two terminal ports, do not connect to the middle pin (GND) See the photo below for the red and blue wire example. Be sure to screw down the terminal blocks to make a good connection!
You must also supply 5-12VDC to power the motor. There are two ways to do this
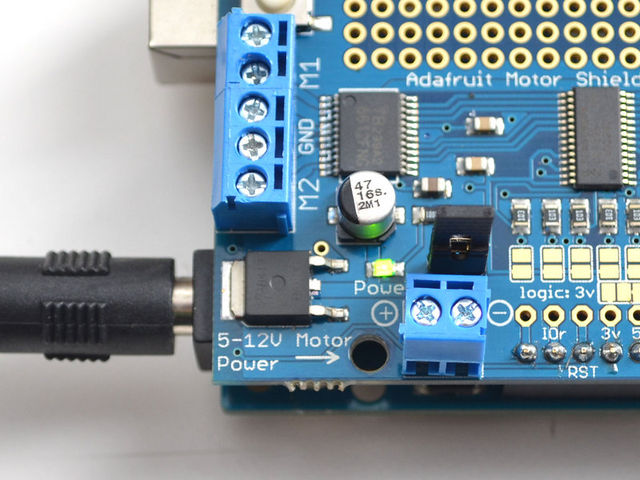
- You can power the Arduino via the DC Barrel Jack and insert the VIN Jumper shown as the tall black handle right next to the green Power LED below
- You can power the Arduino via the DC Barrel jack or USB port. Then Power the shield via the 5-12VDC motor power terminal port, the double terminal block next to the green Power LED and remove the VIN jumper
If the Green LED isn't lit up brightless do not continue - you must power it via the VIN jumper or the terminal block
Once you have verified the motor is connected properly and you have the power LED lit up brightly, we can upload our code.
In the IDE, load File->Examples->Adafruit_MotorShield->DCMotorTest
You should see and hear the DC motor turn on and move back and forth, attaching a slip of paper or tape as a 'flag' can help you visualize the movement if you have trouble seeing the movement
Test de moteur pas-à-pas
You can also test a stepper motor connection with the shield. The shield can run unipolar (5-wire and 6-wire) and bipolar (4-wire) steppers. It cannot run steppers with any other # of wires! The code is the same for unipolar or bipolar motors, the wiring is just slightly different.
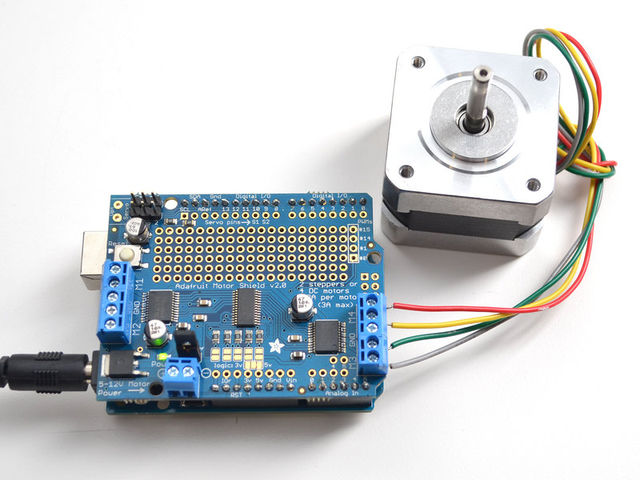
Plug the shield into the Arduino and connect a stepper motor to motor port 2 - unlike DC motors, the wire order does 'matter'. Connect to the top two terminal ports (coil #1) and the bottom two terminal ports (coil #2).
- If you have a bipolar motor, do not connect to the middle pin (GND).
- If you are using a unipolar motor with 5 wires, connect the common wire to GND.
- If you are using a unipolar motor with 6 wires, you can connect the two 'center coil wires' together to GND
You must also supply 5-12VDC to power the motor. There are two ways to do this
- You can power the Arduino via the DC Barrel Jack and insert the VIN Jumper shown as the tall black handle right next to the green Power LED below
- You can power the Arduino via the DC Barrel jack or USB port. Then Power the shield via the 5-12VDC motor power terminal port, the double terminal block next to the green Power LED and remove the VIN jumper
If the Green LED isn't lit up brightless do not continue - you must power it via the VIN jumper or the terminal block
Once you have verified the motor is connected properly and you have the power LED lit up brightly, we can upload our code.
In the IDE, load File->Examples->Adafruit_MotorShield->StepperTest
You should see and hear the stepper motor turn on and move back and forth, attaching a slip of paper or tape as a 'flag' can help you visualize the movement if you have trouble seeing the movement. There are four ways to move a stepper, with varying speed, torque and smoothness tradeoffs. This example code will demonstrate all four.
Source: Adafruit Motor Shield V2 for Arduino créé par LadyAda pour AdaFruit Industries. Crédit [www.adafruit.com AdaFruit Industries]
Traduit par Meurisse D. pour MCHobby.be
Nos remerciements à Mr Pierre M. pour ses suggestions de correction.
Traduit avec l'autorisation d'AdaFruit Industries - Translated with the permission from Adafruit Industries - www.adafruit.com
Toute référence, mention ou extrait de cette traduction doit être explicitement accompagné du texte suivant : « Traduction par MCHobby (www.MCHobby.be) - Vente de kit et composants » avec un lien vers la source (donc cette page) et ce quelque soit le média utilisé.
L'utilisation commercial de la traduction (texte) et/ou réalisation, même partielle, pourrait être soumis à redevance. Dans tous les cas de figures, vous devez également obtenir l'accord du(des) détenteur initial des droits. Celui de MC Hobby s'arrêtant au travail de traduction proprement dit.


