Différences entre versions de « PiFace2-Manuel-Alimentation »
| Ligne 12 : | Ligne 12 : | ||
* Soit via le bornier d'alimentation 5V -ET- alimenter le Pi en 5V depuis la carte PiFace | * Soit via le bornier d'alimentation 5V -ET- alimenter le Pi en 5V depuis la carte PiFace | ||
| − | {{ambox-stop|text= | + | {{ambox-stop|text=Ne jamais utiliser deux sources d'alimentation séparées en même temps (une sur le PiFace, l'autre sur le Pi) SI LE CAVALIER D'ALIMENTATION "JP3" EST EN PLACE.}} |
| − | + | {{ambox|text=Comme déjà précisé, les port de sortie du PiFace ne fournissent pas de tension d'alimentation (car il s'agit de collecteur ouvert permettant un retour à la masse)}} | |
| − | {{ambox|text= | + | {{ambox|text=Le relais ne fournit pas de tension car il agit comme un "interrupteur".}} |
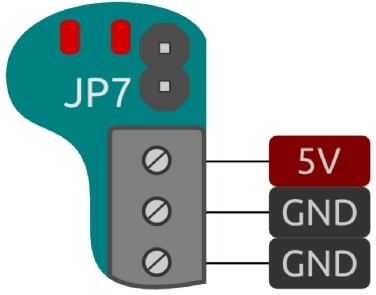
The top 3 set of terminals on the right of the board is used to supply or take power, with the top pin being 5V and bottom two ground. In many applications these do not need to be connected to anything, as the PiFace Digital 2 will be powered by the Raspberry Pi | The top 3 set of terminals on the right of the board is used to supply or take power, with the top pin being 5V and bottom two ground. In many applications these do not need to be connected to anything, as the PiFace Digital 2 will be powered by the Raspberry Pi | ||
Version du 17 mai 2017 à 11:15
Les circuits intégrés du PiFace Digital 2 requière une tension d'alimentation de 3.3V (avec un courant tout à fait négligeable). Cette alimentation 3.3v est toujours ponctionnée sur le Raspberry-Pi.
Par contre les relais et les LEDs requière une tension de 5V pour fonctionner.
Sur le PiFace Digital 2, cette tension de 5V peut être fournie de différentes façons (voir les détails ci-dessous concernant la configuration des cavaliers):
- Soit avec une tension de 5V indépendante de celle du Raspberry-Pi (Via le bornier d'alimentation)
- Soit depuis l'alimentation 5V du Raspberry-Pi
- Soit via le bornier d'alimentation 5V -ET- alimenter le Pi en 5V depuis la carte PiFace
| Ne jamais utiliser deux sources d'alimentation séparées en même temps (une sur le PiFace, l'autre sur le Pi) SI LE CAVALIER D'ALIMENTATION "JP3" EST EN PLACE. |
| Comme déjà précisé, les port de sortie du PiFace ne fournissent pas de tension d'alimentation (car il s'agit de collecteur ouvert permettant un retour à la masse) |
| Le relais ne fournit pas de tension car il agit comme un "interrupteur". |
The top 3 set of terminals on the right of the board is used to supply or take power, with the top pin being 5V and bottom two ground. In many applications these do not need to be connected to anything, as the PiFace Digital 2 will be powered by the Raspberry Pi
Traduction basée sur le document Technical DataSheet produit par Farnell
Toute référence, mention ou extrait de cette traduction doit être explicitement accompagné du texte suivant : « Traduction par MCHobby (www.MCHobby.be) - Vente de kit et composants » avec un lien vers la source (donc cette page) et ce quelque soit le média utilisé.
L'utilisation commercial de la traduction (texte) et/ou réalisation, même partielle, pourrait être soumis à redevance. Dans tous les cas de figures, vous devez également obtenir l'accord du(des) détenteur initial des droits. Celui de MC Hobby s'arrêtant au travail de traduction proprement dit.

