Pololu-Zumo-Shield-Arduino-ajouter-detecteur-ligne
Présentation
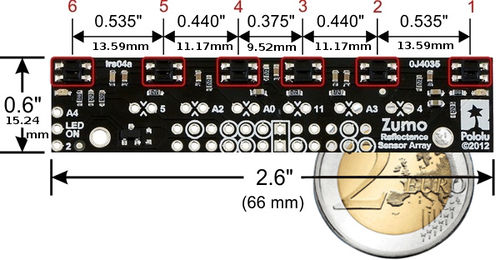
The Zumo reflectance sensor array lien pololu is an easy way to add line-following and edge-detection capabilities to the Zumo robot. It is designed specifically to mount to the front expansion area of the Zumo shield, and it includes everything you need for installation. Note that the reflectance sensor array is not included with the Zumo shield or Zumo Robot Kit, and the Zumo robot can be used without it. For more information on the Zumo reflectance sensor’s capabilities and how it works (including a schematic diagram), please see its product page lien pololu. This section is devoted specifically to assembling the sensor and using it with the Zumo shield.
Assemblage du senseur
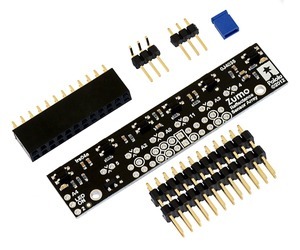
The Zumo reflectance sensor array ships with all of the components you need to connect it to a Zumo shield:
- sensor array PCB with the surface-mount parts pre-populated
- 2×12 extended 2.54mm male header (will be soldered to sensor PCB)
- 2×12 2.54mm female header (will be soldered to Zumo shield)
- 1×3 2.54mm straight male header (optionally soldered to sensor PCB)
- 1×3 2.54mm right-angle male header (optionally soldered to sensor PCB)
- blue shorting block
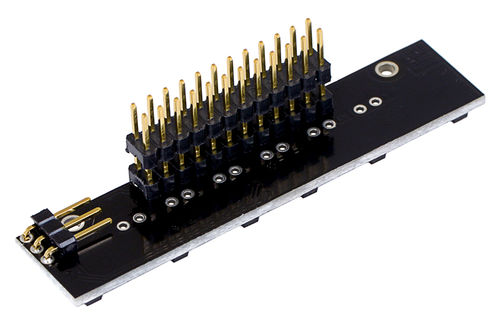
Before soldering in the main male header strip, we recommend soldering one of the two included 1×3 male headers into the set of three holes along the edge of the board. This step is optional but recommended because it allows dynamic control of the IR emitters (and red LEDs). By controlling when these LEDs are on, you can save power and make your programs easier to debug. If you skip this step, the IR emitters will just be on whenever the sensor array is plugged in and the Zumo is on. We recommend using the right-angle header mounted as shown in the picture below, but the straight 3-pin header will also work if you do not have anything already soldered to the Zumo shield’s front expansion area that would interfere. If you choose to install this header, please make sure you are doing it in a way that will not prevent installation of the sensor array (e.g. by installing it on the wrong side or by installing the right-angle pins in the wrong orientation)! If you are going to install this 3-pin header, it is generally easier to do so before soldering the larger 24-pin header.
To enable dynamic control of the IR emitters, install the 3-pin header and use the included blue shorting block to connect the LEDON pin to the appropriate digital I/O pin. If you are using an Arduino Uno or older Arduino, you should use the shorting block to connect LEDON to digital pin 2 (the position that puts it flush with the edge of the board); if you are using an Arduino Leonardo or A-Star 32U4 Prime, you should use the shorting block to connect LEDON to analog pin 4 (A4).
The extended 2×12 male header strip should be mounted to the sensor array PCB on the opposite side from the components. Make sure you solder the shorter side of the pins to the PCB, not the longer side! Note that only 12 of the 24 pins are actually used by the sensor array; these pins have silkscreen circles around them on the component side of the board, and these are the only pins that need to be soldered, though it is fine to solder all 24 pins.
Connecter sur le Zumo Shield
The 2×12 female header included with the reflectance sensor array should be soldered to the front expansion area of the Zumo shield so that it is centered in the expansion area and flush with the Zumo chassis (rows 2 and 3). While it is fine to solder all 24 pins to the shield, only the 12 pins required by the reflectance sensor array need to be soldered (see the Array pinout section below for more information on which pins are required).
Basé sur "Zumo Shield for Arduino" de Pololu (www.pololu.com/docs/0J57) - Traduit en Français par shop.mchobby.be CC-BY-SA pour la traduction
Toute copie doit contenir ce crédit, lien vers cette page et la section "crédit de traduction". Traduit avec l'autorisation expresse de Pololu (www.pololu.com)
Based on "Zumo Shield for Arduino" from Pololu (www.pololu.com/docs/0J57) - Translated to French by shop.mchobby.be CC-BY-SA for the translation
Copies must includes this credit, link to this page and the section "crédit de traduction" (translation credit). Translated with the Pololu's authorization (www.pololu.com)


